Adobe InDesign offers robust tools for page layout and design, but resizing pages and managing content can sometimes present a challenge. Whether you need to alter a single page for a special insert, adjust margins for binding, or switch orientations, understanding how to effectively change page sizes is crucial for a smooth workflow. This guide will delve into the various methods available, from simple manual adjustments to sophisticated automatic layout scaling, ensuring your content adapts gracefully to your design intentions.
Understanding Document Setup and Its Implications
When you first create an InDesign document, you define its page size and orientation in the Document Setup dialog box. This initial setup dictates the dimensions of all pages within the document. If you later decide to change the page size for the entire document, you would typically revisit File > Document Setup. However, it's vital to understand that altering the page size here will affect all pages in your document simultaneously. This can be useful for projects where a uniform change is required, such as converting a document from A4 to Letter size.
However, if you use Document Setup or Margins and Columns to make changes to an existing layout, such as altering page size or page margin, you could spend considerable time and effort in rearranging objects to fit the new layout. This is because simply changing the document's dimensions doesn't automatically adjust the placement and scaling of existing content. Objects will retain their original positions and sizes relative to the page, which can lead to misalignment, text overflow, or awkward spacing.
The "Adjust Layout" Feature: A Double-Edged Sword
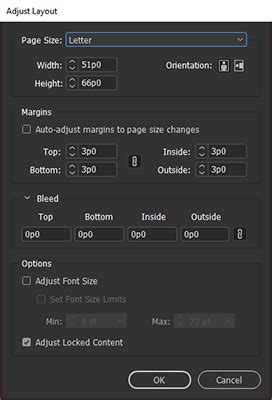
Within the Margins and Columns dialog box (accessed via Layout > Margins and Columns), there's an option called Adjust Layout. When selected, InDesign attempts to automatically reposition and resize objects on the page to accommodate changes in page size, margins, or columns. This can be a significant time-saver, especially for less complex layouts.
However, the effectiveness of Adjust Layout can vary greatly depending on the complexity of your design. For highly intricate layouts with precise object positioning, or when dealing with imported graphics that have fixed dimensions, Adjust Layout might not always produce the desired results. It can sometimes lead to unintended shifts in object placement or scale, requiring manual correction anyway.
Font Size Adjustments: Maintaining Readability
A related consideration when altering page dimensions or margins is how text will be affected. InDesign offers the option to Adjust Font Size within the Margins and Columns dialog. When this option is selected, InDesign attempts to modify the font size in your document based on the page size and margin changes. This means that text font size and leading (the space between lines of text) can change with respect to the change in document size. Font size goes up to one decimal point after being scaled. This feature can help maintain a consistent visual hierarchy and readability across different page sizes, preventing text from becoming too small or too large. However, it's important to note that you can decide whether to scale text or not, giving you control over this automatic adjustment.
The Power of the Page Tool for Individual Page Resizing
For situations where you need to resize a single page within a document, or when the automatic adjustments of Adjust Layout are insufficient, the Page Tool (keyboard shortcut: Shift + P) becomes indispensable. This tool allows for much finer control over individual page dimensions.
Manual Resizing with the Page Tool
To use the Page Tool:
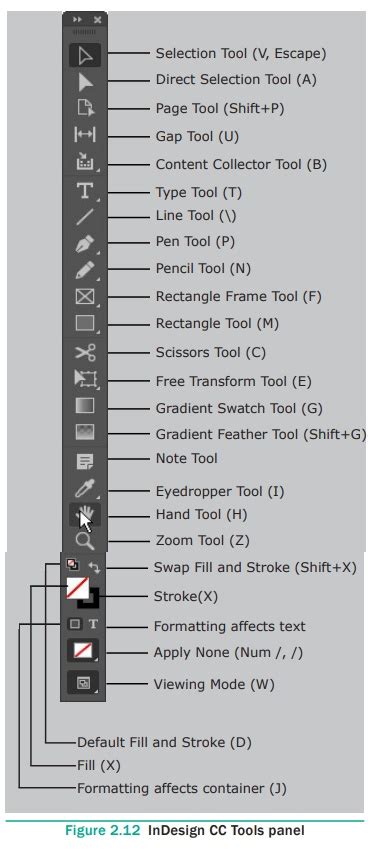
- Activate the Page Tool: Select it from the Tools panel.
- Select the Target Page: Click directly on the page you wish to resize. You will see a bounding box appear around the page.
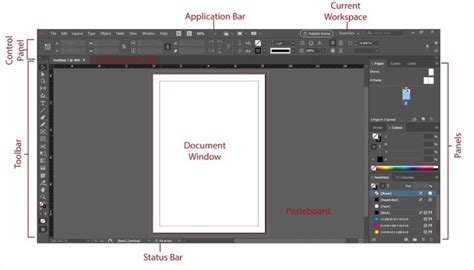
- Access Controls: Navigate to the Control panel that runs along the top of your InDesign workspace. When the Page Tool is active and a page is selected, new options specific to page manipulation will appear here.
- Modify Dimensions: You'll find text boxes for Width and Height. You can manually type in new measurements for the page. To the right of these boxes, there's a drop-down menu offering standard page sizes (like Letter, Legal, A4, etc.) that you can select.
- Apply Custom Sizes: For instance, you might need to add a small amount of bleed or adjust for binding. You can manually input revised Width and/or Height measurements, adding a specific value (e.g., 2 mm to the size on all sides).
Important Note: If you want to permanently change the size of the page, you have to hold down the Alt key (Windows) or Option key (Mac) while resizing using the page handles or by typing in new dimensions. Without holding the modifier key, you are often just previewing the change.
Resizing for Specific Needs: The Binding Example
A common scenario is needing to increase the size of a page slightly on one side to accommodate binding. For example, you might want to add an extra 1/2 inch at the inner margin. Previously, attempts to do this might have caused unintended changes to fonts and layouts. The Page Tool provides a way to address this precisely. By selecting the specific page, you can adjust its dimensions directly. The key is to ensure that other layout adjustments are managed appropriately.
Leveraging Liquid Layout for Intelligent Content Adaptation
When resizing pages, especially content-heavy ones, InDesign's Liquid Layout feature is a powerful ally. Liquid Layout allows you to define rules for how the content on a page should adapt when the page size or orientation changes. This is particularly useful when you want to resize a single page to provide a pull-out section in the middle of a book or to accommodate a printer's request for a slightly larger back cover.
Accessing and Understanding Liquid Layout
The Liquid Layout panel can be accessed via Window > Interactive > Liquid Layout. This panel is only active and visible when the Page Tool is selected.
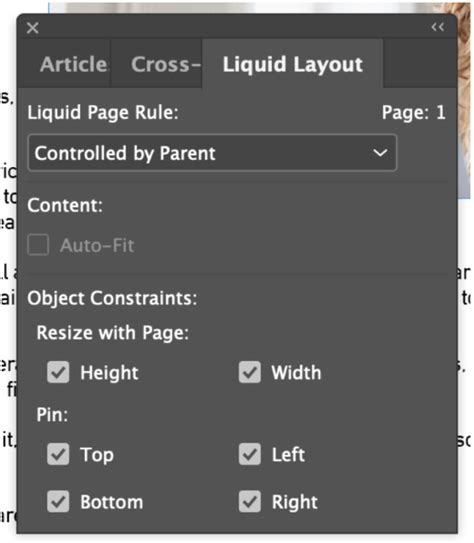
Within the Liquid Layout panel, you'll find several Rules that dictate how content behaves:
- Controlled by Master: This is often the default rule. It means the page's layout behavior is dictated by the Master page applied to it. If the Master page has Liquid Layout settings defined, those will be applied.
- Scale: This rule scales the entire page content proportionally to fit the new page dimensions. This is excellent for maintaining the overall visual balance of your design. If you select this rule, your content will scale proportionally with the new page size.
- Re-center: This rule attempts to keep objects centered on the page, adjusting their positions as the page resizes.
- Object-Based: This rule applies Liquid Layout rules to individual objects based on their own settings and how they are grouped.
- Guide-Based: This rule uses guides to control how objects move and resize.
Applying Liquid Layout Rules
When your page is content-heavy, open the Liquid Layout panel. You can then set the Rule for the page. If the page is based on a Master page, you might need to adjust the Master's Liquid Layout Rule in the Pages panel. You can choose from options like Scale, Re-center, Object-Based, or Guide-Based, depending on how you want your content to adjust on the page that has that Master applied to it.
To resize pages with content proportionally, ensure the Adjust Layout option is enabled (Layout > Margins and Columns). Then, in the Control panel (when the Page Tool is active), under the Liquid Page Rule, select Scale from the drop-down menu. Enter your desired document dimensions. The selected pages should then resize proportionally with all their content to the new dimensions.
Best Practices for Importing and Managing Content
While InDesign is a powerful design tool, it's worth considering how you bring content into your documents to optimize performance and editability.
Importing Type from Illustrator
A common workflow might involve creating text elements in Adobe Illustrator and then importing them into InDesign. However, importing type directly from Illustrator can sometimes yield mixed results. Font rendering, character spacing, and paragraph styles may not always translate perfectly, potentially leading to unexpected formatting issues.
Best Practice: Direct Typing and Separate Imports
A recommended best practice is to type everything directly in InDesign. This ensures that text formatting is handled natively within InDesign, maintaining consistency and predictability. For background elements, consider bringing them in as separate files. Similarly, import all images as separate files.
Why this approach is beneficial:
- Editability: Importing files separately allows you to quickly edit your page without constantly switching between programs. If an image needs an update, you can edit it in its source application and the changes will reflect in InDesign.
- Performance: Importing files separately, especially large ones, prevents your computer from slowing down. It's not constantly rendering huge files within InDesign, leading to a smoother and more responsive workflow.
- Flexibility: This method provides greater flexibility when making design changes. You can easily swap out images, adjust background colors, or modify text without the complications that can arise from complex, imported vector artwork containing text.
By adopting these practices, you can significantly streamline your InDesign workflow, reduce potential errors, and improve the overall efficiency of your design process. The Page Tool and Liquid Layout features, when used in conjunction with a well-organized content import strategy, empower you to confidently manage even the most dynamic page size requirements.