Changing the color of an object is a fundamental skill for designers and artists working with Adobe Photoshop. This process is not merely about aesthetic alteration; it's about imbuing an object with meaning, context, and emotional resonance. Harmonizing an object's color with a brand's palette, the surrounding image background, or other compositional elements can significantly impact user perception. Furthermore, strategically chosen colors can capture attention and evoke specific emotions, making them powerful tools in visual communication. The ability to modify colors also extends to practical applications like creating mockups, where a single original photograph can be transformed into an infinite array of color variations for display.
The techniques discussed herein are drawn from comprehensive Photoshop training, which also explores related skills such as gradient application, text creation, filter usage, layer styles, and cropping. For those seeking to deepen their expertise, a wealth of additional courses on topics including Figma, Illustrator, Lightroom, and Premiere Pro are available through communities like BYOL, offering personalized support, certificates, and collaborative challenges.
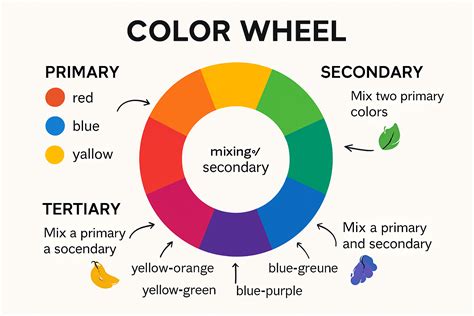
To effectively manipulate colors in Photoshop, a foundational understanding of color theory is beneficial. This theoretical grounding provides insight into the "magic" performed within the software, enabling more precise and intentional adjustments.
Understanding the Fundamentals: Hue, Saturation, and Lightness
A common misconception is that "color" and "hue" are interchangeable terms. For the purposes of digital image manipulation in Photoshop, it's useful to distinguish them.
Hue represents the pure form of a color, unadulterated by any shades of black, white, or gray. It is the foundational aspect of every color the human brain can identify, encompassing primary and secondary colors in their most basic state. For instance, digital displays commonly utilize red, green, and blue as their primary hues.
Shades, on the other hand, are black and white. Understanding this distinction is crucial because it grants greater control and comprehension over the specific elements being edited within Photoshop. By grasping these core concepts, users can approach color adjustments with a more informed perspective.
The Impact of Color Choices
Smart color selections have a direct and profound influence on how users perceive messages and respond to calls to action. Color choice transcends mere aesthetics or the desire to stand out on a crowded "shelf." It involves engaging mental and emotional triggers that are significantly affected by both color and saturation. Designers must recognize how brands leverage color palettes to effectively communicate and influence user behavior, ultimately contributing to the delivery of better products and more seamless user experiences.
Method 1: Adjusting Hue and Saturation for Global Color Changes
This method is ideal for straightforward color alterations, such as modifying a single dominant color in an image or a uniform object.
Level: EASY - Adjusting a Hue
This technique is perfect for scenarios where you need to change the overall color of an object or a specific color range without complex selection processes.
Step 1: Select Your Object and Consider Adjustments
Imagine a scenario for an online shoe store. The company has a popular running shoe model available in twelve different colors, but only one original photograph is provided, showcasing the green variant. The goal is to create mockups for the remaining eleven color options using this single image. This is where the power of color adjustment comes into play.
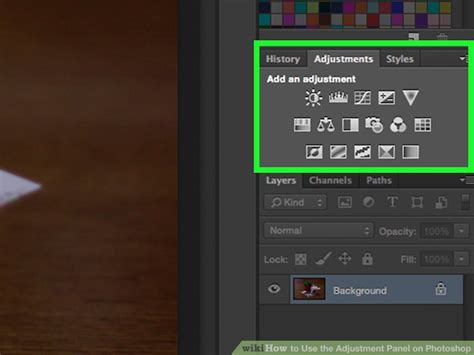
To begin, navigate to the Adjustments panel, typically found on the right side of your Photoshop workspace. This panel houses a variety of tools designed for image editing.
Step 2: Adjust Hue, Saturation, and Lightness Levels
This is where the creative process truly begins. To achieve precise color matching, you can fine-tune the appearance by clicking and dragging the sliders beneath the Saturation and Lightness bars. Once the desired color is achieved, save your work. Congratulations, you've successfully altered the color!
Level: EASY WITH A TWIST - Selecting and Adjusting a Specific Hue
This approach is necessary when an image contains multiple colors, and you need to modify only one specific hue without affecting others.
Step 1: Identify Your Composition and Target for Change
Consider an image featuring a collection of sunglasses, each with different colored frames. The objective is to change the yellow frames to a different color, leaving the other frame colors untouched.
Open the Adjustments panel and select Hue/Saturation. In this case, simply adjusting the main Hue slider would result in unwanted changes across all colors. The solution lies in targeting the specific hue.
Step 2: Utilize the Preset Dropdown for Specific Hue Adjustment
Above the Hue adjustment slider, you'll find a Preset dropdown menu. Clicking this reveals a list of available color ranges. In the previous example, where only a single highlight needed changing, the "Master" preset was adequate because gray is not a distinct hue. However, for this sunglass collection, we need to isolate the yellow.
Select Yellow from the Preset list. Now, any adjustments made will exclusively affect the yellow elements within the image.

Step 3: Repeat the Magic with Targeted Sliders
Return to the Hue slider and drag it until you achieve the new desired color for the sunglasses. Remember that you can also adjust the Saturation and Lightness sliders to perfectly match the product's original appearance or to achieve a specific aesthetic.
Step 4: Non-Destructive Editing and Masking
A significant advantage of using adjustment layers in Photoshop is their non-destructive nature. When you adjust the Hue/Saturation, Photoshop automatically applies a layer mask to the image. This mask ensures that the color changes are confined to the intended areas, allowing you to easily revert or refine the edits later. This process results in a perfectly color-transformed object within your composition.
Method 2: Leveraging the Hue/Saturation Adjustment Layer for Targeted Changes
This method offers a precise and non-destructive way to alter the color of specific objects or entire images.
Step 1: Select the Object (Optional but Recommended)
For precise control, begin by selecting the object whose color you wish to change. Photoshop offers various selection tools, such as the Object Selection Tool or the Quick Selection Tool. While any selection tool can be used, the effectiveness of the selection will directly impact the final result. If no selection is made, the adjustments will apply to the entire image.
Step 2: Add a Hue/Saturation Adjustment Layer
Once your selection is made, create a new Hue/Saturation Adjustment Layer from the Adjustments panel. If a selection was active in Step 1, Photoshop will automatically generate a layer mask, confining the adjustments to the selected area.
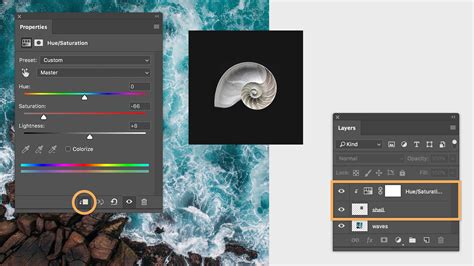
Step 3: Modify the Color Using the Hue Slider
Within the Properties panel of the Hue/Saturation adjustment layer, use the Hue slider to alter the color of your object. If you skipped the selection step, this slider will affect the entire image.
To further refine which colors are affected, use the eyedropper tool located next to the "Master" dropdown. Clicking on a specific color in your image with this tool will target that particular hue for adjustment. Close the dialogue box when satisfied. You can always revisit the HSL Adjustment Layer in the Layers panel to further modify the hue, saturation, or lightness.
A key benefit of using Hue/Saturation adjustment layers is their ability to affect multiple layers below them, unlike the Color Replacement Tool, which operates only on the active layer.
Method 3: The Color Replacement Tool for Direct Color Swapping
The Color Replacement Tool provides a straightforward method for replacing existing colors with new ones.
Step 1: Duplicate the Image Layer
The Color Replacement Tool is a destructive tool, meaning it directly alters the pixels of the layer it's applied to. To maintain the integrity of your original image, it's crucial to duplicate the background layer by pressing Cmd/Ctrl + J before proceeding.
Step 2: Select the Color to Replace
Use the eyedropper tool to sample the color you wish to replace within your image. You can add multiple color samples to the replacement palette by using the eyedropper with a plus sign. Conversely, you can remove unwanted samples using the eyedropper with a minus sign.
Step 3: Configure Tool Settings
In the Options bar, you can adjust the Mode for different results. The "Color" mode is often preferred for replacing color while preserving luminosity and saturation. The "Hue" mode replaces only the hue, keeping saturation and luminosity intact. The "Saturation" mode replaces only the saturation, keeping hue and luminosity.
The "Limits" option determines how Photoshop samples colors:
- Contiguous: Replaces only colors that are adjacent to the sampled color.
- Discontiguous: Replaces all instances of the sampled color within the brush's tolerance, regardless of proximity.
The "Tolerance" slider controls the range of colors that will be affected. A lower tolerance affects only colors very similar to the sampled color, while a higher tolerance affects a broader range of hues.
The "Fuzziness" slider (when using localized color clusters) expands or contracts the selection, making it more generic or specific.

Step 4: Paint Over the Target Colors
With the tool configured, begin painting over the areas of the image where you want to replace the color. Photoshop will replace the sampled color with your chosen foreground color based on your settings.
PRO-TIP: For more accurate selection when dealing with similar colors, enable "Localized Color Clusters." This setting helps prevent stray colors from being selected, ensuring that only similar hues within your photo are affected.
As with other methods, you can add a layer mask to the Color Replacement Tool layer to selectively reveal or hide the color changes, allowing you to revert to the original image in specific areas.
Method 4: The Color Replacement Brush for Precise Painting
The Color Replacement Brush offers a more painterly approach to color modification, allowing for granular control over the application of new colors.
Step 1: Activate the Color Replacement Brush Tool
Locate and select the Color Replacement Brush Tool. This tool is often nested under the Brush Tool or Mixer Brush Tool in the Photoshop toolbar.
Step 2: Adjust Tool Settings in the Options Bar
In the Options bar, pay close attention to the Mode dropdown menu. Similar to the Color Replacement Tool, selecting "Color," "Hue," or "Saturation" will dictate how the brush affects the underlying pixels. You can also adjust the brush size, hardness, and spacing to suit your needs.
Step 3: Sample the Target Color
Use the eyedropper tool to sample the color you intend to replace.
Step 4: Sample the Replacement Color
Select your desired foreground color, which will be the color used to paint over the existing colors.
Step 5: Paint Over the Colors You Want to Change
Begin painting over the areas of your image where you want to apply the new color. The Color Replacement Brush will intelligently replace the sampled target color with your chosen replacement color, respecting the chosen blending mode and tolerance settings.
✔ Color Replacement Tool | Photoshop Tutorial | Artose
Method 5: Utilizing a Color Fill Layer with Blending Modes
This method is exceptionally powerful for applying a uniform color to an object or an entire layer and then controlling its interaction with the underlying image.
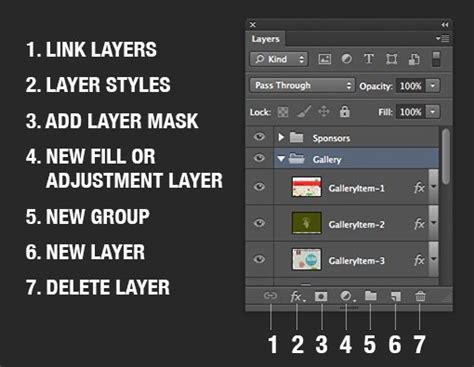
Step 1: Create a New Fill Layer
From the bottom of the Layers panel, click the "Create new fill or adjustment layer" icon and select "Solid Color…". Choose your desired target color from the Color Picker and click "OK."
Step 2: Change the Blending Mode
With the new color fill layer selected, change its Blending Mode from "Normal" to "Hue". This initial step applies the color's hue to the entire layer.
Step 3: Refine with a Layer Mask and Blending Modes (Optional but Powerful)
To make the color change selective, you will need to use a layer mask. Hold down the Option/Alt key and click the "Add layer mask" button at the bottom of the Layers panel. This will create a black mask, hiding the color fill layer's effect entirely.
Now, select a white brush and paint on the mask over the areas where you want the color fill to be visible. This effectively "reveals" the color fill layer only on the desired parts of your image.
Alternatively, you can experiment with other blending modes like "Color" or "Soft Light" on the fill layer to achieve different artistic effects. The "Color" blend mode applies the hue and saturation of the fill layer while retaining the luminosity of the layer below, often resulting in a natural-looking color shift.
Alternative Methods in Photoshop
Adobe Photoshop offers a diverse array of tools and techniques for color manipulation, catering to various workflows and desired outcomes. Beyond the primary methods discussed, consider these alternatives:
- Gradient Map Adjustment Layer: This powerful tool allows you to remap the tonal range of an image using a gradient. By creating a custom gradient, you can effectively change the colors of an entire image or specific tonal ranges.
- Color Balance Adjustment Layer: This adjustment allows you to fine-tune the color balance of an image by shifting the levels of cyan, magenta, yellow, red, green, and blue in the shadows, midtones, and highlights.
- Selective Color Adjustment Layer: This allows for precise adjustments to specific color ranges (reds, yellows, greens, cyans, blues, magentas, whites, neutrals, and blacks) within an image, offering granular control over color correction and manipulation.
- Layer Styles (Color Overlay): Applying a "Color Overlay" layer style to a layer can fill the layer with a solid color. Combined with layer masks or blending modes, this can be an effective way to recolor objects.
While each of these methods has its merits, the Hue/Saturation adjustment layer and the Color Fill layer with blending modes are often favored for their simplicity, flexibility, and the high degree of control they offer, making them excellent choices for both beginners and experienced professionals.
The effectiveness of any color change in Photoshop ultimately depends on the source image and the effort invested in the process. By mastering these techniques, users can achieve a wide range of professional results, transforming their images with precision and creativity.