The kaleidoscope, an optical instrument celebrated for its symmetrical patterns born from repeated reflections, has captivated observers for centuries. First realized in its full effect in 1815 by Sir David Brewster, who derived its name from the Greek words "kalos" (beautiful), "eidos" (form and shape), and "skopeō" (to look or examine), this device creates a world of repeating, beautiful imagery. Recreating this mesmerizing visual phenomenon in Adobe Photoshop is not only achievable but also a gateway to producing unique abstract photo effects, print-ready graphics, and even animated GIFs. This tutorial explores various methods to achieve the kaleidoscope effect, from foundational manual techniques to leveraging powerful Photoshop actions and filters.
The Foundation: Understanding the Mirror Effect
At its core, the kaleidoscope effect in Photoshop relies on the principles of mirroring and duplication. The concept is remarkably similar to creating a mirror effect in Photoshop, which itself involves duplicating an image and then flipping it horizontally and/or vertically. This fundamental manipulation, when applied iteratively and with specific rotations, forms the basis for the intricate, repeating patterns characteristic of a kaleidoscope.

The "infinity mirror effect," a related concept, takes this further by arranging two or more parallel or angled mirrors to create a series of smaller reflections that appear to recede into infinity. This principle, while distinct, shares the underlying idea of recursive visual repetition and can be explored further through concepts like the Droste effect.
Manual Creation: A Step-by-Step Approach
For those who prefer a hands-on approach, a manual method can yield stunning results. This technique often involves careful duplication, flipping, and rotation of image layers.
Prepare Your Image: Open your chosen image in Photoshop. It's highly recommended to use a square image, where the width and height are equal, as this simplifies the subsequent transformations. For clarity in the process, rename this initial layer "Image 1."
First Duplication and Flip: Duplicate "Image 1" and name the new layer "Image 2." Select "Image 2" and flip it horizontally (W: -100%). Crucially, set the Reference Point Location to the middle left. This ensures the horizontal flip originates from the left edge.
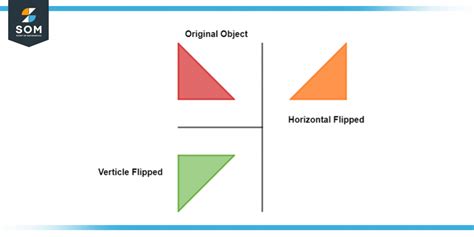
Second Duplication and Vertical Flip: Select both "Image 1" and "Image 2" layers and duplicate them. Press Control+T (or Command+T on Mac) to activate the Transform tool. Flip these duplicated layers vertically (H: -100%). For this vertical flip, set the Reference Point Location to the middle bottom. This anchors the flip to the bottom edge.
Revealing the Pattern: Navigate to Image > Reveal All. This command adjusts the canvas to fit all visible elements, allowing you to see the initial symmetrical pattern emerge from the combined transformations.
Further Refinement and Rotation: At this stage, you'll likely have multiple layers forming a basic symmetrical pattern. Merge all these layers. Then, duplicate the resulting merged layer. Rotate this duplicated layer by 90 degrees. Change the blend mode of this rotated layer to "Screen." Merge these layers again.
Adding More Complexity: Duplicate the most recently merged layer and rotate it by 45 degrees. This final rotation adds another layer of complexity and visual interest to the kaleidoscope effect.
This manual method, while requiring several steps, provides a deep understanding of how the effect is constructed. It's particularly effective when starting with an image that has ample negative space, as this can prevent the final edit from becoming overly chaotic. The process rewards experimentation; you can refine your crop at various stages or even fill blank spaces with smaller imagery. The final square result can even be saved as a custom pattern for future use, allowing for a "kaleidoscope of a kaleidoscope" effect by repeating the process.
Leveraging Photoshop Actions for Instant Results
For those seeking quicker outcomes or a more streamlined workflow, Photoshop action packs offer a compelling solution. These pre-recorded sets of commands can generate intricate kaleidoscope effects in mere seconds.
How to Make a Photoshop Kaleidoscope Effect
These action generators work by automating the duplication, flipping, and rotation steps described above. The user typically opens their image, plays the action, and then makes minor customizations to achieve different looks. The benefits are numerous:
- Speed: Instant results are a primary advantage, making them ideal for projects with tight deadlines.
- Variety: Kaleidoscope Photoshop action packs often come with a wide array of pre-designed effects, offering diverse shapes and sizes to create truly unique images.
- Ease of Use: For beginners, these actions provide an accessible entry point into creating complex visual effects without needing to master intricate manual steps.
- Customization: While providing instant results, many actions also include customization sections. This allows users to adjust parameters like "Offset" to move the image vertically or horizontally, fine-tuning the final output.
The PDF help files often included with these action packs provide detailed instructions and guidance on how to best utilize their features, including how to incorporate vector shape masks for even more creative control.
The Scripted Fill Approach: Precision and Patterns
Photoshop's "Scripted Fill" feature offers another powerful, yet often overlooked, method for creating kaleidoscope patterns, especially those inspired by music videos. This technique leverages predefined patterns and allows for precise control over the fragmentation and repetition of elements.
Define Your Pattern: Start by creating a selection of your subject matter using tools like the Quick Selection Tool. Refine the selection using the "Refine Edge" dialogue, paying close attention to details like hair. Once satisfied, go to Edit > Define Pattern. This custom pattern can now be used in subsequent steps.
Utilize Scripted Fill: Create a new document of a suitable size (e.g., 2500x2500 pixels). Go to Edit > Fill and select "Pattern" as the content. Choose your newly defined custom pattern from the "Custom Pattern" dropdown.
Advanced Transformations: For more complex "blossom" or intricate effects, the "Transform Again" command (found under Edit > Transform, or by using the shortcut Alt+Control+T after an initial transformation) becomes invaluable. This command repeats the previous transformation, allowing for the creation of layered, repeating elements that build the kaleidoscope structure.
Layering and Masking: Incorporating adjustment layers, gradient fills, and vector shapes (like polygons) can further enhance the effect. Rasterizing vector shapes turns them into pixels, allowing them to be incorporated into patterns. Layer masks, particularly when used with gradient tools, can help to blend and refine the overall composition, creating smooth transitions and revealing specific parts of the layered effects.
This method is particularly effective for creating abstract geometric patterns and mandalas, offering a high degree of control over the final visual output.
The Mirror Effect in Action: A Deeper Dive
The mirror effect, as a precursor to the kaleidoscope, deserves a closer look. The process involves duplicating an image and then applying transformations.
- Horizontal/Vertical Flipping: The most basic mirror effect is achieved by simply flipping the duplicated layer horizontally or vertically.
- Layered Mirror Effects: To create more complex fragmented patterns, multiple instances of the Mirror effect can be layered. By adjusting the "Reflection Angle" for each instance, you can fragment a shape into various symmetrical forms like lotuses, scallops, or floral designs. For instance, setting reflection angles at 15, 30, 60, 90, and 180 degrees on successive layers can create a circular fragmentation.
- Adjustment Layers: Applying these layered Mirror effects to an adjustment layer is a non-destructive workflow. This means you can easily swap out the underlying content - a letter, a shape, or a video clip - and the same mirror effects will be applied, transforming the new content into kaleidoscopic patterns. Animating the position of the underlying video layer can further enhance the visual dynamism.
This technique is exceptionally versatile, allowing for the transformation of simple elements into intricate, abstract visuals. When applied to video footage, it can create mesmerizing, "trippy" kaleidoscopic patterns that are a staple in many music videos.
Online Tools and Simpler Alternatives
For users who may not have Photoshop or prefer online solutions, tools like MockoFun offer a "smart photo filter" that functions as an online kaleidoscope maker. These platforms provide a user-friendly interface with various filters, including kaleidoscope effects, allowing for quick design creation without software installation. While some features may be premium, many online tools offer a good starting point for generating kaleidoscope designs.
The Essence of Kaleidoscope: Symmetry and Repetition
Regardless of the method employed - manual manipulation, Photoshop actions, scripted fills, or online tools - the underlying principle remains the same: the creation of symmetrical patterns through duplication, reflection, and rotation. The beauty of the kaleidoscope effect lies in its ability to disguise the original image, transforming familiar forms into abstract, mesmerizing compositions. Whether you're aiming for print-ready graphics, abstract art, or animated visuals, Photoshop offers a rich toolkit to explore the endlessly fascinating world of kaleidoscopic imagery. The possibilities for creating unique and captivating visuals are truly boundless, inviting endless experimentation and creative exploration.
tags: #kaleidoscope #effect #photoshop