The allure of placing subjects into entirely new worlds, transcending the limitations of physical space and budget, is at the heart of chroma keying, commonly known as using a green screen. This powerful technique, once reserved for high-budget film productions, is now an accessible and invaluable tool for photographers and digital artists alike. Whether you're aiming to create intricate Photoshop composites, enhance stock photography, elevate product shots, or simply place individuals into fantastical backgrounds, understanding the nuances of green screen work is crucial. This in-depth tutorial will guide you through the entire process, from the critical stages of lighting your green screen and subject to the precise editing techniques within Adobe Photoshop, ensuring you achieve professional-grade results every time.
What is a Green Screen and Which Type Should You Use?
At its core, a green screen is a backdrop, typically a vibrant shade of "chroma green," designed to be easily isolated and replaced with another image or video in post-production. The principle behind chroma keying relies on the fact that the chosen background color is distinct from natural skin tones and hair colors, allowing for a clean separation of the subject from the background. While blue screens are also used, green is often preferred due to its greater separation from common human features and its less frequent appearance in everyday clothing.

When selecting a green screen, consider the material and its surface. Paper roll green screens are highly recommended for their smooth, seamless finish. The smoother the surface of your green screen, the less likely you are to encounter wrinkles, creases, or uneven lighting, all of which can significantly complicate the editing process. Fabric backdrops can also be used, but they require careful attention to eliminate wrinkles through stretching and fastening. For on-the-go shoots, compact, fold-out green screen panels offer a convenient solution, providing a portable, uniform surface. Ultimately, any solid, easily distinguishable color can serve as a backdrop for keying, but "chroma green" remains the industry standard for good reason.
The Art of Lighting: Even Illumination for a Flawless Key
The success of a green screen composite hinges significantly on proper lighting. This is arguably the most critical phase, as errors here will be amplified in post-processing. The goal is to achieve two distinct, yet balanced, lighting scenarios: one for the green screen backdrop and another for your subject.
Lighting the Green Screen
The green screen itself must be lit as evenly as possible. This means eliminating hotspots and dark shadows, which can lead to uneven keying and difficult-to-remove artifacts. Soft, diffused, and non-directional lighting is paramount. This can be achieved using LED or flash lighting, but always in conjunction with diffusers such as softboxes or even white bedsheets.
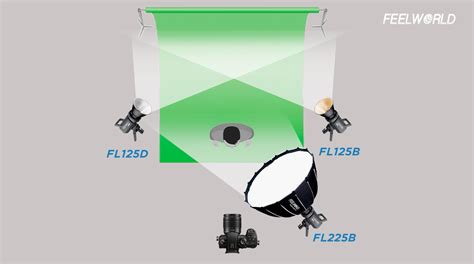
To ensure evenness, an exposure test is essential. With flash lighting, this involves using a remote trigger to fire flashes and a light meter to measure the light across the entire surface of the screen. The aim is to adjust the power of your lights and their positioning until a consistent reading is achieved. For beginners, an even metering of approximately f/8 is a good starting point. In practice, this might translate to a background exposure of f/8 ½. The key is to have the background evenly lit, creating a uniform color canvas for editing. Investing in multiple high-quality lights for the screen itself is often necessary; cheaper kits may only provide enough light for the subject, leading to a patchy background. Renting powerful lights, such as two 1000-watt lights with diffusers, is a worthwhile investment for achieving a professional result.
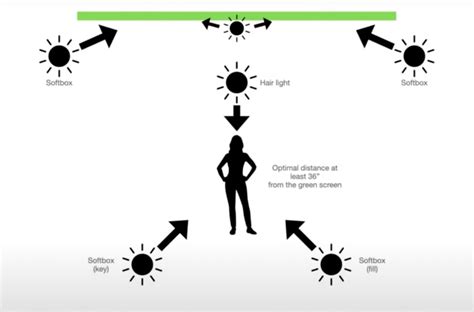
Lighting Your Subject
Once the background is evenly illuminated, attention shifts to lighting the subject. The exposure for your subject should be slightly darker than the green screen background. This deliberate underexposure ensures that the background appears brighter and helps to minimize the reflection of green light onto the subject, a phenomenon known as "light spill." For instance, if the background is metered at f/8 ½, aim for the subject's exposure to be around f/8.
Several key principles apply to subject lighting:
- Subject Separation: Ensure your subject is positioned far enough in front of the green screen so that the background lights do not directly illuminate them. This distance also helps prevent green light from bouncing off the screen and onto the edges of the subject.
- Suitable Lighting: Employ lighting that complements the desired final image. For general stock shots, a soft, widely spread reflected light, achieved with a white brolly or a softbox, is effective. If you are compositing the subject into a specific image, meticulously match the lighting style of that background. This includes the direction, harshness, and color temperature of the light. Understanding how to create both soft and hard light is beneficial here.
- Metered Exposure: Take a meter reading at the subject's position and adjust the light power accordingly to achieve the desired exposure. The objective is to have the background at least half a stop brighter than the foreground.
A crucial aspect to avoid is "light overspill." If the background lights are significantly brighter than the foreground lights, green light will reflect onto your subject, contaminating the edges of their hair, skin, and clothing. This contamination makes it incredibly difficult to achieve a clean key in post-processing, often resulting in the loss of detail in these areas.
Post-Processing in Photoshop: The Art of the Cutout
With the shooting phase complete, the digital magic begins in Adobe Photoshop. While various software options exist for chroma keying, Photoshop offers a robust set of tools for achieving precise results.
Initial Selection with Color Range
A common and effective starting point is Photoshop's "Select > Color Range" command. This tool allows you to isolate specific colors within your image.
- Open your image in Photoshop.
- Navigate to Select > Color Range.
- Within the Color Range dialog box, select the Eyedropper tool.
- Click on the green (or blue) background of your image to sample the color.
- To capture a broader range of the background color, you can hold down the Shift key and click on other green areas. This adds to the selection.
- Adjust the Fuzziness slider. A higher Fuzziness value (often 80-90) captures a wider range of similar colors, which is beneficial for dealing with slight variations in the green screen. The preview window will show a black silhouette of your subject against a white background as you adjust. Aim for a selection where your subject is solid black and the background is solid white, with minimal gray areas.
- Click OK. This will create a selection around your subject.
Refining the Selection with Select and Mask
Once an initial selection is made, the "Select and Mask" workspace provides advanced tools for refining the edges.
- With the selection active, go to Select > Select and Mask.
- Under the "View Mode" options, select "Black and White." This allows you to clearly see the selection mask. White areas represent the selected subject, and black areas represent the background to be removed.
- If you notice any white areas within your subject that should be background, use the minus brush tool (available in the Select and Mask toolbar) to paint over these areas and remove them from the selection.
- Switch back to a more visible view mode like "Overlay" to see the effect on your image.
- Invert the selection: Go to Select > Inverse. Now your background is selected.
- Refine Edges: To smooth the outline and create a more natural transition, use the "Refine Edge Brush Tool" (often found within the Select and Mask toolbar, or accessible by clicking "Select and Mask" again). Brush along the edges of your subject, particularly around hair and fine details.
- Decontaminate Colors: If there's still a green fringe around your subject, tick the "Decontaminate Colors" option within the Select and Mask properties. This attempts to remove color casting from the edges. Adjust the "Radius" slider as needed.
- Feathering: To soften the edges further and blend the subject more seamlessly, you can apply a slight feather. Within Select and Mask, you can adjust the "Smooth" and "Feather" sliders. A feather of 2.8 pixels is often a good starting point.
- Click OK to apply your refined selection.
How To Remove a GREEN SCREEN in Photoshop!
Advanced Refinements and Compositing
After creating a precise mask, further adjustments can enhance the composite.
- Add a Layer Mask: With your subject selected, click the "Add Layer Mask" icon at the bottom of the Layers panel. This non-destructively hides the background.
- Address Green Cast: If a residual green color remains on your subject, particularly in highlights or edges, you can use adjustment layers. Add a Hue/Saturation adjustment layer.
- Clipping Mask: To affect only the layer below (your subject), right-click the Hue/Saturation layer and select "Create Clipping Mask."
- Target Greens and Yellows: In the Hue/Saturation panel, select "Greens" from the dropdown menu and reduce the saturation. You may also need to target "Yellows" depending on the color cast.
- Minimum Filter (for outlines): For stubborn dark outlines, you can experiment with the "Filter > Other > Minimum" filter. Apply it to the layer mask itself (not the image layer) with a radius of 1 or 2 pixels. This can help to shrink the mask slightly and remove thin dark edges. Be cautious, as overdoing this can erode fine details.
- Compositing the Background: Create a new layer below your subject layer. Place your chosen background image on this new layer.
- Color and Tone Matching: To make the composite look natural, the subject's colors and tones should match the background.
- Color Balance: Use adjustment layers like "Color Balance" or "Photo Filter" to adjust the color temperature and hue of your subject to match the lighting of the background. For instance, if the background is warm, use a warming filter on your subject.
- Curves and Levels: Employing "Curves" or "Levels" adjustment layers (again, clipped to the subject layer) is crucial for matching the brightness, contrast, and tonal range. Pay close attention to the highlights and shadows of both the subject and the background to ensure they align.
- High Pass Sharpening: A "High Pass" filter can be used as a sharpening technique. Duplicate your subject layer, apply the High Pass filter, and then set the layer's blend mode to "Overlay" or "Soft Light." Adjust the opacity to control the sharpening effect.

By meticulously following these steps, from the foundational principles of lighting to the intricate editing techniques in Photoshop, you can transform ordinary photographs into extraordinary visual narratives. The ability to seamlessly integrate subjects into any environment opens up a universe of creative possibilities.