Navigating the world of digital art can feel overwhelming, especially when encountering powerful yet initially unintuitive features like layer blending modes. For beginners diving into Clip Studio Paint (CSP), understanding these modes is a crucial step towards unlocking the program's full creative potential. This guide aims to demystify layer blending modes, explaining their functions and offering practical tips for their application, transforming them from intimidating tools into indispensable assets for your artistic workflow.

The Foundation: Understanding Layers in Digital Art
Before delving into blending modes, it's essential to grasp the fundamental concept of layers. In digital art, layers function like a stack of transparent plastic sheets. Each sheet can hold a different element of your artwork - a sketch, line art, base colors, shadows, highlights, or textures. This separation allows for unparalleled flexibility: you can edit, move, scale, rotate, or apply special effects to one element without affecting any other part of your image.
When you create a new file in Clip Studio Paint, a default layer is automatically generated. The most commonly used layer type for artists is the raster layer, where the image content is composed of pixels. You can add new raster layers via the "New Raster Layer" icon in the Layer palette or by renaming existing layers for better organization. Proper naming is crucial; distinguishing between "Layer 1," "Layer 2," and "Layer 3" becomes nearly impossible as your projects grow in complexity.
Deleting a layer is straightforward but permanent; all its contents are lost. Layers can be rearranged in the Layer palette by clicking and dragging them to the desired position, indicated by a red line showing where the layer will be placed. To temporarily hide a layer's content without deleting it, simply click the "eye" icon next to its name.
Opacity is another critical layer property, dictating how transparent a layer's content appears. A layer at 100% opacity is fully opaque, while 0% opacity makes it completely invisible. Adjusting opacity can be vital for subtle effects or when dealing with complex files that might strain your hardware. For memory and space optimization, you can combine layers that no longer need to be separate using the "File - Merge Selected Layers" option. You can also create exact duplicates of layers, which is invaluable for experimentation or creating variations.
Transforming the contents of a layer is also a core function. After selecting a layer in the palette, you can use the handles of the bounding box to resize, rotate (by hovering over a corner until the cursor changes to a curved double-headed arrow), or move the layer's content.
Exploring the Palette of Possibilities: Clip Studio Paint's Blending Modes
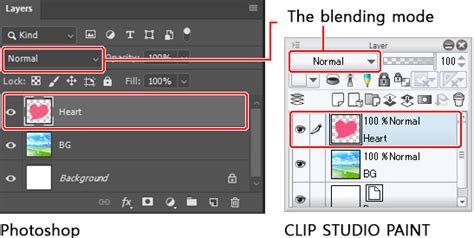
A blending mode is an effect applied to a layer that determines how its colors interact with the colors on the layers beneath it. By default, all layers are set to Normal mode, where the color is simply placed on top of the layer below without any alteration. Anything drawn with 100% opacity will appear opaque, obscuring the layers underneath.
Clip Studio Paint offers a vast array of blending modes, each offering unique ways to combine and modify colors. While the sheer number can be daunting, understanding the most common ones can significantly enhance your artistic output.
Modes That Darken the Image
These modes generally darken the resulting image by multiplying or burning the colors.
- Multiply: This is perhaps the most useful blending mode for beginners. It multiplies the colors of the blending layer with the colors of the base layers, resulting in a darker color. A key application is when importing scanned line art. By setting the line art layer to Multiply, the white background becomes transparent, allowing you to color on layers beneath it without affecting the lines.
- Color Burn: Named after a traditional photography technique, Color Burn darkens the base layer and then blends it with the color of the blending layer. This mode increases contrast and saturation, leading to darker results.
- Linear Burn: Similar to Color Burn, this mode also darkens the base layer and blends it with the blending layer's color, but it does so by reducing the brightness of the base layer and increasing contrast.
Modes That Lighten the Image
Conversely, these modes lighten the image, often by inverting or dodging colors.
- Screen: This mode inverts the base colors and then multiplies them with the colors of the blending layer. It creates the opposite effect of Multiply, resulting in a lighter image. It's particularly useful for creating glows or bright light effects.
- Color Dodge: Color Dodge lightens the base layers and reduces contrast. It's named after the "dodging" technique in photography, which lightens areas of a print. This mode can create vibrant, luminous effects.
- Linear Dodge (Add): This mode adds the color information of the base layers and the blending layer, resulting in a brighter color. It essentially brightens the image by increasing luminosity.

Modes That Contrast and Blend
These modes offer a more complex interaction, often combining darkening and lightening effects based on the underlying colors.
- Overlay: This mode behaves like Screen mode in bright areas and like Multiply mode in darker areas. It's a versatile mode that can enhance contrast without significantly altering the overall color.
- Soft Light: The effect of Soft Light depends on the density of the superimposed color. Using bright colors on the blending layer will create a brighter effect, similar to dodge modes, while dark colors will create darker effects, akin to burn modes. It provides a gentler, more subtle contrast adjustment than Overlay.
- Hard Light: Similar to Soft Light, the effect of Hard Light also depends on the density of the superimposed color. However, it applies a stronger contrast effect, acting like a combination of the Overlay mode with the underlying color. If the blending color is lighter than 50% gray, the image is lightened; if it's darker, the image is darkened.
- Vivid Light: In Vivid Light mode, contrast is enhanced for blending. Highlights are made brighter, and shadows are darkened. This mode adjusts the highlights of the base layer according to the grayscale of the blending layer.
- Pin Light: In Pin Light mode, the grayscale of the overlapping color is used to replace the underlying layer. For example, if the blending layer's color is brighter than 50% gray, the base layer's color is only replaced in the areas where the color of that layer is darker. This mode can create sharp, defined effects.
- Hard Mix: This mode involves significant mathematical calculations within Clip Studio Paint's programming. The RGB values of the base layer and the blending layer are added together. If the resulting value is greater than 255, a value of 255 (pure white) is displayed. This mode makes all colors more "extreme," often resulting in posterized or highly saturated effects.
Modes That Affect Color Components
These modes manipulate specific color components like hue, saturation, or luminosity.
- Hue: This mode applies the hue (color) of the blending layer while maintaining the brightness and saturation of the layer below.
- Saturation: In this mode, the saturation of the blending layer is applied while the brightness and hue of the layer below are maintained.
- Color: This mode applies the hue and saturation of the blending layer to the luminosity of the layer below.
- Luminosity: This mode applies the luminosity of the blending layer to the hue and saturation of the layer below.
Modes That Create Differences
These modes work by comparing color values between layers.
- Difference: This mode subtracts the color of the blending layer from the color below, then blends the pure value of the difference with the blending color. It's useful for aligning images or creating abstract color effects. If the blending layer is white, the base layer's colors are inverted.
- Exclusion: Exclusion produces similar effects to Difference but with less contrast. The closer the blending layer is to white, the more obvious the difference between the base color and the blended color will be.
Specialized and Mathematical Modes
- Divide: There is a lot of math going on behind the scenes in this mode. The RGB values of the base layer are multiplied by 255 and then divided by the RGB values of the blending layer. This can lead to very bright or desaturated results depending on the input values.
- Lighten/Darken (Lighten and Darken effects): These effects are applied to replace colors. The Lighten mode replaces darker pixels with lighter ones from the blending layer, while the Darken mode replaces lighter pixels with darker ones.
Practical Applications: Bringing Blending Modes into Your Workflow
Understanding the theory behind blending modes is one thing; applying them effectively in your art is another. Here are some practical examples and tips:
Creating Atmosphere and Lighting:
- Night Sky: To create a night sky, you can create a new layer above your background material and use a gradient tool to create a black-to-blue gradient. While "Multiply" could work for darkening, "Hard Light" might offer a more pleasing result for a vibrant night sky.
- Adding Glows: Use the "Screen" or "Add" modes on a new layer to paint soft, glowing effects for lights, magical auras, or celestial bodies.
- Simulating Light Sources: For a warm, sunlit scene, use "Overlay" or "Soft Light" on a layer filled with a warm color (like yellow or orange) and adjust its opacity. Conversely, for cool, moonlight effects, use a cool-toned color.
Enhancing Colors and Textures:
- Color Correction: Use "Hue/Saturation/Luminosity" adjustments on a layer to fine-tune the overall color balance of your artwork.
- Adding Texture: Import a texture image onto a new layer, set its blending mode to "Overlay," "Soft Light," or "Multiply," and adjust its opacity to seamlessly integrate it into your artwork.
- Coloring Line Art: As mentioned, "Multiply" is invaluable for coloring scanned line art. For digital line art, you might color on a layer below the linework and then use "Multiply" on a separate layer for shadows or base colors to ensure they don't obscure the lines.
Comic Creation Specifics:
- Tones: Clip Studio Paint's "Tone" layer effect allows you to convert layers into screentones, essential for comic creation. You can adjust frequency, density, shape, and angle.
- Frame Borders: The "Frame Border Folder" tool is specifically designed for creating comic panels, keeping them organized and editable.
- Speech Bubbles and Text: While not a blending mode, the ability to easily create and edit text and speech bubbles on separate layers is crucial for comic artists.

Advanced Layer Features and Workflow Tips
Beyond blending modes, Clip Studio Paint offers a host of other layer functionalities that complement their use:
- Layer Folders: Organize your layers into folders for better project management, especially in complex illustrations or comics.
- Clipping Layers: Use "Clip to Layer Below" to confine the drawing on a new layer to the boundaries of the artwork on the layer beneath it. This is excellent for adding shadows, highlights, or details without going outside the lines.
- Layer Masks: Masks allow you to selectively hide parts of a layer without permanently erasing them. This provides a non-destructive workflow, letting you easily refine or revert changes.
- Reference Layers: Designate a layer as a reference layer for tools like the fill bucket or perspective rulers.
- Locking Layers: Prevent accidental edits or movements by locking layers or specific attributes like transparent pixels.
- Expression Color: Adjust how a layer's colors are displayed, converting them to grayscale or monochrome without altering the original data.
- Layer Color: Assign a color to a layer in the palette for organizational purposes, helping you quickly identify different elements.
Workflow Recommendations:
- Utilize Keyboard Shortcuts: Customize shortcuts for frequently used layer actions like creating new layers or duplicating them.
- Name Your Layers: This cannot be stressed enough. Descriptive layer names save immense time and prevent confusion.
- Avoid Flattening: Unless absolutely necessary for specific export formats, avoid flattening your image. Flattening merges all layers into one, negating the benefits of a layered workflow.
- Experiment: The best way to learn blending modes is to experiment. Create simple test files with basic shapes and colors and cycle through the different modes to observe their effects firsthand.
By understanding and actively employing Clip Studio Paint's layer modes and related features, artists can achieve a wider range of visual effects, streamline their workflow, and elevate the quality and professionalism of their digital artwork. The power of these tools lies not just in their technical capabilities but in the creative freedom they afford.