Inkscape is a powerful, free, and open-source vector graphics editor that allows users to create and manipulate scalable vector graphics (SVG). This guide will walk you through the fundamental tools and techniques to get you started with drawing in Inkscape, from setting up your project to applying fills and strokes, and even incorporating text and complex path operations.
Project Setup and Workspace Navigation
Upon launching Inkscape, you'll be greeted with a blank canvas, ready for your creative endeavors. The interface is designed to be intuitive, with key elements strategically placed for efficient workflow.
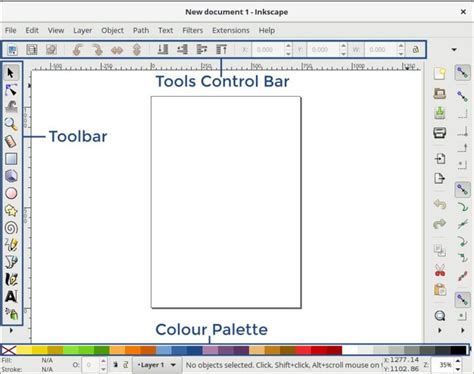
The vertical toolbar on the left is your primary toolkit, housing a diverse array of drawing and manipulation tools. Each tool has a specific function, from creating basic shapes to drawing intricate curves.
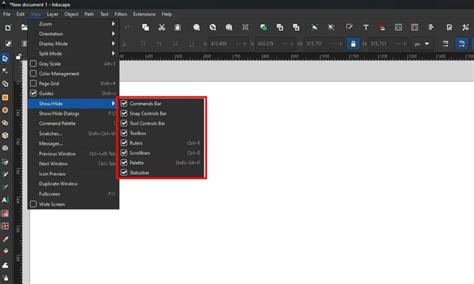
Above the drawing area, below the window bar, you'll find the command bar. This bar contains standard menus like File, Edit, View, Layer, Object, Path, Text, Filters, and Help, offering access to a wide range of functionalities. Beneath the command bar is the tool input bar, which dynamically displays options and settings relevant to the currently selected tool. This means the options you see here will change as you switch between different tools.
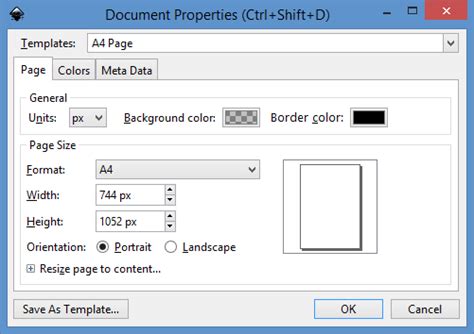
Before you begin drawing, it's crucial to set up your project. This involves creating a blank page and defining its size. You can access page setup options through the "File" menu, typically under "Document Settings." Here, you can set the page size to the required dimensions. Inkscape offers various units of measurement, including millimeters (mm), centimeters (cm), pixels (px), and others, allowing you to tailor your canvas to your specific needs. For many digital projects, particularly those intended for web display or screen presentations, the size 1920×1080 px is mostly used for drawing. This resolution is standard for High Definition (HD) displays.
Drawing Basic Shapes and Utilizing the Grid
The toolbar on the left side offers many options for drawing. Among these are tools for creating fundamental geometric shapes. To draw a rectangle, for instance, you would select the fourth tool from the top in the toolbar, which is shown as a square. Once this tool is active, you can drag a rectangle on the page. As you draw, the current dimensions are displayed for you in the lower information bar, providing real-time feedback on the size of your shape.
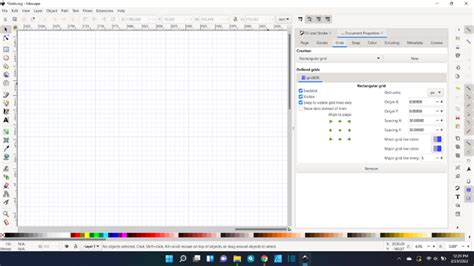
Inkscape's grid functionality is an invaluable aid for precise drawing. The grid, which can also be found under the "Document Settings" menu item, is a great help. When the grid is activated, newly drawn shapes will automatically snap into the grid by themselves. This snapping behavior ensures that your elements align perfectly with the grid lines, facilitating accurate placement and scaling. After drawing a shape, you can see the exact dimensions of the element and the coordinates within the newly created page and adjust them if necessary. This is typically done by selecting the object and then looking at the tool input bar or using dedicated dialog boxes.
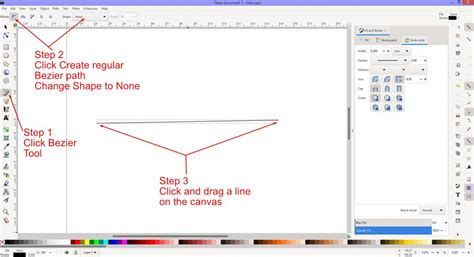
Beyond rectangles, Inkscape allows for the creation of other shapes. For example, to draw a triangle, you can utilize the "Draw Bézier curves and straight lines" tool. This versatile tool, often represented by a pen icon, is selected from the left toolbar. To do this, select the tool and click the points where you want the corners of the triangle to be. Each click defines a vertex, and connecting these points creates the triangle. This tool can also be used to create many other shapes and figures, including polygons, stars, and custom freehand drawings, by strategically placing and connecting nodes.
Applying Fills and Contours (Strokes)
A fundamental aspect of vector graphics is the ability to define the appearance of your objects through fills and strokes. Each element can be assigned a specific infill and contour. To apply these properties, you first need to select the object you wish to modify. Once an object is selected, you can then press the right mouse button. This action will typically open a context-sensitive menu. From this menu, you will want to select the button for "Fill and Contour" on the left side of the shortcut bar.
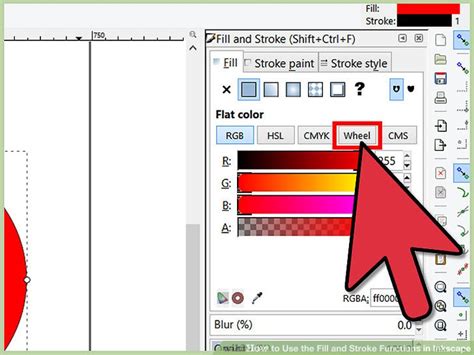
Upon selecting "Fill and Contour," a dedicated window will appear, usually on the right-hand side of your Inkscape workspace. This "Fill and Contour" window then opens on the right-hand side, offering further setting options. Within this dialog, you'll find three main tabs: "Fill," "Stroke paint," and "Stroke style."
- Fill Tab: This is where you define the color that fills the interior of your shape. You can choose from solid colors, gradients, patterns, or even set the fill to be transparent.
- Stroke Paint Tab: This tab controls the color of the outline or border of your object. Similar to the fill, you can select solid colors, gradients, or patterns for your stroke.
- Stroke Style Tab: Here, you can adjust the thickness (width) of the stroke, as well as its joins (how corners are rendered), caps (how line endings are rendered), and dash patterns (to create dashed or dotted lines).
Here you can make settings for the color, contour and contour properties. For example, to change the fill color of a rectangle, you would navigate to the "Fill" tab, select a color swatch, or input specific color values. To change the stroke color, you would go to the "Stroke paint" tab. To make the outline thicker, you would adjust the "Width" parameter in the "Stroke style" tab.
It's important to note that sometimes the "Fill and Contour" dialog might display "N/A" for fill or stroke. As a rule, the fill and stroke indicator will show N/A for fill or stroke if no fill or stroke has been set, or when the object selected is part of a group. If you encounter this, and you expect a fill or stroke to be present, try selecting the object again and ensuring that a color has been chosen in the respective tabs. If the object is part of a group, you might need to ungroup your shape. You can do this by selecting the object and going to "Object" > "Ungroup." While it's unusual for a newly created shape to be automatically grouped, it's a troubleshooting step that can sometimes resolve display issues.
If you are having trouble opening the "Fill and Contour" dialog, here's a common method:
- Once you've drawn your shape, left-click on a blank area of the Inkscape page to deactivate the shape tool. This ensures you are not trying to draw a new shape.
- Left-click the new shape to select it. You should see selection handles appear around the object.
- Press the keyboard shortcut Shift+Control+F. This is a universal shortcut in Inkscape to open the fill and stroke dialog window.
- If the "Fill and Stroke" dialog opens as it should, you can then left-click the flat fill button (if you want a solid fill) and minimize the dialog window if you want more space to work.
- Finally, left-click the fill color you want in the Inkscape palette (the row of color swatches usually found at the bottom of the Inkscape window).
If you experience issues, it's helpful to provide specific details. For instance, a step-by-step description of what you are doing when you create your shape and try to fill it with color can be crucial. Information about your operating system and version (e.g., Windows 10, macOS Monterey, Ubuntu Linux), and the Inkscape version you are using can also assist in diagnosing problems. Additionally, details about your input device (e.g., 3-button mouse, graphic tablet, touchpad) and how Inkscape was installed can be relevant. Any messages that appear in the Inkscape status bar at the bottom of your window when you attempt to add fill and stroke colors are also important clues.
Incorporating Text into Your Designs
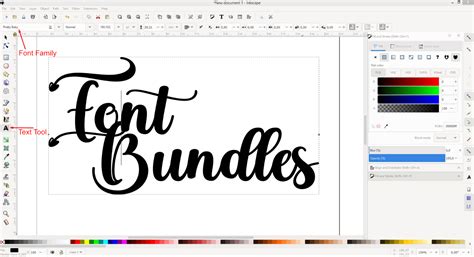
Adding text is a common requirement for many graphic design projects, and Inkscape makes this process straightforward. To insert texts into the drawing, use the "Create and edit text objects" tool in the left toolbar. This tool is typically represented by an "A" icon.

Once the text tool is active, click on your canvas where you want the text to begin. You can then start typing. In the upper status bar, there are more options for adjusting the font, font size, and other settings. This includes selecting from a wide range of installed fonts, changing the size of the characters, adjusting line spacing, character spacing, and text alignment. You can also apply fills and strokes to text objects just as you would with any other shape.
Advanced Path Operations: Combining and Modifying
Inkscape's power as a vector editor truly shines when it comes to manipulating paths. Paths are the fundamental building blocks of vector graphics, representing lines, curves, and shapes. It is possible to combine or modify several different paths (elements). To access these powerful operations, you first need to select the paths you want to work with. Then, navigate to the "Path" menu. A number of editing options are displayed in the window when you hover over or click on the "Path" menu item.
Some of the most frequently used path operations include:
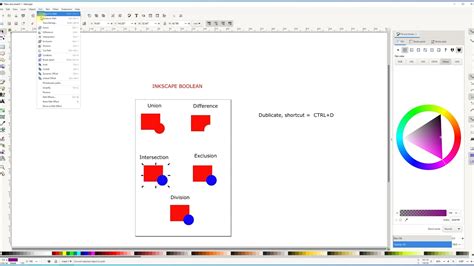
- Union: Combines two or more selected objects into a single, new object. The resulting object takes on the color and properties of the topmost object.
- Difference: Subtracts the top object(s) from the bottom object. This is useful for creating cutouts or holes.
- Intersection: Creates a new object that is the intersection of all selected objects. Only the areas where all objects overlap will remain.
- Exclusion: Creates a new object from the areas where selected objects do not overlap. This is similar to XOR.
- Division: Divides selected objects into separate components based on their intersections.
- Combine: This operation is a bit different from the others and is often misunderstood. When two elements are combined, they take on the same color and functions. This means that if you have two shapes with different fills, after combining them, they will both adopt the fill of the top object. Crucially, a combination should not be confused with a grouping. Grouping merely collects objects together for easier selection and manipulation, but they retain their individual properties. Combining, on the other hand, merges them into a single entity with unified attributes.
Understanding these path operations is key to creating complex and sophisticated vector artwork. They allow you to build intricate shapes from simpler ones, create detailed illustrations, and prepare designs for various applications, from logos to print media.
Troubleshooting Common Issues
It's common for new users to encounter challenges when first learning a new software. If you're experiencing difficulties, such as an inability to apply fills or strokes, it's understandable to feel frustrated. However, please don't give up yet. Unfortunately, any number of things could be responsible for your problem.
As mentioned earlier, providing detailed information is crucial for effective troubleshooting. Beyond the technical details, a step-by-step description of what you are doing when you create your shape and try to fill it with colour is invaluable. For example:
- "I selected the rectangle tool."
- "I clicked and dragged on the page to create a square."
- "I then right-clicked the square."
- "I selected 'Fill and Contour' from the menu."
- "The dialog opened, and I clicked on the red swatch in the 'Fill' tab."
- "The square did not turn red."
This level of detail allows others to follow your process and identify potential points of error.
If you're struggling with a specific issue, sometimes taking a short break can be beneficial. Please, do hang on a while longer. Take a break from this, and do something pleasant and relaxing. Returning with a fresh perspective can often lead to breakthroughs.
Remember, Inkscape is a powerful tool with a learning curve. By familiarizing yourself with the interface, practicing with basic tools, and understanding how to apply fills, strokes, and manipulate paths, you'll be well on your way to creating impressive vector graphics.