Photoshop's layer system stands as its most powerful feature, enabling intricate image manipulation and non-destructive editing. To truly harness its potential, understanding how to efficiently navigate and control these layers through keyboard shortcuts is paramount. Whether you're a novice or a seasoned professional, a well-practiced set of hotkeys can dramatically accelerate your workflow, boost confidence, and propel you towards Photoshop mastery. This article delves into the essential shortcuts for creating, selecting, manipulating, and organizing layers, transforming your editing process from a series of clicks into a fluid, intuitive experience.
Opening and Navigating the Layers Panel
Before diving into layer-specific shortcuts, it's crucial to ensure the Layers panel is readily accessible. This panel is your central hub for all layer-related operations.
- To open the Layers panel: Navigate to the Window menu and ensure Layers has a tick next to it. Alternatively, press the F7 key.
Once the Layers panel is visible, you can begin to explore the myriad ways to interact with your layers using keyboard commands.
Creating New Layers: Efficiency at Your Fingertips
The ability to create new layers is fundamental to Photoshop's non-destructive workflow. While the standard method involves clicking the "Create new layer" icon, several shortcuts offer greater speed and control.
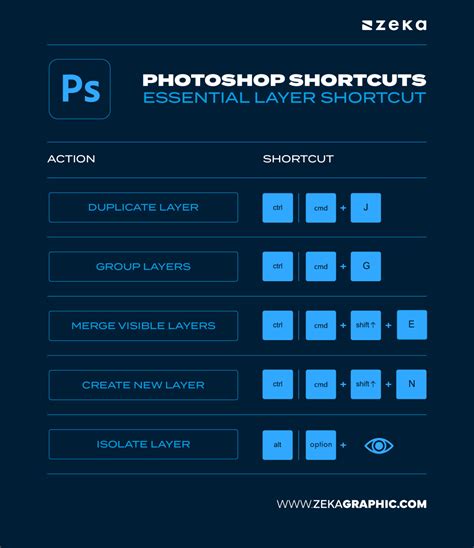
To add a new layer and display the New Layer dialog box: Press Command + Shift + N (Mac) / Control + Shift + N (Win). This dialog box allows you to name the new layer, set its color label, mode, and opacity before it's created.
To add a new layer without displaying the New Layer dialog box: Press Command + Option + Shift + N (Mac) / Control + Alt + Shift + N (Win). This is a rapid way to add a blank layer directly into your document, often placed above the currently selected layer.
To add a new layer above the currently selected layer: By default, Photoshop adds a new layer above the layer currently selected in the Layers palette.
To add a new layer below the currently selected layer: Hold down Command (Mac) / Control (Win) and click on the "Create new layer" icon. The new layer appears below the layer that was selected. Note that this does not work with the Background layer, as Photoshop does not allow any layers to be placed below it.
How to Extract Shadows & Highlights to New Layer Photoshop Tutorial | Photoshop Action
Selecting Layers: Precision and Range
Efficiently selecting one or multiple layers is key to applying edits uniformly or isolating specific elements. Photoshop offers a variety of methods to achieve this, catering to different selection needs.
To select a single layer: Simply click on the desired layer in the Layers panel.
To select multiple contiguous layers: Click on the first layer, then hold down the Shift key and click on the last layer in the desired range. This selects both layers and all layers in between.
To select multiple non-contiguous layers: Hold down the Command (Mac) / Control (Win) key and click on each individual layer you wish to select in the Layers panel.
To select all layers: Press Command + Option + A (Mac) / Control + Alt + A (Win). Note that this selects all layers except the locked Background layer.
To select all layers of the same type: Select one layer of the desired type (e.g., a Type layer), then go to Select > Similar Layers. This also works effectively for Adjustment layers, Fill layers, and Smart Objects. In versions CS6 and later, you can use the Filter Options at the top of the Layers panel to filter by layer type, or search for a layer by entering a keyword.
To select layers using the Move Tool (Auto-Select): With the Move Tool selected (shortcut V), check the Auto-Selection option in the Options bar. You can choose between "Auto-Select Layers" or "Group." This allows you to click directly on an object in the image area to select its corresponding layer.
To temporarily invoke Auto-Select: With the Move Tool selected, hold down Command (Mac) / Control (Win) and click on part of the layer’s content in the image area.
To select more than one layer by dragging: With the Auto-Select feature invoked, you can click-drag over objects in the image area to select their corresponding layers in the Layers panel. This method is particularly useful when you have multiple distinct objects on separate layers. However, be mindful that if Auto-Select is on, a single click will auto-select and attempt to move the first layer you click on, rather than selecting additional objects.
To select layers below the active layer: Select the first layer, then press Option + Shift + [ (Mac) or Alt + Shift + [ (Win).
To select layers above the active layer: Select the first layer, then press Option + Shift + + ] (Mac) or Alt + Shift + ] (Win).
To select the top layer: Press Option + . (Mac) or Alt + . (Win).
To select all layers between the active layer and the top layer: Press Option + Shift + . (Mac) or Alt + Shift + . (Win).
To select every layer except the locked Background layer: Press Command + Option + A (Mac) / Control + Alt + A (Win).
Manipulating Layers: Moving, Duplicating, and Deleting
Once layers are selected, a range of shortcuts allows for quick manipulation, streamlining repetitive tasks.
To move a layer up in the layer stack: Hold down Control (Win) / Command (Mac) and press the right bracket key (]). Each press moves the layer up one position.
To move a layer down in the layer stack: Hold down Control (Win) / Command (Mac) and press the left bracket key ([). Each press moves the layer down one position.
To jump a layer to the top of the layer stack: Press Shift + Control + ] (Win) / Shift + Command + ] (Mac).
To jump a layer to the bottom of the layer stack: Press Shift + Control + [ (Win) / Shift + Command + [ (Mac). Note that these movement shortcuts do not work with the Background layer.
To duplicate a layer: Press Command + J (Mac) / Control + J (Win). This is a swift way to duplicate the selected layer or to copy a selection to a new layer.
To duplicate a layer by dragging: Select the layer(s) in the Layers panel and Option (Mac) / Alt (Win) -drag until you see a heavy black line between the layers, then release the mouse button and the Option/Alt key. This method is preferred by some over Command/Control + J as it offers a visual confirmation.
To delete a layer: Select the layer and press the Delete key, or click the trash can icon at the bottom of the Layers panel.
To delete a group: Select the Group in the Layers panel and click the trash can icon, or go to Layer > Delete > Group.
Layer Visibility and Organization
Controlling the visibility of layers and organizing them into groups are crucial for managing complex projects.
To hide or show a layer: Click the Layer Visibility (eyeball) icon next to the layer in the Layers panel.
To temporarily hide all other layers: Hold down Alt (Win) / Option (Mac) and click on the Layer Visibility icon of the layer you want to keep visible. This is an incredibly useful tool for focusing on a single layer without losing the context of your overall composition.
To cycle through layers while hiding others: Hold down Alt (Win) / Option (Mac) and click on the Layer Visibility icon. Then, continue holding Alt (Win) / Option (Mac) and press the left or right bracket keys ([ or ]). The right bracket cycles up through the layers, making each one visible while hiding the others, and the left bracket cycles down.
To create an empty Layer Group: Click the Create Layer Group (folder icon) at the bottom of the Layers panel. The Group will be added above the currently targeted layer, or at the top of the layer stack if no layers are targeted.
To create a new Layer Group and place targeted layers into it: Select the layers you want to group, then press Command + G (Mac) / Control + G (Win), or go to Layer > Group Layers, or drag the selected layers onto the New Group icon.
To ungroup layers: Select the Group in the Layers panel and press Command + Shift + G (Mac) / Control + Shift + G (Win), or go to Layer > Ungroup Layers.
To reverse the stacking order of selected layers: Select the layers and go to Layer > Arrange > Reverse.
Layer Properties and Effects
Shortcuts can also be employed to modify layer properties like opacity, blending modes, and to create masks and links.
To adjust layer opacity: With the Move Tool selected (shortcut V), simply type a number. For example, typing "5" sets opacity to 50%, "8" for 80%, and "3" for 30%. Typing two numbers quickly, like "37", sets the opacity to 37%. Typing "0" sets it to 100%.
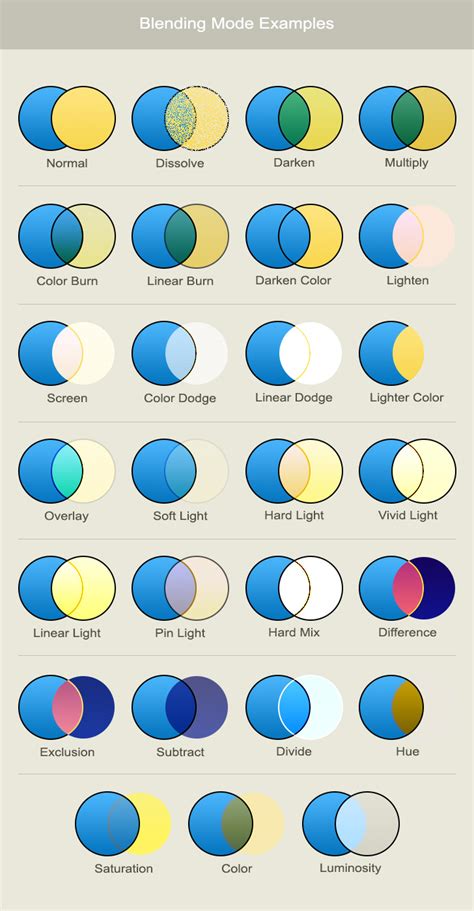
To cycle through layer blend modes: Select the layer, then hold down the Shift key and use the + (plus) and - (minus) keys. This allows you to quickly preview different blending effects.
To load a layer or layer mask as a selection: Command (Mac) / Control (Win) -click on a layer or layer mask thumbnail in the Layers panel.
To create a clipping mask: Select the layer you want to clip, then press Command + Option + G (Mac) / Control + Alt + G (Win). This is useful for applying adjustments or effects to specific layers below.
To release a clipping mask: Select the clipped layer and press Command + Option + G (Mac) / Control + Alt + G (Win). The same shortcut is used for both creating and releasing.
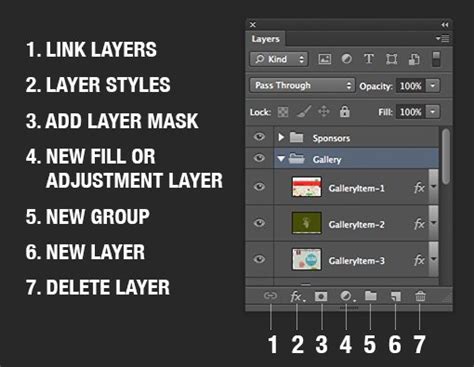
To link layers: Select the layers you want to link, then click the link icon in the Layers panel. To unlink a single layer, select it and click the link icon. When multiple layers are linked, commands applied to one will affect all linked layers. Showing Transform Controls (Command + Shift + Alt + T on Win / Control + Shift + Option + T on Mac) when multiple layers are selected will display a bounding box around all linked layers.
To merge visible layers onto a new layer (Flattening): Press Command + Option + Shift + E (Mac) / Control + Alt + Shift + E (Win). This creates a new layer that is a flattened composite of all currently visible layers, without altering the original layers.
To merge all layers (Flatten Image): Press Shift + Command + E (Win) / Shift + Control + E (Mac). This operation is destructive and should be used with caution, or preferably on a duplicated document.
Advanced Layer Techniques and Tips
Beyond basic manipulation, several shortcuts and techniques unlock more advanced layer functionalities.
To change preview settings for Layer thumbnails: Select Panel Options from the Layers panel fly-out menu. You can choose from different Thumbnail Size options. Additionally, you can select Change Thumbnail Contents to either "Layer Bounds" (which generally displays a larger preview of layers with minimal content) or "Entire Document" (which generally displays layer content smaller in relation to the entire document).
To load files into Photoshop layers: When you know you will want to open several files into a single document, it is easiest to select the desired files from Bridge and then choose Tools > Photoshop > Load Files into Photoshop Layers.
Layer Groups and Masking: Layer Groups are excellent for organizing complex documents. Not only do they help manage layers, but they can also be used to mask the contents of multiple layers simultaneously. With a Group targeted in the Layers panel, click the Add Pixel (or Vector) Mask icon from the Masks panel. By default, Layer Groups display blending effects like opacity and blend modes. In this state, the Group’s blend mode is set to "Pass Through," meaning blending applied to layers within the group affects layers below it. To limit blending to only layers within the group, set the Group's blend mode to "Normal."
Continuous Learning and Discovery
Photoshop is a constantly evolving software, and new tips and tricks emerge regularly. Many of these invaluable shortcuts are shared through blogs and video tutorials. Following resources from experienced designers and instructors can provide ongoing learning opportunities. The key to mastering these shortcuts is consistent practice. Try incorporating a few new shortcuts into your daily workflow each week, and you'll soon find your efficiency and creative output significantly enhanced. Learning these power shortcuts will not only increase your productivity but also boost your confidence as you take a giant leap forward on the road to Photoshop mastery.