For aspiring creators of comics, cartoons, and webtoons, a solid understanding of digital art tools is paramount. Clip Studio Paint (CSP) stands out as a powerful and versatile software, widely adopted by professionals, particularly in Japan, where a significant portion of manga is produced digitally. This tutorial aims to guide newcomers through the essential features and techniques within Clip Studio Paint, from initial setup to the completion of a manga manuscript, drawing upon the wealth of knowledge shared by experienced artists.
The Foundation: Essential Tools and Techniques
Getting started with digital art involves familiarizing yourself with various tools that mimic traditional mediums or offer unique digital advantages.
Sketching and Line Art: From Rough Ideas to Crisp Lines
Pencils are your initial allies for rough sketches. Their inherent imprecision allows for fluid exploration of shapes and shading without immediate commitment. As you move towards refining your artwork, pen tools become crucial for establishing clean line art.
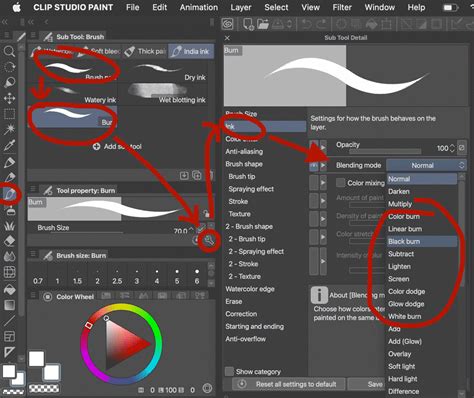
The default G-pen in Clip Studio Paint is a popular and effective choice, designed to emulate the feel of traditional dip-pens with their characteristic slightly rougher lines. Many seasoned comic artists, accustomed to inking on paper, find this tool to be a natural extension of their traditional workflow.
For traditional American comics, line weight - the variation in line thickness - is a vital technique for conveying information. Artists use thicker lines to suggest the direction of the light source and to imply texture. For instance, a character's head might feature thicker lines on the side facing away from the light, indicating that the light source is coming from the opposite direction.
Expressing Form and Depth: Hatching and Cross-Hatching
Hatching is a fundamental technique for rendering shadows and form using closely spaced parallel lines. The density of these lines directly correlates to the intensity of the shadow. Cross-hatching, which involves layering lines in multiple directions, allows for the creation of deeper, richer shadows and more complex tonal variations.
Harnessing Pen Pressure for Dynamic Lines
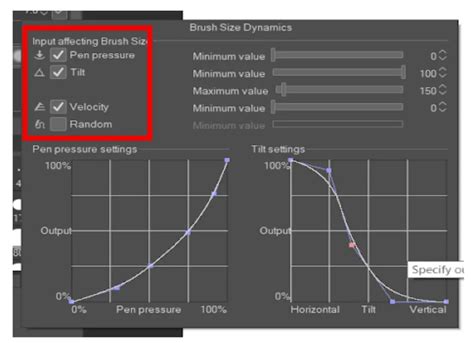
One of the key advantages of digital art is the ability to fine-tune how your input device, such as a digital pen or pen tablet, interacts with the software. Clip Studio Paint allows you to adjust pen pressure sensitivity. After connecting your device, navigate to the pen pressure wizard. If you find yourself applying too much pressure, resulting in lines that are too thick or opaque, you can adjust the pressure curve. This adjustment ensures that a lighter touch requires less pressure to achieve the desired line thickness or color opacity.
The following figure illustrates how the shape of a brush, such as the Round watercolor brush, can be modified within the Brush tool settings to respond differently to pen pressure.
For those hesitant to dive into brush customization, Clip Studio Paint's Assets library offers a vast collection of user-created brushes that can be downloaded and experimented with, saving you time and providing a starting point for your artistic journey.
The Art of Light and Shadow: Adding Dimension and Emotion
Light and shadow are not merely aesthetic elements; they are powerful storytelling tools that breathe life into your narrative. They add depth and realism to your artwork, but more importantly, they can be used to express a character's emotions and the overall mood of a scene.
Unlike in full illustrations or paintings where shadows might be rendered with intricate detail, comic panels often benefit from simpler shadow and highlight applications. For example, a campfire can serve as a clear light source, with simple shadows and highlights indicating its presence and effect on the surrounding environment.
To achieve greater realism, it is crucial to consider the light source when applying light and shadow. Think about how light interacts with different elements within a scene to enhance composition and clarity. In some instances, artists may choose to exaggerate light or shadow to amplify dramatic or emotional impact, but a strong understanding of fundamental lighting principles ensures that these choices remain believable within the context of the artwork.
Shadows can be strategically placed to define spaces and separate elements, such as adding shadows to a staircase or behind a character to create depth. Highlights, conversely, can indicate the direction of the light source, illuminating characters or objects.
Leveraging References for Realistic Lighting
Photographic references are invaluable for understanding how light behaves in real-world scenarios. Observing how light falls on objects and surfaces can provide crucial insights for your own artwork.
3D models offer another powerful reference tool. By incorporating 3D character models or objects onto your canvas and manipulating the virtual light source, you can observe in real-time how light and shadow play across different forms. Clip Studio Paint further simplifies this process with its Shading Assist function, which can automatically generate shadows based on your line art and project them onto your flat colors.
Digital Coloring Techniques in Clip Studio Paint
Clip Studio Paint excels in streamlining the digital coloring process, making it efficient and versatile.
Flatting with the Fill Tool
One of the most efficient digital coloring techniques involves filling areas with flat colors quickly and cleanly, without affecting existing line art. The Fill tool is instrumental here. By simply tapping within enclosed line art, you can uniformly and evenly block in base colors.

Creating Smooth Gradients
The Gradient tool is another valuable asset for creating smooth color transitions. By dragging the tool across a desired area, you can achieve even and seamless gradients, ideal for skies, backgrounds, or subtle atmospheric effects.
Incorporating Texture and Pattern
Texture and pattern can significantly enhance the visual interest and dimension of your comic panels without demanding extensive drawing time. Clip Studio Paint allows you to import and apply texture images to various elements, such as a character's hair, clothing, or background. It's important to ensure these textures are blended seamlessly with your artwork to maintain a cohesive look.
Understanding Perspective for Believable Worlds
Accurate perspective is fundamental to creating believable and immersive scenes in comics and manga.
The Basics of Perspective
When depicting environments, understanding the basics of perspective is crucial. This involves creating a sense of depth and spatial relationship between objects. In some instances, the perspective might align with the character's eye level, creating a point-of-view effect that immerses the reader in the character's visual experience.
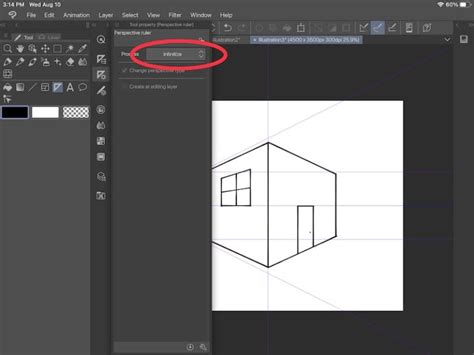
Tools for Accurate Perspective
Photo references and 3D models can greatly aid in understanding and drawing scenes with accurate perspectives. Clip Studio Paint further simplifies this with its perspective ruler. This tool allows you to establish vanishing points and draw precise guidelines, ensuring that your lines converge correctly and your scenes maintain structural integrity.
Advanced Techniques and Workflow Enhancements
As you progress, Clip Studio Paint offers a range of advanced tools and features to elevate your workflow and the quality of your artwork.
Utilizing 3D Models for Complex Scenes
3D character models and backgrounds are invaluable for arranging complex scenes or tackling difficult poses. They provide a solid foundation upon which you can build your artwork, ensuring accurate anatomy and spatial relationships.
The Power of Vector Layers
Vector layers are a game-changer for line art. Unlike raster layers, which are pixel-based, vector lines are mathematical paths. This means you can scale your line art up or down without any loss of quality or pixelation. Furthermore, vector lines can be easily adjusted and edited later in the process, offering immense flexibility.
Preparing Your Canvas for Print and Web
When preparing your artwork, understanding canvas settings is vital. For manga intended for printing, a typical size might be around 11x17 inches (standard B4 size in Japan). The resolution should be set to 300 dpi (dots per inch) for optimal print quality.
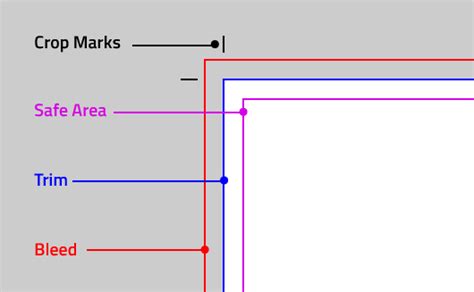
It's also important to understand the concepts of Bleed Area, Safe Area, and Trim Area. The bleed area provides extra space around the edges of your canvas to account for trimming during printing. The safe area is the crucial zone within which all important content, such as text and characters, must be placed to avoid being cut off. The trim area represents the final size of your page after it has been cut.
Understanding Expression Color: RGB vs. CMYK
The concept of "Expression Color" in Clip Studio Paint refers to the color mode of a file or layer. You can set each layer to be Monochrome, Gray, or Color.
- RGB is best suited for digital viewing, such as on screens and for web publication.
- CMYK is essential for printing, as it represents the color space used by most printing processes.
It's important to note that when converting from RGB to CMYK, colors may appear duller, as the CMYK color gamut is smaller than RGB.
Screen Tones: Adding Nuance and Texture
Screen tones are a traditional manga technique that has been effectively translated into digital workflows. They are patterns of dots or lines used to create shading, texture, and depth, offering a more nuanced alternative to solid black or gray fills.
- Dot Tones: The most common type, used for shading various parts of your manga.
- Line Tones: Employed to add texture or a different shading style.
- Gradation Tones: Provide smooth transitions from dark to light, useful for backgrounds or atmospheric effects.
Within Clip Studio Paint, you can access and create your own screen tones by adjusting parameters like frequency, density, and angle. Screen tones work best on raster layers because they are pixel-based, allowing for detailed application without distortion.
Applying Screen Tones Effectively
Beginner-friendly steps for applying screen tones include:
- Selecting a raster layer.
- Choosing the desired screen tone from the tool options.
- Using the "Bucket Fill" tool to quickly fill large areas with the selected tone.
- Employing Layer Masks to non-destructively erase or hide parts of the tone, allowing for precise control.
- Keeping Layers Organized by naming each layer is crucial, especially as your project grows, to easily adjust specific elements without affecting others.
Embracing the Digital Workflow: Efficiency and Professionalism
The transition from traditional to digital art, while potentially challenging, offers significant benefits in terms of efficiency and flexibility. Clip Studio Paint is designed to facilitate this transition and empower artists to produce high-quality work consistently.
The Importance of Efficiency for Professional Artists
As a professional manga artist, the ability to draw many pictures efficiently is as critical as drawing skill itself. A professional must be able to produce a large volume of high-quality pages within a given timeframe. Clip Studio Paint, with its array of tools and features, is instrumental in creating an environment that supports speed, efficiency, and the consistent delivery of high-quality work.
Exploring Clip Studio Paint's Modes: Simple vs. Studio
Clip Studio Paint offers two primary interface modes to cater to different user needs:
- Simple Mode: An intuitive and easy-to-use interface designed for beginners. It provides access to essential tools for drawing, brushes, and layers, allowing users to start drawing immediately.
- Studio Mode: This mode unlocks the full power of Clip Studio Paint, offering all available tools and features for creating illustrations, comics, and animations. It's ideal for users looking to delve deeper into the software's capabilities, including workspaces, vector tools, and advanced functionalities.
Both modes allow for drawing illustrations that emulate traditional materials, and users can experiment with various brushes and techniques. Simple Mode is a great starting point, while Studio Mode provides the comprehensive toolkit for professional-level work.
Beyond the Basics: Animation and Special Effects
Clip Studio Paint is not solely for static artwork; it also offers robust tools for animation.
Bringing Your Art to Life with Animation
The software supports a range of animation techniques, from basic keyframing to creating animated emotes and special effects. Tutorials cover animating blinking characters, creating dynamic lighting effects, and even animating natural phenomena like crackling electricity or a slow-burning campfire.
Creating Dynamic Scenes with Effect Lines
For action-packed comic pages, effect lines are essential for conveying speed, impact, and energy. Clip Studio Paint provides tools to create these dynamic visual elements, adding a professional polish to your action sequences.
Resources for Continued Learning
The journey of mastering Clip Studio Paint is ongoing, and a wealth of resources are available to support your learning:
Official and Community Tutorials
Clip Studio Paint's official website offers a range of tutorials, and the vast online community provides countless video guides and articles. Platforms like YouTube host numerous channels dedicated to Clip Studio Paint, covering everything from basic tool usage to advanced animation and specific stylistic techniques.
The Clip Studio Assets Library
The Clip Studio Assets library is an indispensable resource. It provides access to an enormous collection of brushes, textures, 3D models, and other materials created by users worldwide. These assets can significantly speed up your workflow and introduce you to new creative possibilities.
Learning from Professionals
Many professional artists share their workflows and techniques through tutorials and online courses. Learning how established creators approach their work, from storyboarding to final inking and coloring, can provide invaluable insights and inspiration. The Etherington Brothers, for example, offer a wealth of tutorials on various drawing subjects, from hands and wings to architecture and character design.
Conclusion: Your Creative Journey with Clip Studio Paint
Clip Studio Paint offers a comprehensive and powerful environment for digital artists looking to create comics, manga, webtoons, and animations. By familiarizing yourself with its diverse toolset, understanding fundamental art principles like light, shadow, and perspective, and leveraging the wealth of available resources, you can embark on a rewarding creative journey. The key lies in consistent practice, experimentation, and a willingness to explore the vast capabilities of this exceptional software. Remember, the "undo" button is your friend, and every artist, no matter how experienced, is continually learning and evolving.