Emulating the rich, textured feel of traditional oil painting within a digital environment presents a unique set of challenges and rewards. This tutorial delves into achieving a convincing oily dry brush effect in Clip Studio Paint, a versatile software favored by illustrators, comic artists, and animators. It is crucial to understand that no single "magic" brush can replicate the nuances of traditional media. Instead, a thoughtful combination of brush properties, application techniques, and an awareness of edge control are key to success.
The Mindset of Traditional Emulation
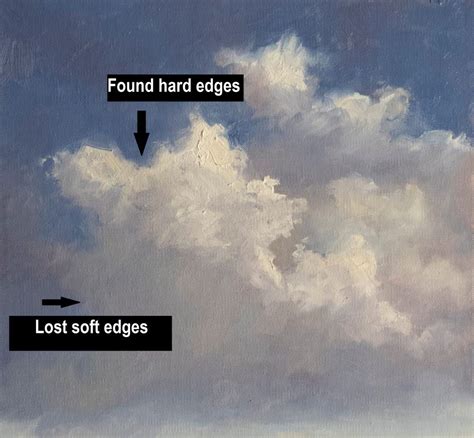
When aiming for a traditional look with digital tools, it's essential to shift away from the expectation of a singular, all-encompassing brush. Traditional oil painters utilize a diverse arsenal of tools - a variety of brush sizes, palette knives, and even rags - to achieve loose, painterly styles. For digital artists, this translates to seeking brushes that can effectively create two distinct types of edges: hard, or "found" edges, and soft, or "lost" edges.
In any given painting, the focal points, such as a character's face or a significant object, will typically exhibit a higher concentration of hard or found edges. Conversely, less important areas of the composition will feature a greater prevalence of soft or lost edges. This interplay between hard and soft edges is fundamental to guiding the viewer's eye and establishing depth and form within a digital artwork.
Essential Brush Selection and Customization
The journey to an oily dry brush effect begins with a curated selection of brushes. While some may be purchased from specialized creators, others can be effectively crafted within Clip Studio Paint itself. The goal is to find tools that mimic the behavior of physical bristles and paint, offering varied textures and blending capabilities.
The Foundation: Oil Paint Flat Brush
Clip Studio Paint comes equipped with a powerful built-in brush known as the "Oil paint flat brush." This brush is an excellent starting point due to its inherent blending capabilities right out of the box. For achieving a nuanced effect, it is often recommended to use this brush at approximately 90% opacity. At full opacity, it can render completely opaque strokes. However, at 90%, it allows for the creation of mid-tone transition colors that can be sampled and reused, facilitating a smooth transition between hard and soft edges.
Mimicking Bristle Variation: The Cat's Tongue Brush
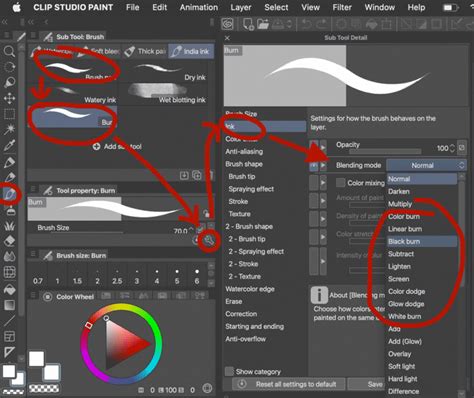
A highly effective customization of the "Oil paint flat brush" involves creating a "Cat's tongue" variant. This is achieved by duplicating the original brush and then tapering the front and back ends of the stroke. The key to this modification lies in the "brush size dynamics" setting within the sub tool details palette. By setting this to "pen pressure," the brush's size will dynamically respond to the pressure applied by the stylus, naturally creating the desired tapered effect. This allows for more organic and varied stroke endings, crucial for a dry brush feel.
Exploring Third-Party Brush Packs: Daub Brushes
For artists seeking a broader range of sophisticated tools, resources like www.daub-brushes.com offer an excellent collection of brushes specifically designed for Clip Studio Paint and Manga Studio. While their "super bundle" provides a vast array of options, it can be somewhat overwhelming for beginners. Focusing on a select few brushes from their collection can yield significant results.
One such brush is "Ink tapered raw," found within the inks and pigments folder. Despite its name, this brush is highly effective for achieving a traditional media brush effect. When used at 100% opacity, it closely resembles the "Cat's tongue" brush but possesses a distinct dry brush texture at the stroke's conclusion. This brush also exhibits excellent mixing properties, contributing to a more natural paint feel. Daub's brushes are often created using scans of natural media combined with watercolor paper textures, lending them an authentic traditional quality.
Custom Brush Creation: Flat Ribbon Variants
Creating custom brushes can further enhance the dry brush effect. The "Flat ribbon vertical" brush, for instance, is a self-made tool characterized by a vertical chisel that does not inherently follow the direction of the stroke. Its counterpart, "Flat ribbon," functions similarly but allows the brush tip's direction to align with the stroke's direction. The "Flat ribbon horizontal" offers a variation that produces distinct hard edges and a flat texture when drawing a downward stroke. For a softer touch, the "Flat ribbon soft" brush can be created by incorporating additional textures from the Clip Studio materials library.
The essence of these custom brushes lies in their ability to generate "unplanned, spontaneous edges," which are vital for a convincing dry brush look. When using a mouse with such brushes, Clip Studio Paint can be observed selecting different patterns from its loaded textures, applying them randomly. This inherent randomness contributes significantly to the organic, unpredictable nature of traditional media.
The Pigmento 10 Brush: A Specialized Tool
The "Pigmento 10" brush, also from the Daub set, offers a unique characteristic: it forces a shadow into the paint color. While it can be tempting to use this brush for direct painting, it can lead to a contamination of colors. As intermediate colors are picked up, the black shadow color can be incorporated, making it challenging to maintain pure and clean hues. A more effective approach for using "Pigmento 10" is at a low opacity, around 20%. This allows for subtle darkening and tonal variation without overwhelming the color palette.
Custom Brush Tips - Clip Studio Paint Quick Tip
The Theory of Edges: Lost and Found
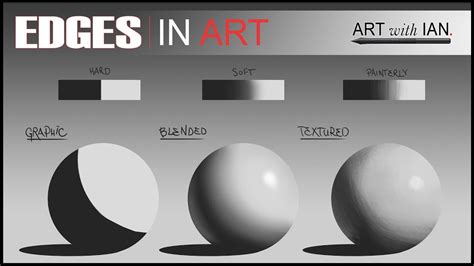
Understanding the concept of "lost" and "found" edges, also referred to as soft and hard edges, is paramount to mastering the oily dry brush effect. The transition between these edge types dictates the perceived form and focus within a digital painting.
Navigating Edge Transitions
Different methods exist for transitioning between hard and soft edges. Consider a scenario where gray undertones are laid at 60% opacity, followed by orange at 90% opacity, and then shadows are applied using the "Oil paint flat brush." This initial stage might result in a prevalence of hard-edged brush strokes with few "lost" edges.
To introduce softer transitions, one can then switch to a "lost edge" brush. By color picking from the existing image, artists can begin to find these transitions. For example, using the "Ink tapered raw" brush, a rough, lost edge stroke can be created. Subsequently, the "Oil paint flat brush" can be employed to refine and define hard edges where necessary. The direction of this process - whether starting with hard edges and moving to soft, or vice versa - is less important than the deliberate manipulation of these transitions.
Blending Tools for Softening
An alternative method for transforming a "found" edge into a "lost" edge involves utilizing blending tools. Clip Studio Paint offers a highly effective blender called "Soothing watercolor." This tool can be used to soften harsh lines and create smoother transitions, mimicking the way paint might blend on a physical canvas.
Integrating Blenders and Texturizers
For a more streamlined workflow, some artists prefer to integrate their favorite texture brushes into their blending tools. The "Bristle broom" brush from the Daub set, although found in the brush folder, can be moved to the blenders folder. This allows for quick access to this textural blender when the "J" key (the default shortcut for blenders) is pressed. This practice consolidates tools and enhances efficiency.
The process often culminates with a subtle application of a textural brush like the "Daub Pigmento" brush. Used sparingly, typically at 10% to 20% opacity, this brush can add final touches of texture and depth without overworking the edges.
Putting Theory into Practice: A Practical Approach
To solidify these techniques, it is beneficial to explore structured learning resources. For instance, a tutorial titled "Simple Dry Brush Technique" available on Gumroad.com/RubenLara offers a focused approach to this style. This resource emphasizes not only the use of a limited set of brushes but, more importantly, the underlying methodology and mindset required for achieving a traditional look with digital tools.
Reuben Lara, the creator of such tutorials, is a traditionally trained artist who leverages Clip Studio Paint and Adobe Photoshop. His work provides free training for beginner and intermediate artists through video tutorials, reviewing affordable and accessible tools, and imparting production-proven techniques honed over two decades in the design and illustration industry. His emphasis on understanding the "why" behind the techniques, rather than just the "how," is invaluable for developing a strong foundation in digital painting.
The pursuit of an oily dry brush effect in Clip Studio Paint is a journey of experimentation and understanding. By embracing the principles of edge control, thoughtfully selecting and customizing brushes, and adopting a mindset that respects the nuances of traditional media, artists can unlock a rich and expressive digital painting style. The key lies in the deliberate interplay of texture, opacity, and blending, allowing for a dynamic and engaging visual outcome.