Creating the illusion of torn paper in Photoshop can lend a striking, artistic, and often mysterious quality to your designs. Whether you're aiming for a vintage collage aesthetic, a dramatic artistic statement, or a subtle textural enhancement, understanding how to craft convincing torn edges is an invaluable skill. This tutorial will guide you through various techniques, from building the effect from scratch to leveraging pre-made assets, ensuring you can achieve a professional and compelling result.
Preparing Your Canvas and Initial Setup
Before diving into the specifics of the torn edges, it's crucial to set up your Photoshop document correctly. This often involves ensuring you have enough working space and a clear layer structure.
Begin by opening your chosen image in Photoshop. The first step is to duplicate the Background layer. Navigate to the "Layer" menu in the Menu Bar at the top of the screen, then select "New," and subsequently "Layer via Copy." Examining your Layers panel will reveal that your document now contains two layers.
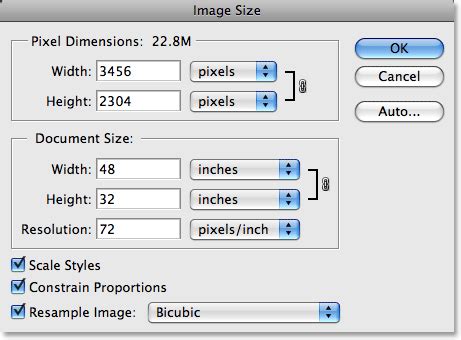
To provide yourself with more room to maneuver, it's beneficial to add a small amount of extra canvas space around your image. Access Photoshop's "Canvas Size" dialog box. You can add an extra 100 pixels around the image by entering '100' for both the Width and Height options in the center of the dialog box. Ensure that the measurement type is set to "pixels" for both. Crucially, make sure the "Relative" option is checked. This ensures that the extra space is added to your existing canvas. If "Relative" is unchecked, you would inadvertently change the canvas size to 100x100 pixels, which is not the desired outcome. Click "OK" to exit the "Canvas Size" dialog box. You will now observe extra space surrounding your image in the document window. This extra space will be trimmed away once the torn edges effect is complete.
Building the Torn Edge with the Eraser Tool
One fundamental method for creating torn edges involves meticulously using Photoshop's Eraser Tool. This approach offers a high degree of control and allows for natural-looking imperfections.
Normally, Photoshop adds new layers directly above the currently selected layer. However, by holding down the Ctrl (Windows) or Command (macOS) key as you click on the "New Layer" icon, you instruct Photoshop to add the new layer below the selected layer. This action will bring up Photoshop's "Fill" dialog box, which is used to fill a layer or a selection with color. Click "OK" to exit this dialog box. Photoshop will fill the new layer with white. You might not immediately see this new layer in the document window because the image on the layer above it ("Layer 1") is blocking it from view.
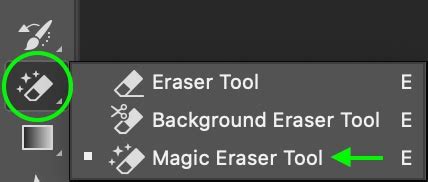
It's now time to begin creating the torn edges effect. Ensure you are working on the correct layer. At this moment, "Layer 2" should be selected, indicated by it being highlighted in blue in the Layers panel. Select Photoshop's Eraser Tool from the Tools panel. A key aspect of using the Eraser Tool is that you can utilize any of Photoshop's brushes with it, just as you would with the actual Brush Tool. This opens the Brushes panel. Click on the menu icon in the top right corner of the Brushes panel to reveal a list of menu options. For instance, if you are using Photoshop CS4, the menu icon appears as a small arrow. This action changes how brushes are displayed in the Brushes panel, making it easier to identify the specific brush you intend to select.
Let's start by creating the initial torn edges effect along the left side of the image. The term "initial" is used because after working around the entire image once, you will repeat the process a second time for enhanced realism.
Position the Eraser Tool in the top left corner of the document. Ensure that only about 25-30% of the brush extends into the image itself. The remainder of the brush should be positioned outside the image, within the white space that was added earlier in the tutorial. Click once, and with your mouse button still held down, drag a short brush stroke downwards along the upper left edge of the image. As observed, the initial brush stroke may not completely remove the original straight edge; a faint part of it might remain visible due to the specific shape of the bristle brush being used.
Continue working your way down the left side of the image by clicking and dragging out short brush strokes. Always maintain 70-75% of the brush shape outside the image, in the white area, to avoid erasing too much of the edge. If you find that the default brush size is too large for your image, you can adjust it on the fly using the left and right bracket keys ([ and ]). Once you reach the bottom left corner of the photo, continue moving around the rest of the image until you return to the top left corner where you began.
Adding Depth and Dimension with Layer Styles
To give the torn paper a sense of realism and depth, applying layer styles is essential. These styles can simulate shadows, highlights, and textures that make the torn edge appear three-dimensional.
Now that you have established the initial torn edges effect, it's necessary to create a duplicate of the layer. With "Layer 1" selected in the Layers panel, press Ctrl+J (Windows) or Command+J (macOS) to quickly duplicate it. You will now have a copy of the layer, appropriately named "Layer 1 copy," at the top of your Layers panel.
This action will bring up Photoshop's Layer Style dialog box, set to the "Color Overlay" options in the middle column. By default, Photoshop sets the color of the overlay to red, and your photo will suddenly appear filled with red in the document window. Photoshop's Color Picker will then appear. Choose a light gray from the Color Picker and click "OK" to exit it. Do not close the Layer Style dialog box just yet, as there are more layer styles to add.
Click directly on the words "Inner Glow" on the left side of the dialog box. Avoid simply clicking inside the checkbox to the left of the words. The "Inner Glow" options will now appear in the center of the Layer Style dialog box. First, to change the style from a glow to a shadow, alter the "Blend Mode" option at the top of the dialog box from "Screen" to "Multiply." Then, click on the small color swatch directly below the word "Noise" to change the color of the style. By default, this is set to yellow. When you click on the color swatch, Photoshop's Color Picker will appear, similar to when you changed the color of the "Color Overlay" style previously. Lower the "Opacity" down to around 10% so that the shadow appears very subtle.
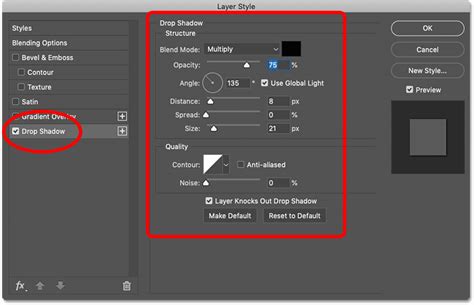
Next, click directly on the words "Drop Shadow" at the top of the list of layer styles on the left of the dialog box. The "Drop Shadow" options will appear in the center column of the Layer Style dialog box. Lower the "Opacity" of the shadow down to around 30% so it is much less intense than the default opacity setting of 75%. Click "OK" when you are finished to exit the Layer Style dialog box.
Refining the Torn Edges and Adding Texture
With the foundational torn edges in place and depth added, the next steps involve refining the appearance and incorporating realistic paper textures.
Click on the top layer in the Layers panel ("Layer 1 copy") to select it. Then, click on the layer visibility icon on the left of the layer to turn the layer back on, making it visible again within the document window. With the top layer selected, return to the edges of the image using the Eraser Tool with short brush strokes, just as you did initially on "Layer 1." This will remove more of the edge. Remember to keep most of the brush shape outside of the image so that no more than 25-30% of it extends into the image. Again, you can change the brush size if needed by pressing the left bracket key ([) to make it smaller or the right bracket key (]) to make it larger.
This action will bring up the "Trim" dialog box. Select the "Top Left Pixel Color" option. Since the pixel in the top left corner of the document is white, Photoshop will trim away all of the white area surrounding the image.
To further enhance the realism, you can introduce a paper texture. Drag the paper texture image from your desktop to your open document. Then, drag this new layer so that it is positioned just above the "Paper edge" layer (or its equivalent in your layer stack).
Alternative Techniques and Advanced Customization
While the Eraser Tool method is effective, Photoshop offers other avenues to achieve torn edges, including using selections, warp transforms, and pre-made assets.
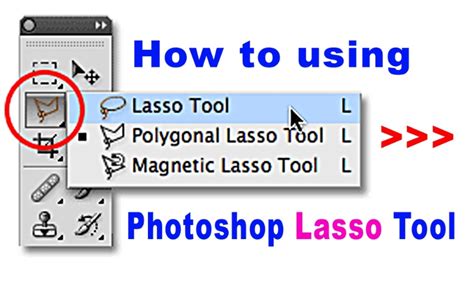
For instance, artist Lidia Lukianova likes to incorporate a layer of mystery into her work. She used the Lasso (L) tool to draw the jagged edge of ripped paper across a modelâs face. With the "Paper edge" layer selected, she then used Ctrl+click (Windows) or Command+click (macOS) on the mask of the "Model" layer to create a selection. Lukianova deselected the "Paper edge" layer by holding Control+D (Windows) or Command+D (macOS), then dragged it below the "Model" layer.
Continuing with Lukianova's approach, while still on the "Paper edge" layer, she selected the Warp tool (Edit > Transform > Warp). She then dragged the top handles to customize the shape of the ripped edge, making it appear less uniform and more natural. To add the appearance of dimension to the torn paper, Lukianova double-clicked the "Paper edge" layer to open the Layer Style dialog, where she could apply effects similar to those described earlier.
Another method involves leveraging filters and transformations. After creating your initial torn edge (perhaps with the Eraser Tool or a selection), you might apply a Gaussian Blur (Filter > Blur > Gaussian Blur) to soften the edges slightly. Subsequently, using the Filter Gallery, specifically the "Cutout" effect under the "Artistic" tab, can further enhance the paper-like texture. Transform tools (Ctrl+T or Command+T) with slight adjustments to width and height (e.g., 101% width, 99% height) can also introduce subtle distortions that mimic natural tearing.
Utilizing Pre-made Templates and Brushes
For those seeking efficiency or a different stylistic approach, pre-made templates and brushes offer excellent solutions.
Photoshop effects for creating a torn paper effect to achieve a collage look are readily available. You can utilize any number of pre-made brushes, Photoshop's default brushes, or even real paper torn edges. The advantage of using pre-made elements is that they often come with intricate details and textures already built-in, saving significant time.
Consider exploring resources like Envato Elements for "Paper Torn & Burn Photo Templates." These templates often incorporate realistic torn and burning effects suitable for designs like band posters or photo album layouts. Similarly, "Instant Films Collage Mockups" can provide a vintage, Polaroid-like frame with torn edges, offering a customizable template with multiple background options. For a more minimalist aesthetic, "Modern Photo Collage Templates" combine torn and tape effects. If a sentimental touch is desired, a "Photograph Collage Scrapbook Theme" might be ideal, featuring earthy tones and scrapbook-style borders. Finally, "Elegant Photo Collage Cards" offer a clean and refined way to present collages with a fashionable combination of earth tones and neutral hues.
Torn Paper Effect | Photoshop Tutorial | 2 Minutes Tutorial
These templates often utilize smart objects and layer masks, making them highly customizable. You can easily replace placeholder images and adjust colors to fit your specific project needs. When working with templates, always ensure you understand how the layers are organized and how to effectively modify them to achieve your desired outcome.
Creating a Collage with Torn Edges
The torn edges effect is a cornerstone of creating compelling photo collages. The process involves layering images and meticulously masking them to simulate ripped paper.
To begin creating a collage in Photoshop, open your first photo, then open your second photo. Create a New Document (File > New Document). Bring both photos into your new document. It is highly recommended to convert both photos to Smart Objects. To do this, press and hold Control (Windows) or Command (macOS) while clicking the layer name to open the sub-menu, then select "Convert to Smart Object."
Decrease the opacity of the top layer to 50%. Now, align the two photos so that the subject's face, for example, is the same size on both layers. Using the Free Transform Tool (Command-T or Ctrl-T), resize the top layer as needed.
To add a worn, torn photo edges effect, open an image of a torn piece of paper. Bring this torn paper image into your working file, placing it on top of your photo layers. Position the edge of the torn paper approximately where you desire the torn edge to appear. Don't worry about precise placement initially. Select the top photo layer. Now that you can visualize where the rip is appearing, this is the opportune moment to make any necessary adjustments to align the two portraits as accurately as possible.
Next, you will need to create a selection of the ripped paper edge. Command-click (macOS) or Control-click (Windows) the torn paper layer. Create a Layer Mask on the top photo layer. You can then click and drag your cursor around to introduce asymmetry to the rip. If the source image of the torn paper edge has an undesirable hue, you can desaturate it. Select the torn paper layer and create a Hue/Saturation Adjustment (Command-H or Ctrl-H). To sharpen the paper's texture, go to Filter > Sharpen > Unsharp Mask.
By combining these techniques, you can craft sophisticated and visually engaging torn edge effects in Photoshop, transforming ordinary images into artistic statements.