While Adobe InDesign stands as a powerhouse for print and editorial design, its native capabilities for intricate typography manipulation, particularly text warping, are notably more constrained than those found in companion applications like Adobe Illustrator or Photoshop. InDesign excels at layout and text flow, but for advanced stylistic distortions such as warping text into arcs, waves, or custom shapes, users often need to look beyond its immediate toolkit. This guide will explore the methods available for achieving text warping effects within an InDesign workflow, primarily by leveraging the strengths of other Adobe Creative Cloud applications and understanding InDesign's own text wrapping features.
The Limitations of InDesign for Text Warping
Adobe InDesign is an amazing platform for print and editorial design, but incorporating elements and features from Illustrator can elevate your layout to an entire visually appealing level. When working with typography effects, there are limitations in Adobe InDesign. For instance, you aren't able to warp text - or add any other distortion feature to type much like you would in Illustrator or even Photoshop. This means that the direct application of familiar tools like "Arc," "Wave," or "Distort" found in other Adobe programs is not a built-in function for text objects within InDesign itself. The absence of these direct warping tools necessitates a workaround for designers aiming to integrate such dynamic typographic elements into their InDesign layouts.
Leveraging Illustrator for Advanced Text Warping
The most common and effective strategy for incorporating warped text into an InDesign project involves creating the warp effect in Adobe Illustrator, a program far more adept at such manipulations. This approach allows for a high degree of creative control over the text's distortion.
Creating Warped Text in Illustrator
To begin, create a document in Illustrator with dimensions similar to your InDesign layout. This preparatory step is crucial for accurately visualizing how the warped text will integrate into the overall design before transferring it.
- Type Your Text: Select the Type Tool (T) in Illustrator and click on your artboard to type the desired text.
- Format the Typeface: Utilize the Properties panel to format the typeface, size, and color. For example, Gotham Black, 100 pt, and black are suitable choices for demonstration.
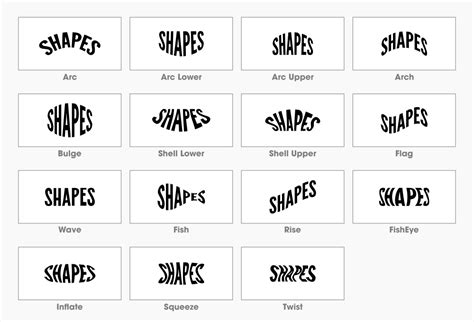
- Apply the Warp Effect: With the text frame selected using the Selection Tool (V), navigate to
Effect > Warp. Here, you will find various pre-set warp styles. For a wave effect, select "Wave."- Wave Settings: Focus on the four main settings: the wave type, the "Bend" slider for controlling the intensity of the curve, and the "Horizontal" and "Vertical Distortion" sliders for fine-tuning the distortion along each axis. Experiment with these until you achieve the desired look.
- Confirm the Effect: Click "OK" once you are satisfied with the warp effect.
How To Warp Text Into Shapes | Adobe Illustrator Tutorial
Transferring Warped Text to InDesign
Once the text is warped in Illustrator, there are a couple of efficient methods for transferring it to your InDesign project:
- Using CC Libraries: Drag and drop the warped text object into your Creative Cloud Library. It is important to hold down the Command key while dragging to ensure that the warp effect and its formatting are preserved. Without this step, Illustrator might only save the typeface itself, not the applied distortion.
- Exporting as a PNG with Transparency: Alternatively, you can export the warped text as a PNG file with a transparent background. Go to
File > Export > Export As...and select PNG as the file format. Ensure the "Transparent" option is checked. This method is often the most robust for maintaining the visual integrity of the warped text within InDesign.
When adding distorted text from Illustrator to InDesign, the most efficient way is to save it as an image. So keeping a master file in Illustrator for the editable text - in case you ever want to go back to make changes - is a good idea.
Alternative Method: Text on a Path in InDesign
While InDesign doesn't offer direct warp filters, it does allow you to place text along a custom path. This method provides a degree of warping, particularly for creating curved or arced text.
Creating and Applying Text to a Path
- Draw a Path: Use the Pen Tool (P) to draw a custom path on your InDesign canvas. Click to create anchor points, and drag to create curved lines. You can also use existing shapes as paths.
- Apply Text to the Path: Select the Type on a Path Tool. Click on the path you have created. The cursor will change to indicate that text can now be applied.
- Type Your Text: Begin typing your text. It will flow along the path you’ve defined.
- Adjust Text and Path: You can edit the text as needed. To remove the visible stroke of the path, select the path with the Direct Selection Tool (A) and set the stroke color to "None."
This process allows text to follow the contour of any shape, effectively creating a warp. For instance, you can wrap text around any object, including text frames, imported images, and objects you draw in InDesign.
Advanced Distortion: Outlining Text in InDesign
For more granular control over text distortion within InDesign, you can convert text to outlines. This transforms the editable text into a series of vector paths that can be manipulated directly.
Converting Text to Outlines
- Create Text: Use the Type Tool (T) to add your text to the InDesign canvas.
- Select Text: Select the text frame using the Selection Tool (V).
- Create Outlines: Go to
Type > Create Outlines. This action converts each character into a compound path. - Manipulate Outlines: Activate the Direct Selection Tool (A). You can now click on individual anchor points of the outlined characters and drag them to warp the text in various directions. Holding Shift allows you to select multiple anchor points simultaneously for more complex distortions.
This method offers a manual approach to warping, akin to the "makeshift solution" described, where you are essentially manipulating the vector points of each letter. The simplest formula is skew, which moves the point horizontally based on its vertical position (relative to the polygon's geometricBounds) or vice versa. A circle formula unlocks various arch/arc and bulge/inflate/squeeze warpings. In my testing so far, this process takes a negligible amount of time to complete for reasonably complex polygons. The main issue is that each pathPoint generates three history states.
Understanding InDesign's Text Wrap Feature
While not a direct text warping tool, InDesign's "Text Wrap" feature is essential for controlling how text interacts with objects. When you apply a text wrap to an object, InDesign creates a boundary around it that repels text, forcing it to flow around the object's contours.
Applying and Configuring Text Wraps
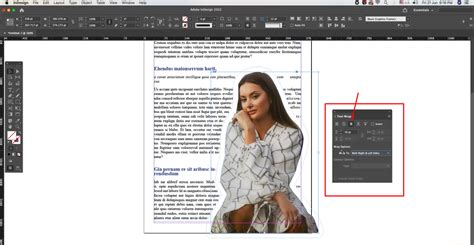
- Select the Wrap Object: Choose the object (text frame, image, or drawn shape) around which you want the text to wrap.
- Access Text Wrap Panel: Go to
Window > Text Wrap. - Choose a Wrap Style: In the Text Wrap panel, select one of the preset wrap styles. You can choose to wrap around the bounding box of the object or create a custom contour.
- Customize the Wrap:
- Offset Values: Specify offset values to control the distance between the text and the wrap object.
- Contour Options: For more precise wrapping around image subjects, InDesign offers options like "Select Subject" (which uses Adobe Sensei to detect the subject) or the ability to generate boundaries from Photoshop Paths saved with an image.
- Wrap To Menu: This menu allows you to specify whether the wrap is applied to a specific side (such as the right side or largest area), or toward or away from the spine in a facing-pages layout.
- Options: Further options include "Jump Object," which moves wrapped text to the next available leading increment below a text-wrapped object, ensuring text alignment across columns.
The object that text wraps around is called the wrap object. You can wrap text around the contours of a subject directly in InDesign without having to use Alpha Channels or Photoshop paths. In the Contour Options section, choose Type > Select Subject. To add or delete anchor points, use the Pen tool. To select or move anchor points, use the Direct Selection tool.
Advanced Text Wrap Scenarios
- Graphic Frame: Generates the boundary from the container frame.
- Same As Clipping: Generates the boundary from the imported image’s clipping path.
- Photoshop Path: Generates the boundary from a path saved with the image. If this option isn’t available, no named paths were saved with the image.
- Apply To Parent Page Only: If this option is selected, you must override a parent page item on a document page to wrap text around it.
The Direct Selection tool is crucial for fine-tuning the wrap boundary when using custom paths or after using "Select Subject." When an object has a text wrap applied to it, the text will flow around its defined boundary.
In conclusion, while direct text warping is not an inherent feature of Adobe InDesign, creative professionals can achieve sophisticated warped text effects by collaborating with Illustrator, utilizing InDesign's "Text on a Path" functionality, converting text to outlines for manual manipulation, or employing the robust text wrap features to control text flow around objects. Each method offers a different approach to enhancing typographic design within the InDesign environment.