Camera shake and micro-jitters are persistent challenges in modern filmmaking. As consumer and prosumer cameras have become smaller and lighter since the 2000s, their reduced mass makes them more susceptible to user-induced motion. While action-packed sequences might leverage camera shake for a dynamic feel, for most standard content, it can detract from professionalism. Fortunately, DaVinci Resolve offers robust stabilization tools to counteract these unwanted movements. This tutorial explores the various methods and settings within DaVinci Resolve to achieve smooth, polished footage.
Understanding the Fundamentals of Stabilization
Before diving into the technical aspects, it's crucial to grasp two key principles regarding video stabilization:
Stabilization is Not a Panacea: DaVinci Resolve's stabilization tools are designed to smooth out minor unwanted movements or remove judder from shots intended to be steady. They are not a magic fix for extremely shaky footage. If you've been running with a handheld mirrorless camera, stabilization will not suddenly transform your footage into a gimbal-smooth shot. The effectiveness is directly proportional to the initial quality of the footage.
Shoot Wider for Post-Production Stabilization: If you anticipate needing stabilization during post-production, it's a wise strategy to frame your shots a little wider than you might otherwise. Stabilization inherently crops into your footage to correct motion. Providing extra room in your frame helps preserve your final composition and avoids awkward cropping. Additionally, consider practicing handheld camera techniques that minimize bouncing motion, such as those detailed in tutorials on walking with a camera. Pairing these techniques with editing software stabilization yields significantly better results.
Stabilizing Footage on the Edit Page
The Edit page offers an intuitive and efficient way to stabilize your video clips.
Accessing the Stabilization Tools
- Select Your Clip: In the timeline, highlight the clip you wish to stabilize.
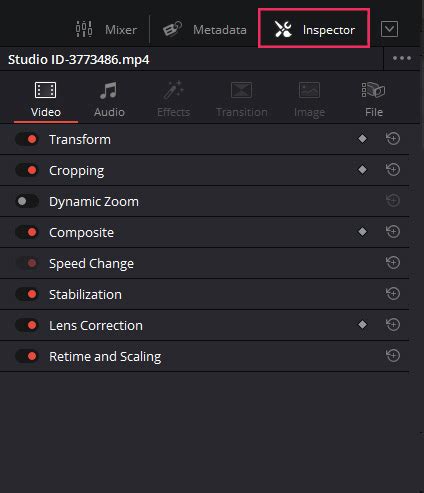
- Open the Inspector: Navigate to the top right of the interface and open the Inspector window.
- Locate Stabilization: Halfway down on the right-hand side, you will find the "Stabilization" section. Click to expand its menu.
- Enable Stabilization: Click the "Stabilize" button to initiate the analysis and stabilization process.
DaVinci Resolve will then analyze the footage to understand its movement patterns and begin the stabilization process. It's important to reiterate that this process primarily addresses handheld motion and shakes. It won't necessarily make a shot with a visible bounce, like someone walking, appear as if it was filmed with a dolly or gimbal. The preparatory tips mentioned earlier play a significant role in ensuring the stabilization tool functions optimally.
Fine-Tuning Stabilization with Parameters
While Resolve's default settings often yield good results, some footage may require adjustments to prevent undesirable artifacts like "jello" - a wobbly, distorted visual artifact where parts of the image bend or ripple unnaturally.
Stabilization Mode Options
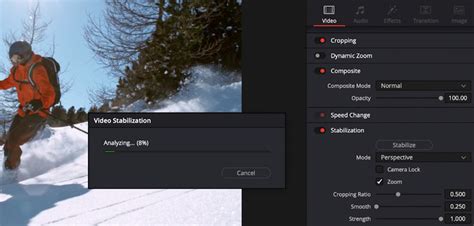
Within the stabilization menu, three modes dictate how the stabilization is processed:
- Perspective: This is the default mode. It analyzes pan, tilt, zoom, and rotation to stabilize the video while meticulously maintaining the original perspective. This mode is generally best when the camera experienced physical movement.
- Similarity: If you encounter unwanted "jello" motion artifacts with the Perspective mode, try switching to Similarity. This mode manipulates the footage to actively cancel out the jello effect.
- Translation: If the unwanted motion is primarily limited to pan and tilt jitters, Translation is the ideal choice. This mode is best suited for small, linear movements.
Additional Settings and Parameters
Beneath the "Mode" dropdown, you'll find checkboxes and sliders for further refinement:
Checkboxes:
- Camera Lock: Selecting this option aims to remove all motion from the shot, effectively simulating the use of a tripod for an entirely static shot.
- Zoom: This setting instructs DaVinci Resolve that it is permissible to zoom into the shot to conceal movement near the edges of the frame. It's recommended to leave this ON by default, unless a visual effects artist requires the entire frame for specific compositing tasks.
Sliders:
- Cropping Ratio: Directly linked to the "Zoom" function, this slider determines how much of the footage is acceptable to crop once stabilization is applied.
- Smooth: This slider allows you to further smooth the motion, aiming for a more gimbal-like feel rather than a purely natural handheld movement.
- Strength: This parameter controls the overall intensity of the stabilization. It's useful for retaining slight handheld motion while still cleaning up jitteriness.
Achieving optimal results often involves a degree of trial and error, adjusting each setting incrementally until the desired outcome is met for your specific clip.
Stabilizing Footage on the Color Page
For those who prefer to work within the color grading environment, DaVinci Resolve also offers stabilization tools directly on the Color page.
Accessing Stabilization on the Color Page
- Navigate to the Color Page: Select the Color page tab at the bottom of the Resolve interface.
- Locate the Tracker Panel: In the center column, find the Tracker panel. This is the same panel typically used for tracking Power Windows.
- Activate Stabilization Tools: Click the camera icon with a wobble effect. This action will reveal the stabilization tools within the Tracker panel.
The stabilization modes, parameters, and functions available on the Color page are identical to those found on the Edit page. The reason for this redundancy stems from DaVinci Resolve's origins as a dedicated color grading tool. As the Edit page has evolved into a more comprehensive part of the software, retaining these tools on the Color page ensures continuity for artists who primarily work within that environment.
Workflow Considerations: Avoiding Overwrites
A critical point to remember when applying stabilization on the Edit page and then proceeding to grade on the Color page is the potential for pre-made color grades to overwrite stabilization parameters. Stabilization is directly tied to the clip, not to a specific node.
To circumvent this issue:
- Enter Keyframe Timeline Mode: Go to
Mark > Keyframe Timeline Mode. - Change to Color Mode: Switch the mode from "All" to "Color." This ensures that stabilization data applied in the Edit page is preserved when copying or applying grades.
If you are already deeply involved in the grading process, handling stabilization directly on the Color page might be a more logical workflow.
Alternative Stabilization Methods and Advanced Techniques
The Cut Page for Quick Stabilization
For swift stabilization needs on less complex shots, the Cut page provides a simplified approach:
- Display Tools: On the Cut page, select the clip to be stabilized and click the icon with three sliders to display the "Tools" panel.
- Apply Stabilization: Choose a stabilization mode and click the "Stabilize" button. This method is efficient for quick fixes when intricate control isn't paramount.
Leveraging Boris FX Mocha Pro for Advanced Stabilization
For shots that present significant tracking challenges or require a higher degree of control, third-party plugins like Boris FX Mocha Pro offer advanced planar motion tracking and stabilization capabilities.
Using Mocha Pro for Stabilization
- Launch Mocha Pro: Apply the Mocha Pro plugin to your clip within DaVinci Resolve and launch the Mocha Pro UI.
- Track Your Footage: Identify stable background elements within your footage (e.g., buildings, floor textures) and use Mocha Pro's x-spline tools to draw shapes around them. Align the surface and grid to your chosen tracking object. Mocha Pro can track translation, scale, rotation, shear, and perspective. Initiate the tracking process by clicking "Track Forward" or "Track Backward."
- Utilize the Stabilization Module: In Mocha Pro's "Classic" mode, access the "Stabilize" module. Here, you can select the specific motion you wish to stabilize, including X/Y translation, rotation, zoom, shear, and perspective. Options like "Maximum Smooth" can lock the image, or you can define a range of frames for smoothing.
- Manage Borders and Fill: The "Borders" tab allows you to enable "Center," "Zoom," and "Apply Crop" to manage black areas resulting from stabilization. The "AutoFill" tab can intelligently fill these regions by sampling pixels from adjacent frames using the tracking data.
- Render the Stabilized Footage: Render the stabilized clip within Mocha Pro. If using the plugin version, return to DaVinci Resolve, open the Inspector, and under the Mocha Pro settings, select "Stabilize" from the module dropdown and enable "Render."
Mocha Pro's sophisticated tracking capabilities provide granular control, making it an invaluable tool for complex stabilization tasks.
Optimizing Footage for Stabilization: Pre- and Post-Shoot Considerations
The quality of stabilization is intrinsically linked to the source material. Optimizing your footage, both before and after shooting, can significantly enhance the results.
Pre-Shoot Optimization
As an editor, providing the cleanest possible footage for stabilization is paramount. Recommend these measures to the production team:
- Higher Video Resolutions: Shooting at higher resolutions provides more pixel data, which is beneficial as digital stabilization requires some cropping.
- Higher Frame Rates: More frames per second mean smoother transitions between stabilized frames, making the software's job easier.
- Specialized Camera Mounts: Employing gimbals, steadycams, or other stabilization mounts whenever possible is the most effective first step.
- Wider Lenses and Deeper Focus: Shooting slightly wider allows for more cropping without compromising the composition. A deeper focus ensures more of the scene remains sharp.
- Minimize Grain and Noise: High levels of grain or noise can become more apparent and distracting when footage is zoomed in during stabilization.
- Avoid In-Camera Effects: Effects like lens flares can appear to jump unnaturally when stabilized.
- Global Shutter Cameras: While not always feasible, global shutter cameras can help mitigate the "rolling shutter" effect, which causes frames to appear wobbly.
Post-Shoot Assessment
Once footage arrives, carefully assess which shots genuinely require stabilization:
- Necessity: Does the shot truly need stabilization, or will it appear amateurish if not handled correctly?
- Narrative Importance: How crucial is the shot to the story? Will it make the final cut?
- Aesthetic Fit: Does the shot's movement align with the project's overall visual style?
- Alternatives: Are there less shaky alternative takes that could be used?
- Scope of Stabilization: Does the entire clip need stabilization, or only specific sections?
DaVinci Resolve Stabilization Modes Explained
DaVinci Resolve offers three primary stabilization modes, each employing different algorithms to address various types of camera movement. Understanding their nuances is key to selecting the most appropriate one for your footage.
Translation Mode
- Functionality: This is the simplest and least aggressive mode. It exclusively analyzes pan and tilt movements, compensating for horizontal and vertical camera shifts.
- Strengths: It rarely produces disorienting perspectival distortions because it doesn't analyze zoom or make yaw, pitch, and roll adjustments.
- Limitations: It may be insufficient for smoothing out more violent camera shakes and can sometimes introduce jarring movements of its own if not carefully managed.
Similarity Mode
- Functionality: This mode is more sophisticated than Translation. In addition to pan and tilt analysis, it incorporates zoom and rotation parameters into its calculations.
- Strengths: It can compensate for more complex jitters than the Translation mode.
- Limitations: Due to its more intricate analysis, it has a higher potential to introduce artefacts and distortions.
Perspective Mode
- Functionality: This is the most complex stabilization mode available in Resolve. It analyzes pan, tilt, zoom, rotation, and also accounts for complex perspectival changes. These changes can arise from unconventional camera handling or movement.
- Strengths: It offers the most comprehensive stabilization, capable of addressing a wide range of motion issues.
- Limitations: Its complexity means it has the highest potential for creating noticeable artefacts and distortions if not applied judiciously.
Stabilization Modes Explanation & Comparison in DaVinci Resolve
Achieving the Best Results: Trial and Error and Workflow Strategies
Ultimately, the most effective way to master stabilization in DaVinci Resolve is through practice and a willingness to experiment.
- Iterative Adjustments: After selecting a stabilization mode, fine-tune the parameters like Cropping Ratio, Smooth, and Strength. Review the stabilized footage, and if necessary, make further adjustments. This trial-and-error process is crucial for achieving the best outcome for each unique clip.
- The Trade-off: Remember that increased smoothness often comes at the cost of potential distortion or image deterioration. Starting with the cleanest possible footage and shots that require minimal stabilization will always yield superior results.
- RAW Footage Workflow: For those working with RAW footage, it's important to note that Resolve's grading tools operate on the debayered RGB data, not the raw sensor data itself. If you need to leverage Premiere Pro's Warp Stabilizer for its perceived ease of use, consider grading your RAW footage in Resolve, exporting it as a high-quality intermediate codec (like ProRes HQ or DNxHR), and then stabilizing in Premiere. This workflow preserves the benefits of RAW grading while utilizing Premiere's stabilization. Alternatively, you can export an AAF roundtrip to Premiere. The optimal workflow depends on your specific delivery requirements.
DaVinci Resolve's stabilization tools, whether accessed on the Edit page, Color page, or Cut page, are powerful assets for any video editor. By understanding their capabilities, employing best practices during filming, and embracing an iterative approach to fine-tuning, you can transform shaky footage into polished, professional-looking content.
tags: #color #stabilizer #effect #davinci #resolve