Procreate has firmly established itself as a powerhouse for digital artists, offering an expansive toolkit for illustration, photo editing, and graphic composition. At the heart of its creative prowess lies a sophisticated brush system, allowing for unparalleled customization and the creation of entirely new artistic tools. This guide delves into the intricacies of Procreate brushes, from understanding the fundamental settings to crafting unique textures and behaviors that can elevate your digital artwork.
Navigating the Brush Studio: Your Gateway to Customization
The Brush Studio is the central hub for all brush-related modifications and creations within Procreate. It offers two primary approaches: either dive in with a clear vision of the brush you wish to create, meticulously adjusting settings until your goal is achieved, or enter the studio to refine an existing brush. To edit a brush, a simple double-tap on its icon will grant access to the Brush Studio.
Once inside, the left-hand menu serves as your control panel, presenting a myriad of attributes that can be tweaked. These attributes encompass the fundamental aspects of your brush, from its visual appearance to its dynamic behavior. Tapping on any attribute will reveal a submenu of adjustable settings, each designed to offer granular control over the brush's output.
Sculpting Your Brush: Shape, Grain, and Stroke Path
The foundational elements of any brush lie in its Shape and Grain. The Shape defines the silhouette of your brush tip, while the Grain dictates the texture that fills that shape. Procreate allows you to import custom shapes and grains, opening up a universe of possibilities for unique textures. You can adjust the scale, rotation, and even the jitter of both the shape and grain to create organic or highly stylized effects.
The Stroke Path attribute controls how the brush is applied as you draw. Here, you can influence the spacing between individual stamp instances of your brush shape, dictating whether you achieve a smooth, continuous line or a stippled effect. The Taper setting within Stroke Path is particularly powerful, allowing you to define how the brush's thickness changes along the stroke. You can create strokes that start thin, build to full thickness, and then taper off again, mimicking the natural flow of traditional media or creating dynamic digital effects.
Unleashing Dynamic Behavior: Pressure, Tilt, and Barrel Roll
Procreate's integration with the Apple Pencil unlocks a new dimension of brush control through its Dynamics settings. These attributes allow your brush to respond dynamically to your drawing input, creating a more organic and expressive experience.
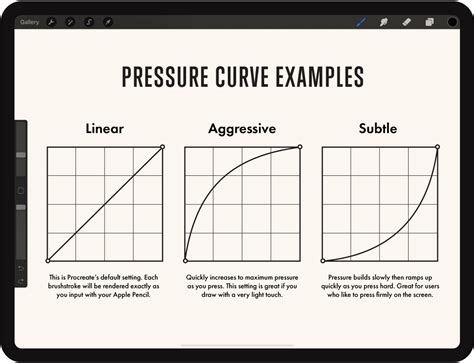
Pressure sensitivity is arguably the most fundamental dynamic. By adjusting the pressure curve, you can dictate how the brush's opacity, size, or any other assignable setting changes in response to how hard you press the Apple Pencil onto the screen. A straight diagonal line represents a linear response, while custom curves can create subtle or dramatic shifts in brush behavior. You can add up to four extra points to a default two-point curve, allowing for highly nuanced control.
Tilt allows your brush to react to the angle at which you hold the Apple Pencil. This can be used to simulate the broad strokes of a calligraphy pen or the varied marks of a chisel-tip marker. By toggling on the Tilt setting, you can adjust the angle at which a specific brush attribute is affected, offering further control over your brush's appearance based on its orientation.
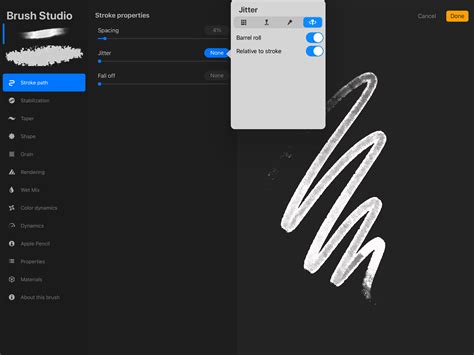
For users of the Apple Pencil Pro, Barrel Roll introduces another layer of dynamic control. This setting allows the brush to respond to the rotation of the Apple Pencil around its axis. The "Relative to stroke" toggle ensures that the stroke's shape starts in a consistent position, regardless of the pencil's initial orientation. This can be particularly useful for creating consistent textures or directional strokes.
The Art of Wet Media: Wet Mix and Color Dynamics
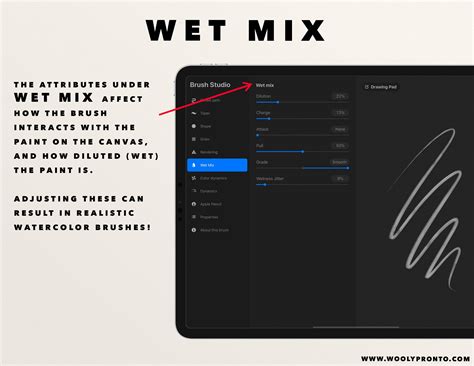
For artists seeking to emulate the fluid and unpredictable nature of traditional paints, Procreate's Wet Mix attributes are indispensable. These settings allow you to simulate behaviors like pigment accumulation, blending, and drying, offering a realistic digital approximation of wet media. You can control the wetness of the brush, the amount of paint it carries, and how it interacts with existing colors on the canvas.
Beyond physical media emulation, Color Dynamics opens up possibilities unique to the digital realm. This attribute enables brushes that can introduce color variations into your strokes, ranging from subtle shifts to vibrant, randomized color changes. This can be used to create painterly effects, add depth to your artwork, or achieve otherworldly color blends that would be impossible with traditional tools.
Advanced Settings and the Drawing Pad: Precision and Preview
Every slider within the Brush Studio offers a numerical value field that doubles as a gateway to Advanced Brush Settings. Tapping this numerical value reveals a panel where you can input precise numbers for greater control, or even use Apple Pencil's Scribble feature to input values. This advanced panel can house up to four distinct settings: Numeric, Pressure, Tilt, and Barrel Roll.
The Numeric setting provides a more precise way to assign a value than simply dragging a slider. The Pressure Curve and Tilt Angle settings, as described earlier, allow for dynamic input mapping.
The Drawing Pad is an integrated preview window within the Brush Studio. Think of it as a digital notepad where you can instantly test your brush modifications. You can draw shapes, scribbles, and strokes to observe how your changes affect the brush's behavior in real-time. The Drawing Pad also offers settings accessible by tapping the square-and-pencil icon in its top-left corner. Here, you can clear the pad to start fresh or reset all brush settings for the current brush being edited. You can also adjust the preview size to see your brush strokes at different scales.
New Brush for Colored Pencil Drawing in Procreate
Managing Your Brush Library: Organization and Importation
Procreate's brush management system has evolved significantly, with brush libraries now integrated with the iPad's Files app. This means your brushes, brush sets, and entire brush libraries are stored as files and folders, accessible through "On My iPad → Procreate → Brushes" or within your iCloud Drive. This integration allows for seamless syncing and management across devices.
You can import new brushes, brush sets (.brushset), or even entire brush libraries (.brushlibrary) directly from the Files app. Simply navigate to your desired file and tap to import. Single brushes will be placed into a new set named "Imported." Procreate also supports importing Adobe® Photoshop® (.abr) brushes, expanding your creative options even further.
Organizing your brushes is crucial for an efficient workflow. You can create new brush sets and libraries, rename them, and even assign an emoji as the icon for a brush set by including it at the beginning of its name. Duplicating brushes and brush sets is straightforward, allowing you to create variations or backups.
Recent brushes are automatically tracked at the top of your brush library, providing quick access to your most frequently used tools. You can find these by tapping Paint, Smudge, or Erase, then selecting "Recent." From the Recent list, you can swipe left to "Find" the original set a brush belongs to, "Pin" it to keep it permanently at the top of your Recent list, or "Clear" it to remove it.
Sharing and Backing Up Your Creations
The ability to share your custom brushes and brush sets is a significant advantage of Procreate's system. You can share individual brushes or entire custom brush sets by swiping left on the brush thumbnail or tapping twice on a brush set respectively, then selecting "Share." This is invaluable for collaborating with other artists or distributing your own brush packs.
For safekeeping, it's essential to back up your custom brushes and brush sets. Consider saving them to an iPad-compatible external hard drive or a dedicated cloud storage location. Moving brushes and brush sets between libraries is also a simple drag-and-drop operation. When moving multiple items, you can tap and hold one item, then use another finger to tap additional items to create a stacked selection. It's important to note that moving brushes and sets between libraries in recent versions of Procreate completely moves the files, rather than copying them.
Deleting a brush or brush set is a permanent action that removes it from both Procreate and the Files app. Therefore, always ensure you have backups of any important custom creations before proceeding with deletion. If a deletion is made accidentally, you can often find the item in the "Recently Deleted" folder within your Locations in the Files app.
Exploring Procreate's Default Brush Library
Procreate ships with an impressive collection of 18 handcrafted brush sets designed to cover a wide spectrum of artistic needs. These sets range from realistic emulations of traditional media to fantastical and experimental digital tools.
- General Harmony: A versatile set for clean, rounded brushes.
- Ink Family: Ideal for comic and manga styles, featuring inks and halftones.
- Technical Pen: Purpose-built for projects requiring precision and a clean aesthetic.
- Sketching: Designed for practical drawing, planning, and quick studies.
- Artistic: Offers a range of rendering brushes for expressive artistic drawing.
- Dry Media: Mimics the textures of dry art materials.
- Paintbox: Encompasses a variety of realistic and digital painting effects.
- Watercolors: Features realistic watercolor brushes for fluid effects.
- Gouache: Offers brushes that emulate gouache painting.
- Pastels: Replicates the unique blending and texture of pastel sticks.
- Crayons: Provides brushes that mimic the varied marks of crayons.
- Charcoal: Emulates the rich, dusty texture of charcoal.
- Smudge Brushes: Specialized brushes for blending and smudging.
- Texture Brushes: Focuses on creating a wide array of surface textures.
- Special Effects: Includes brushes for unique digital effects, such as color shifting and chaotic shapes.
- Elements: Offers brushes for adding natural elements like grass and leaves.
- Calligraphy: Designed for smooth, even calligraphic forms with Streamline enabled.
- Luminance: Brushes that create glowing or emissive effects.
Experimenting with these diverse sets is key to understanding the full potential of Procreate's brush engine and discovering new ways to enhance your artistic workflow. By mastering the Brush Studio and understanding the nuances of each setting, artists can transform Procreate from a powerful drawing app into a deeply personal and endlessly adaptable creative instrument.