Photoshop, a titan in the realm of digital image manipulation, offers a plethora of techniques for breathing life and color into your creative projects. Whether you're aiming to establish a striking backdrop for a new document or to transform the existing canvas of a photograph, Photoshop provides a versatile toolkit. This guide will navigate you through several effective methods for generating colorful backgrounds, from simple solid fills to intricate, layered compositions, catering to both novice users and seasoned professionals.
Foundations: Setting the Initial Color Palette
When embarking on a new Photoshop document, the default background often appears stark white. However, this initial canvas can be easily customized.
Creating a New Document with a Chosen Background Color
The process begins even before the canvas is fully rendered. Upon initiating the creation of a new document, a dialog box presents options for document dimensions and color settings. Within this initial setup, it's possible to dictate the background color. Instead of accepting the default white, you can actively choose your desired hue. This is achieved by interacting with a color picker. Drag the slider to pick your color, type in the top field to enter the layer's name, and click OK. This action directly influences the initial state of your canvas, establishing a colored background from the outset. This creates a new Photoshop document with the background color you selected, laying a foundational layer of color for subsequent modifications or for direct use as a simple, colored backdrop.
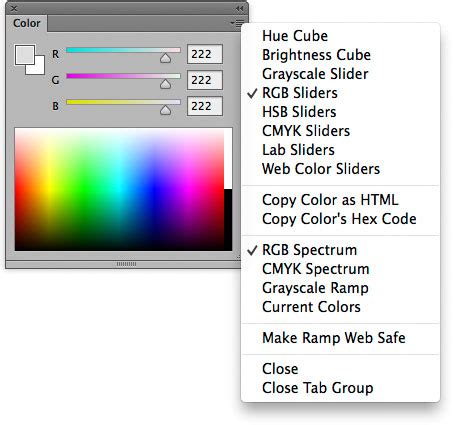
Utilizing the Color Panel for Precise Control
For more granular control over foreground and background colors, Photoshop's Color panel (Window > Color) serves as an indispensable tool. This panel displays the color values for the current foreground and background colors. Using the sliders within the Color panel, you can meticulously edit these colors, employing various color models to achieve precise shades and tones. To activate a color for editing, click the foreground or background color box within the Color panel, which will then be outlined in black. Subsequently, drag the color sliders to modify the color. By default, the slider colors change dynamically as you manipulate them. Furthermore, you can position your pointer over the color ramp, which will transform into an eyedropper. Clicking at this point allows you to sample a color directly from the ramp, offering another method for fine-tuning your palette.
Leveraging the Swatches Panel for Quick Access
The Swatches panel (Window > Swatches) is designed to store colors that you frequently use, presenting a default set of swatches for immediate application. This panel is invaluable for maintaining consistency and efficiency in your color choices. To apply a color swatch to pixel layers, you can simply drag a swatch from the Swatches panel directly onto a pixel layer within the Layers panel. This action instantly populates the selected layer with the chosen color.
Layered Approaches: Building Complexity and Depth
Beyond single-color fills, Photoshop excels at creating rich, multifaceted backgrounds through the strategic use of layers and blending modes.
Solid Color Fill Layers
A straightforward yet effective method for introducing color is through the use of Solid Color fill layers. This technique is particularly useful for changing the background color of an existing image or for establishing a clean, uniform backdrop.
To implement this:
- Navigate to
Layer > New Fill Layer > Solid Color. - A dialog box will appear, prompting you to select your desired color. You can use the color picker here to choose any hue.
- Enter a descriptive name for your layer in the provided field, such as "Background Color," and click "OK."
This action generates a new layer that completely covers your canvas with the selected solid color. This layer can then be repositioned or its opacity and blending mode adjusted to interact with other elements on your canvas. This method is exceptionally useful for quickly changing a white background to a desired color in Photoshop, providing a base for further design work or for creating a simple, impactful background.
Gradient Fill Layers
Gradient fills offer a more dynamic alternative to solid colors, allowing for smooth transitions between two or more colors. This can add a sense of depth and visual interest to your background.
To create a gradient background:
- Go to
Layer > New Fill Layer > Gradient. - In the Gradient Fill dialog box, you can select from a variety of pre-defined gradients or create your own by clicking on the gradient bar.
- Clicking the gradient bar opens the Gradient Editor, where you can adjust the colors, their positions, and the opacity of the gradient.
- You can also choose the Style of the gradient (e.g., Linear, Radial, Angle, Reflected, Diamond) and set its Angle and Scale.
- Click "OK" when satisfied with your gradient.
This method is particularly effective for creating backgrounds that evoke a specific mood or atmosphere. For instance, a warm radial gradient can create a sun-like effect, while a cool linear gradient might suggest a calm, serene environment.
Constructing Abstract Backgrounds with Shapes and Styles
For more complex and visually engaging backgrounds, Photoshop's shape tools and layer styles can be combined. This approach allows for the creation of abstract compositions with unique textures and dimensions.
A method for building such a background involves:
- Creating a New Document: Start with a new Photoshop document of any desired size.
- Setting Base Colors: Set your Foreground color to
#dbdbdband your Background color to#919191. These can serve as initial guiding colors. - Using the Rectangle Tool: Select the Rectangle Tool (U). Ensure the Mode is set to "Shape" in the top toolbar, and set the fill color to
#bcbec0. Draw your first rectangle. - Adding Subsequent Shapes: On a new layer, draw another rectangle at the top of the first one, adjusting its size and angle. Continue adding more rectangles on new layers, varying their size, angle, and making them progressively lighter or darker to create depth.
- Applying Layer Styles: Select a rectangle layer. Go to
Layer > Layer Style > Drop Shadow. Adjust the shadow parameters to add depth. Once satisfied, right-click over the layer and choose "Copy Layer Style." Then, select other rectangle layers and right-click to choose "Paste Layer Style" to apply the same effect. - Gradient Overlays: For added color variation, select a shape layer and go to
Layer > New Fill Layer > Gradient. Right-click over the layer and choose "Copy Layer Style." Then, select another shape layer and go toLayer > Layer Style > Gradient Overlay. Right-click over the layer and choose "Copy Layer Style." Click and drag over the canvas to move the Gradient of that particular shape to a position you like. This allows for intricate color blending within the shapes.
This technique, by layering shapes and applying styles like drop shadows and gradient overlays, can result in a sophisticated, almost three-dimensional abstract background.
How to make a Cool Low Poly Background - Photoshop CS6,CC Tutorial (Background Design)
Painting and Blending: Organic and Textured Backgrounds
For backgrounds with a more organic, painterly feel, using Photoshop's Brush Tool and applying blurs can yield stunning results.
Freehand Painting with Multiple Layers
This method involves building up color and texture through freehand brush strokes on separate layers, creating a rich, layered effect.
The process involves:
- Creating a New Document: Begin with a new document of any size.
- Selecting the Brush Tool: Choose the Brush Tool (B) from the left toolbar. Ensure the Mode is set to "Normal," Opacity and Flow are at 100%, and the Hardness is set to 0% for a soft brush. Select any comfortable brush size.
- Painting the First Layer: Pick a color from your Swatches panel for the foreground color. Create a new layer and rename it to match the color (e.g., "Pure Violet"). Paint areas of the canvas with this color.
- Adding More Colors: Create another new layer on top. Select a different foreground color (e.g., "Pure Red") and paint additional areas of the canvas. Repeat this process, creating new layers for each distinct color, painting on the empty areas of the canvas until the desired coverage is achieved. Each color should reside on its own layer.
- Applying Gaussian Blur: To soften the transitions between the painted areas and create a blended effect, apply a Gaussian Blur to each colored layer. Select a layer, then go to
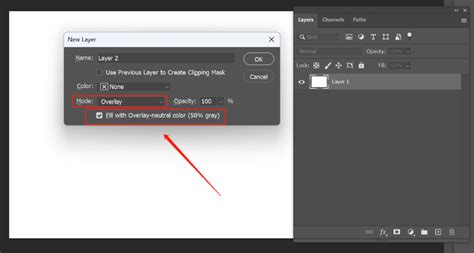
Filter > Blur > Gaussian Blur. Enter a Radius (e.g., 200 pixels) and click "OK." Repeat this for all colored layers. - Converting to Smart Object: To enable non-destructive editing of the applied blurs and to prepare for further effects, select all the colored layers using Shift. Right-click on the selected layers and choose "Convert to Smart Object."
- Duplicating and Applying Further Filters: Duplicate the Smart Object layer (Command/Control + J or right-click and choose Duplicate Layer).
- Top Layer: On the duplicated top layer, apply another Gaussian Blur (e.g., Radius 200). Then, go to
Filter > Pixelate > Crystallizeand set the Cell Size (e.g., 65). Finally, change the Blending Mode of this layer in the Layers panel to "Soft Light." - Second Layer: On the layer below, select
Filter > Pixelate > Pointillizewith a Cell Size of 3. Then, apply a Gaussian Blur with a Radius of 6.4.
- Top Layer: On the duplicated top layer, apply another Gaussian Blur (e.g., Radius 200). Then, go to
By applying these filters and adjusting blending modes, you can transform the initial painted layers into a complex, textured, and colorful background. If any filter needs adjustment, you can simply double-click on the Smart Filter in the Layers panel.
Using the Liquify Filter for Distorted Effects
The Liquify filter in Photoshop allows for creative distortion of pixels, which can be used to create unique, fluid, and abstract backgrounds.
To employ this technique:
- Open an Image: Start by opening any image or a blank canvas in Photoshop.
- Access Liquify: Go to
Filter > Liquify. - Apply Distortions: Within the Liquify dialog box, use the various tools (like the Forward Warp Tool, Twirl Clockwise Tool, etc.) to click and drag on the canvas, distorting the pixels to create swirling, wavy, or other dynamic patterns.
- Apply Gaussian Blur: After achieving the desired distortions, click "OK" to apply the changes. Then, go to
Filter > Blur > Gaussian Blurto soften the effect and create a more cohesive background.
This method is excellent for generating backgrounds with an organic, almost ethereal quality, suitable for projects that require a sense of movement or fluidity.
Working with Existing Images: Changing Background Colors
Photoshop also empowers users to alter the background color of existing photographs, a common task for product photography, portraiture, or simply for creative reinterpretation.
The Quick Selection Tool and Inverse Selection
One of the most efficient ways to change the background of a photo involves isolating the subject and then altering the background.
The steps are as follows:
- Open the Image: Open the photograph you wish to modify in Photoshop.
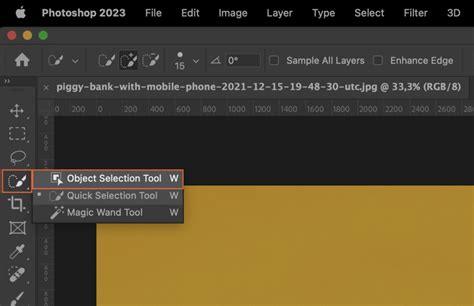
- Select the Quick Selection Tool: Locate the Quick Selection Tool in the Tools menu. If you see a tool that looks like a magic wand, click and briefly hold on to it. When you release the click, a drop-down of available tools should appear, including the Quick Selection Tool.
- Select the Subject: Click and drag the Quick Selection Tool over your subject. Photoshop will attempt to automatically detect and highlight the area you're working on.
- Refine the Selection: If the Quick Selection Tool highlights an area outside the image that you don't want to select, click the âSubtract from Selectionâ brush at the window's top-left corner. You can also switch to the Brush Tool (B) to manually add or subtract areas from the selection.
- Using AI-Powered Tools (PS 2019 and newer): If you're using Photoshop 2019 or newer, you can leverage AI-powered tools for more sophisticated selections. Press Q to enter Quick Mask mode or use AI selection features for faster subject isolation. If you need to add areas the AI tool missed, press B to switch to the Brush Tool and brush in the areas that aren't considered the background.
- Invert the Selection: At this point, your subject is highlighted. To select everything except your foreground subject (i.e., the background), you need to invert the selection. Right-click your selection and click "Select Inverse." Alternatively, with the subject selected, click the masked layer in the "Layers" panel on the right side of your screen, then click "Invert" above it in the "Properties" panel.
- Apply the New Background Color: With the background now selected, you can apply a new color.
- Using a Fill Layer: Go to
Layer > New Fill Layer > Solid Color. Choose your desired background color and click "OK." This will fill the selected background area with your chosen color. - Using a Brush: If you need more control, switch to the Brush Tool (B), select your desired color, and paint over the selected background area.
- Using a Fill Layer: Go to
The result is an image where your subject now appears on top of your chosen background color, effectively changing the background color of the photo. This process can sometimes result in losing subtle shadows or highlights on the edges of the subject, which might require further refinement using techniques like layer masks or dodge and burn tools.
The Magnetic Lasso Tool for Precise Edges
For subjects with well-defined edges, the Magnetic Lasso Tool can be an effective way to create a selection that "snaps" to the contrast between the subject and the background.
The workflow using this tool is as follows:
- Open Both Files: Have the image containing the subject and the image or blank document that will serve as the new background open in Photoshop.
- Select the Magnetic Lasso Tool: Find the Magnetic Lasso Tool within the Lasso Tool group in the toolbar.
- Trace the Subject: Click on a point along the edge of your subject and then move your mouse along the contour. The tool will automatically detect edges with sufficient contrast and create anchor points. Click periodically to set manual anchor points if needed.
- Complete the Selection: Once you have traced the entire perimeter of your subject, click back on your starting point to close the selection.
- Place in New Document: With the subject selected, you can now copy it (Command/Control + C) and paste it into your new background document (Command/Control + V). Photoshop will paste the subject onto a new layer.
This method is particularly useful when you need to transfer a specific element from one image to another with a clean background.
Advanced Techniques and Creative Exploration
Beyond the fundamental methods, Photoshop offers advanced features that allow for highly customized and artistic background creation.
Pixel Bender and Other Filters
Photoshop's extensive filter library provides a vast playground for generating unique textures and effects. Filters like "Mosaic" (Filter > Pixelate > Mosaic) can break down an image into colored squares, creating a pixelated effect. The "Crystallize" filter (Filter > Pixelate > Crystallize) fragments the image into polygonal shapes, while "Pointillize" (Filter > Pixelate > Pointillize) renders the image as a series of dots. These can be applied to solid color layers, gradients, or painted backgrounds to introduce distinct visual styles.
Layer Styles and Smart Objects
As demonstrated in the abstract background creation, layer styles (like Drop Shadow, Gradient Overlay, Bevel & Emboss) can add dimension and complexity to shape-based backgrounds. The power of Smart Objects cannot be overstated. Converting layers or groups of layers into Smart Objects allows for non-destructive application of filters. This means you can go back at any time and readjust filter settings (like the Radius of a Gaussian Blur or the Cell Size of Crystallize) without degrading the image quality. Double-clicking on a Smart Filter in the Layers panel will reopen its respective dialog box.
Utilizing Presets and External Resources
Photoshop's Presets panels are continually being updated with new and improved options for various effects, including gradients and patterns. Furthermore, external resources like Design Bundles offer curated collections of modern color palettes and graphical elements that can be imported into Photoshop to inspire or directly enhance your custom backgrounds.
Conclusion
The creation of colorful backgrounds in Photoshop is a multifaceted process, offering a wide range of techniques to suit any creative need. From the simplicity of a solid color fill to the intricate layering of painted elements and the precise selection of photographic subjects, Photoshop provides the tools to bring any vision to life. By understanding and experimenting with these methods, users can develop visually compelling backgrounds that elevate their digital creations. Photoshop continues to be one of the most powerful image editing tools out there, and the ability to craft vibrant, custom backgrounds is a testament to its enduring versatility.
tags: #colorful #background #photoshop