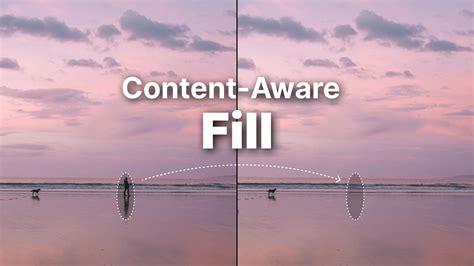
Removing unwanted objects or areas from video footage can often be a painstaking and intricate process. However, with the advent of Adobe's Content-Aware Fill feature in After Effects, this task has been dramatically simplified, allowing users to eliminate distracting elements like microphones, poles, and even people with remarkable ease and efficiency. This powerful tool, driven by Adobe Sensei, offers a temporally aware solution, meaning it not only removes a selected area but also intelligently analyzes frames over time to synthesize new pixels, seamlessly integrating them from other parts of the footage. The goal is to achieve a fill that blends flawlessly with the surrounding image, leaving no trace of the original unwanted element.
Understanding the Core Mechanics of Content-Aware Fill
At its heart, Content-Aware Fill is a sophisticated algorithm designed to intelligently fill in transparent areas created by removing an object. It achieves this by analyzing the pixels surrounding the masked object and leveraging information from adjacent frames to reconstruct the missing background. The process involves several key components and options that allow for fine-tuning the results.
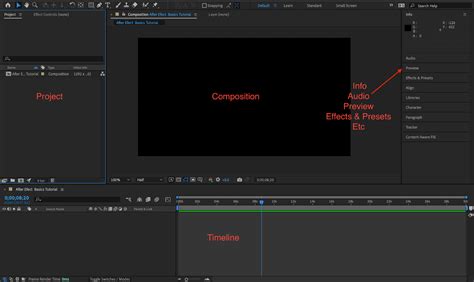
The feature operates by analyzing frames over time to fill in missing pixels by pulling them from other frames in the footage. To begin using Content-Aware Fill in After Effects, navigate to the Window tab at the top of the screen, then select Content-Aware Fill. This will open up the Content-Aware Fill panel in your workspace. You will then need to mask out the object you want to remove from your footage. (You may need to keyframe the placement of your mask if your object is moving throughout.) Set the mask to Subtract so that you now have a transparent alpha channel where that mask is on your footage. You can now select Generate Fill Layer in the Content-Aware Fill panel. After Effects will then analyze the footage and render a .PNG sequence, which it places in the composition.
Fill Methods: Object, Surface, and Edge Blend
Content-Aware Fill offers three distinct fill methods, each suited to different scenarios:
- Object: This method is designed to remove an object from the footage. It fills the transparent area by taking pixels from the current and surrounding frames. Crucially, it estimates the motion of the scene behind the object and uses this information to find appropriate color values that match the background. This method is best used on footage with a moving camera as it replaces the object entirely with what is behind it.
- Surface: This method focuses on replacing the surface of an object. It operates similarly to the 'Object' method by sampling pixels from surrounding frames. However, it specifically utilizes the motion estimated in the composition beneath the transparent area. This is particularly useful when you need to replace or remove a textured surface that has inherent motion.
- Edge Blend: This method is optimized for blending surrounding edge pixels. It fills the transparent area by sampling pixels at the edges of the transparent region and blending them together. This method renders very quickly but has a significant limitation: it cannot have Lighting Correction applied. While fast, its effectiveness is generally lower for complex removals compared to the other methods.
Advanced Controls and Techniques for Optimal Results
Beyond the basic fill methods, Content-Aware Fill provides a suite of advanced options and techniques to tackle more challenging removals and achieve professional-grade results.
Fill Target and Alpha Expansion
The Fill Target serves as a preview of the area that Content-Aware Fill is analyzing. This gives you a visual representation of what the algorithm is working with. Alpha Expansion is a valuable tool that allows you to increase the size of the area to be filled. This can be useful when the initial mask might be too tight, and expanding the fill area slightly can help create a more natural blend by incorporating more surrounding pixels.
Lighting Correction: Handling Dynamic Illumination
Dynamic lighting shifts in footage can pose a significant challenge for object removal. The Lighting Correction feature is specifically designed to address this. When enabled, it incorporates lighting adjustments into the fill process, allowing for the clean removal of objects from footage where lighting changes from frame to frame. This is incredibly helpful if the area you are trying to fill is moving in and out of a light source or if the scene's illumination is inherently dynamic.
You can select from three different correction strengths: Subtle, Moderate, and Strong.
- Subtle offers a gentle adjustment, suitable for minor lighting variations.
- Moderate provides a more noticeable correction, effective for medium lighting changes.
- Strong applies the most aggressive correction, ideal for significant and rapid lighting shifts.
It's important to note that the old Content-Aware Fill (when Lighting Correction is disabled) stays true to the reference frame and does not take into consideration lighting changes. It's more useful in footage with consistent lighting. Content-Aware Fill currently copies only local information from each image and then finds some global adjustments to fit this information into the target frame. With this feature, you have the option to correct fill lighting inside of Content-Aware Fill like the actual fill layer that’s generated. This eliminates the need to generate several fill layers to correct it and is helpful for lighting and color changes. When Lighting Correction is enabled, Content-Aware Fill gives back a fill layer that is seamlessly integrated with the rest of the footage. This does not impact the speed of the performance than without lighting correction.
Start by analyzing the shot. Select Strong first. Situations where the Strong might not work well are footage with flickering lighting conditions, such as grass or sandy shots that reflect a lot of light. The Strong can also color correct too harshly, which can introduce more flickering.
Range and Reference Frames: Guiding the Fill Process
The Range option allows you to choose whether to render the fill layer for only the work area or the entire duration of the composition. This provides control over the extent of the fill process.
For complex backgrounds or situations where Content-Aware Fill struggles to produce satisfactory results, the Create Reference Frame option becomes invaluable. This feature generates a single-frame fill layer and opens it in Photoshop. Here, you can utilize powerful Photoshop tools such as the Clone Stamp and Patch tools to manually refine the fill, creating a more accurate and desired outcome on that specific frame. Once your edits are complete in Photoshop, you save the frame. It's crucial to avoid using "Save As" and instead always "Save" the changes with the same name and location to ensure After Effects can properly import the updated reference frame. Upon reopening After Effects, the Content-Aware Fill panel will place your refined reference frame on a layer below your original shot, guiding the fill process for the entire clip. You can create multiple reference frames at points where lighting or camera angles change significantly to further enhance accuracy. It's also worth noting that any other process can be used to create single-frame layers to guide Content-Aware Fill, as the tool respects the content in those layers.
The Generate Fill Layer button initiates the creation of a new fill layer. The analysis and rendering progress are displayed at the bottom of the Content-Aware Fill panel. Content-Aware Fill prioritizes analyzing and rendering the frame under the Current-Time Indicator (CTI).
Output Depth and Path Options
When generating fill layers, you have control over the output format:
- Output Depth: This setting determines the color depth, in bits per channel (8-, 16-, or 32-bpc), used to write the fill layer sequence files. Higher bit depths offer more color information and can lead to smoother gradients and fewer banding artifacts.
- Path Type: You can choose between 'Project Relative' and 'Absolute' paths for saving your generated fill layers.
- Project Relative saves the files to a location relative to your After Effects project file. A single dot (.) in the path represents the folder where the project file is located.
- Absolute specifies the full, absolute path to the folder where the files will be saved.
- Path: This specifies the actual folder location for saving the generated files based on the selected Path Type.
Additional Settings for Workflow Efficiency
- Create Photoshop Reference Frame: This option, enabled by default, saves reference frames as a PSD file and opens it in Photoshop for editing.
- Create Photoshop Sequence for Output: When enabled, this saves fill layer sequences as PSD files, allowing for further manipulation in Photoshop.
- Auto-manage Unused Fill Footage: When a new fill layer is generated, you will be prompted whether you want to delete fill layer footage that isn't being used in a composition. This helps keep your project organized and reduces clutter.
Step-by-Step Workflow for Object Removal
Let's walk through a typical workflow for removing an unwanted object using Content-Aware Fill.
- Analyze the Shot: Begin by carefully examining your footage to understand the movement of the object you want to remove and the complexity of the background.
- Mask the Object: Use the Pen tool to draw a precise mask around the unwanted object. Select key points along the shape you want to mask. If the object is moving, you will need to track the mask so it moves along with the object throughout the clip. Adjust the mask points using the Selection tool as needed. For the best results, consider applying a small amount of feathering to your mask.
- Open the Content-Aware Fill Panel: Navigate to
Window > Content-Aware Fillto open the panel. - Select Fill Method and Range: In the Content-Aware Fill panel, choose the most appropriate Fill Method (Object, Surface, or Edge Blend) based on your footage. Set the Range that you want After Effects to analyze (Work Area or Entire Composition).
- Enable Lighting Correction (If Necessary): If your footage has dynamic lighting, enable Lighting Correction and select the appropriate strength (Subtle, Moderate, or Strong).
- Generate Fill Layer: Click the Generate Fill Layer button. After Effects will then analyze each frame, fill the transparent area, and add a new Fill layer on top of your selected layer in the Timeline panel. This layer contains the resulting sequence of images that After Effects has analyzed.
- Review and Refine: Examine the generated fill layer to ensure the removal is seamless. If artifacts or inconsistencies are present, consider using the Create Reference Frame option to refine the fill in Photoshop or adjust mask parameters.
This HIDDEN After Effects Panel Changes EVERYTHING! (Content Aware Fill)
When Content-Aware Fill Alone Isn't Enough
While Content-Aware Fill is incredibly powerful, there are situations where it may not achieve the desired results on its own. Footage with water, areas with highly varied light and texture, or very complex, detailed backgrounds can sometimes prove challenging. In these cases, combining Content-Aware Fill with other techniques can significantly enhance the outcome:
- Motion Tracking: If the object or camera is moving, ensuring your mask is accurately tracked is crucial. After Effects' motion tracking tools can help maintain mask accuracy throughout the clip.
- Rotoscoping: For extremely complex shapes or intricate movements, manual rotoscoping might be necessary to create a precise mask before applying Content-Aware Fill.
- Reference Frames in Photoshop: As mentioned earlier, using the Create Reference Frame option and refining the fill in Photoshop with tools like the Clone Stamp tool is a powerful way to tackle difficult scenarios.
- Manual Cleanup: Even with the best settings, you might occasionally need to perform minor manual cleanup using tools like the Clone Stamp or Healing Brush directly on the generated fill layer in After Effects.
Troubleshooting Common Issues
- "Content-Aware Fill After Effects not working": This can sometimes be due to outdated software. Ensure you are using a recent version of After Effects (CC 2019 or later is recommended). GPU acceleration should also be enabled for optimal performance.
- Visible Artifacts or Repeating Patterns: This often indicates that the algorithm didn't have enough clean source information. Try expanding the mask slightly, using a reference frame, or adjusting the fill method.
- Mismatched Textures or Colors: Lighting Correction can help. If that doesn't suffice, a reference frame in Photoshop is your best bet.
- Flickering: This can occur with very dynamic lighting. Experiment with different Lighting Correction strengths or use a reference frame to manually stabilize the fill.
Content-Aware Fill in Context: Beyond Object Removal
It's important to distinguish Content-Aware Fill from other similar-sounding tools. For instance, Content-Aware Scale is a feature in Photoshop and After Effects that allows you to resize elements without distorting important areas. It works by intelligently analyzing image content and preserving key features during scaling. This is distinct from Content-Aware Fill, which focuses on reconstructing missing areas.
The Content-Aware Fill feature has been part of Photoshop for years, saving countless hours for photographers and designers by allowing them to remove unwanted or distracting elements from still images. The algorithm in After Effects builds upon this foundation, adapting it for the complexities of video. While it is not a magical solution and challenging situations will always require additional manual effort, such as masking and rotoscoping, it represents one of the most significant advancements in video editing tools in recent years.
For instance, the Content-Aware tool works well to remove sensor dust from footage since the dirt spots are small and easy for the algorithm to fill. Cutting undesired boom mics during static interviews also produces great results.
Conclusion: A Powerful Tool for Modern Video Editing
Content-Aware Fill in After Effects has revolutionized the way editors approach object removal in video. By intelligently analyzing frames and synthesizing new pixels, it allows for the seamless elimination of unwanted elements, saving considerable time and effort compared to traditional methods. Whether you're dealing with a stray pedestrian in a travel vlog, an unsightly object in a drone shot, or a distracting microphone, this feature provides a robust solution. By understanding its various fill methods, advanced controls like Lighting Correction and Reference Frames, and by employing a systematic workflow, users can achieve professional-quality results and clean up their footage like a pro. While it excels in many scenarios, remembering its limitations and knowing when to combine it with other techniques like motion tracking or manual refinement in Photoshop will unlock its full potential.