Protecting your creative work in the digital age is paramount, especially for photographers and designers who showcase their portfolios online. One of the most effective ways to deter unauthorized use and assert ownership is by incorporating copyright symbols and watermarks into your images. This comprehensive tutorial, designed for users of Photoshop CS5 and earlier, will guide you through the essential steps of creating and applying these protective measures, ensuring your work remains yours. We will explore methods for applying a single watermark to individual images and discuss how to efficiently process multiple files using batch operations.

Understanding the Importance of Copyright Protection
Copyright is a legal right granted to the creator of original works of authorship, including literary, dramatic, musical, and certain other intellectual works. In the context of digital photography and design, this means that your photographs, graphic designs, and other visual creations are automatically protected by copyright from the moment they are fixed in a tangible medium. However, simply having a copyright doesn't always prevent others from attempting to use your work without permission.
This is where watermarking and the explicit display of the copyright symbol come into play. A watermark is a visible or invisible mark placed on an image to identify its owner and deter theft. While there's no foolproof method to prevent all forms of infringement, a well-placed and thoughtfully designed watermark can significantly increase the difficulty for someone to easily clone out the text to use the photo for themselves. It serves as a clear declaration of ownership and can discourage casual appropriation.
Why Use a Copyright Symbol?
The copyright symbol (©) is an internationally recognized indicator that a work is protected by copyright. Its presence on an image immediately informs viewers that the material is not in the public domain and that its use is subject to copyright law. While not legally required in all jurisdictions for protection to exist, its inclusion is a strong visual cue that reinforces your claim of ownership.
Creating a Copyright Watermark Pattern in Photoshop
One of the most versatile methods for watermarking in Photoshop is by creating a custom pattern. This approach allows for a consistent application of your watermark across multiple images and offers flexibility in design.
Step 1: Designing Your Copyright Symbol and Text
Before you can create a pattern, you need to design the elements that will form your watermark. This involves deciding on the text you want to use, the copyright symbol itself, and the overall aesthetic.
- Open a New Document: Go to the
Filemenu at the top of the screen and selectNew...to bring up the New Document dialog box. For this purpose, it's beneficial to create a document that is independent of your final image size. A good starting point could be a width of 6 inches, a height of 4 inches, and a resolution of 300 pixels/inch. This provides ample space to work with your text and symbol. - Insert the Copyright Symbol: You can insert the copyright symbol in several ways.
- Using Glyphs: First, enter any text on the canvas using the Type tool. You need an active text to be able to use glyphs. You can erase the text afterward. To insert the symbol in your text, simply double-click it in the Glyphs panel (Window > Glyphs). It will appear beside the text. Glyphs are symbols that are rarely found on a regular keyboard.
- Keyboard Shortcuts: Alternatively, you can use keyboard shortcuts. For Windows, hold down
Altand type0169on your numeric keypad. For Mac, pressOption + G.
- Type Your Copyright Text: Grab your Type tool from the Tools palette or by pressing
Ton your keyboard. Click inside the image and type in the text as you’d like it to appear. This could include your name, website, or a statement like "All rights reserved." - Formatting the Watermark: Once you have your symbol and text, it's time to format them.
- Font and Size: Experiment with different fonts and sizes to find what looks best and is legible but not overly intrusive.
- Color: Choose a color that contrasts with typical image backgrounds but can be adjusted later for subtlety. Black is often a good starting point.
- Rotation (Optional): The copyright watermark tends to look better with the text rotated a bit. Once you've entered your text and symbol, press
Ctrl+T(Win) /Command+T(Mac) to bring up the Free Transform handles around your text. Place your mouse cursor just outside one of the corner handles and drag left or right with your mouse to rotate the text. - Opacity: While you can adjust opacity later, it's good to consider the desired level of transparency during the design phase.
Step 2: Defining the Watermark as a Pattern
With your copyright text and symbol designed and formatted, you can now convert this into a reusable pattern.
- Trim Excess Space: Go up to the
Imagemenu next and selectTrim. This brings up the Trim dialog box. Ensure that "Transparent areas" is checked and that "Top, Bottom, Left, Right" are all selected. This will remove any unnecessary empty space around your watermark design, making the pattern cleaner. - Define the Pattern: Go up to the
Editmenu at the top of the screen and selectDefine Pattern. Photoshop will ask you to name your pattern. A descriptive name like "Copyright Watermark" is recommended. ClickOK.
You have now successfully created a custom copyright watermark pattern that can be applied to any image.
Applying the Copyright Watermark Pattern to Images
Now that you have your watermark pattern ready, you can apply it to your photos. There are two primary methods: applying it to a single image or using batch processing for multiple files.
Method 1: Applying to a Single Image
This method is ideal for individual photos or when you want more control over the placement and appearance on each specific image.
- Open Your Image: Open a photo typical of the size to which you plan on adding a watermark.
- Create a New Layer: Back in your original image document, you currently have one layer, the Background layer, which contains your image. In the Layers palette, click on the "Create new layer" icon (the square below your current layers). With this new layer selected, go up to the
Editmenu at the top of the screen and selectFill. - Fill with Your Pattern: In the Fill dialog box, ensure that "Contents" is set to
Pattern. Click on the little thumbnail image beside the wordsCustom Patternand then choose your copyright pattern from the list that appears. ClickOK. - Adjusting Prominence and Placement: At this stage, the text might be too prominent, blocking much of the image from view. To fix this:
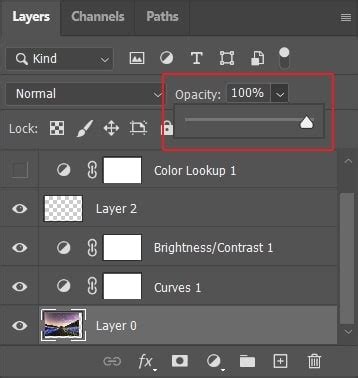
- Blend Mode: With the new layer selected in the Layers palette, go to the layer blend mode options in the top left of the Layers palette. Click on the down-pointing arrow beside the word "Normal" and select
Overlayfrom the list. This blend mode often creates a good balance between visibility and subtlety. - Opacity: Then move over to the
Opacityoption beside it and reduce the opacity as needed. For instance, you might set it at 27% as suggested in some examples, allowing the watermark to be visible but not obscuring the main subject of the photo. - Positioning: You can also decide where you think the watermark should be positioned in the frame. You can always move it and change things once it appears on a photo. If you want the watermark to appear in a specific corner, for example, the lower right:
- Select the watermark layer.
- Go to
Layer > Align > Right Edges. - Follow this with
Layer > Align > Bottom Edges. - Your watermark should snap to the lower right-hand edge.
- If you initially placed the watermark in the center, you can drag the watermark layer to the desired position using the Move tool (
V).
- Blend Mode: With the new layer selected in the Layers palette, go to the layer blend mode options in the top left of the Layers palette. Click on the down-pointing arrow beside the word "Normal" and select
How to Turn a Text Watermark into a Photoshop Brush
Method 2: Using Actions for Repeatable Workflows
For photographers and designers who frequently add watermarks to their images, creating an Action is a highly efficient workflow. An Action records a series of steps that can be replayed on any image.
- Open the Actions Panel: Open the “Actions” panel if not already visible (
Window > Actions). - Create a New Action: Click on the "Create new action" icon (often a square with a plus sign or a page icon). When the New Action window opens, give it a name - "Watermark" or "Copyright" would be the best choice. Ensure "Set" is set to a relevant folder or create a new one. Click
Record. - Perform Watermarking Steps: Now, perform the steps for applying your watermark as described in Method 1. This includes:
- Creating a new layer.
- Filling the layer with your defined copyright pattern.
- Setting the blend mode to
Overlay. - Adjusting the opacity to your desired level.
- Aligning the watermark to a specific position (e.g., lower right corner).
- Stop Recording: Once you have completed all the steps for applying the watermark, click the "Stop playing/recording" button (usually a square icon) in the Actions panel.
You should now be left with an Action that you can use over and over. To apply it to a new image, simply open the image, select the Action you created from the Actions panel, and hit the “Play” button (often a triangle icon).
Method 3: Batch Processing for Large Selections of Images
When you need to apply a watermark to a large collection of images, using Photoshop's or Adobe Bridge's batch processing capabilities is the most efficient approach.
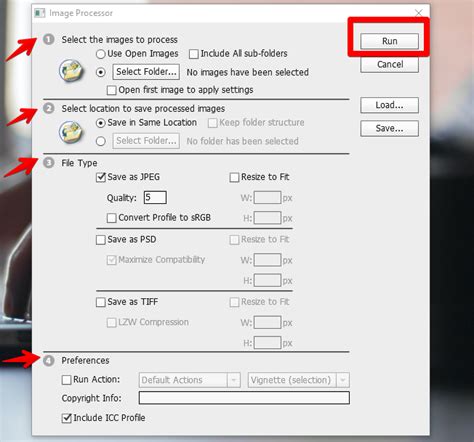
- In Photoshop: Navigate to
File > Scripts > Image Processor. This script allows you to select a source folder, a destination folder, and choose image formats to save your processed files. You can also select an Action from your Actions panel to run on each image. - In Bridge: If you use Adobe Bridge to manage your photos, you can select multiple images, then go to
Tools > Photoshop > Image Processor. The workflow is very similar to Photoshop's Image Processor.
These batch processes will automatically open each image, apply your chosen Action (which includes the watermark), and save the new file to your specified location. This can save a tremendous amount of time compared to watermarking each image individually.
Considerations for Effective Watermarking
Not all copyright watermarks are created equally. While the technical steps are straightforward, the effectiveness of your watermark depends on several factors.
- Placement Strategy: While placement may be different for each image, placing the copyright watermark in the middle of the image, as some photographers do, can make it more difficult for someone to easily clone the text out. However, this can also be more intrusive. Consider placing it in a corner, on a less critical part of the image, or even as a subtle pattern across the entire image.
- Opacity and Visibility: The goal is to make the watermark visible enough to deter casual theft but not so prominent that it distracts from or ruins the image itself. Experiment with different opacity levels and blend modes like
OverlayorSoft Lightto find the best balance. - Font Choice: A clear, legible font is important. Avoid overly stylized or script fonts that might be difficult to read.
- Size: The size of the watermark should be proportionate to the image. A watermark that is too small might be easily cropped out or ignored, while one that is too large can be overwhelming.
- Consistency: Using a consistent watermark across your portfolio helps build brand recognition and reinforces your ownership.
Legal and Ethical Considerations
It's important to remember that while watermarking is a deterrent, it is not a substitute for legal copyright protection. Copyrighted material from sources like Apogee Photo Mag should not be used elsewhere without seeking the author's permission. All written content (and most images) in these articles are copyrighted by the authors.
The techniques learned here allow you to easily insert the copyright symbol and watermarks into any document or image. This symbol has made watermarks look a bit more legitimate, and the intention is for you to feel the same way too. By implementing these Photoshop tutorials, you can take a proactive step in safeguarding your valuable creative assets.