Photoshop's Photo Filter is a powerful yet often underutilized tool that allows for the creative manipulation of color within an image. This tutorial delves into the intricacies of using this adjustment, from basic tinting to more advanced techniques, enabling users to achieve specific moods, correct color casts, and enhance the visual appeal of their photographs. By understanding how to leverage Photo Filters, especially in conjunction with Smart Objects and layer masks, photographers and digital artists can unlock new levels of creative control.
The Power of Smart Filters and Smart Objects
Any filter applied to a Smart Object in Photoshop becomes a Smart Filter. This designation is crucial because it transforms a destructive editing process into a non-destructive one. Smart Filters appear in the Layers panel directly below the Smart Object layer to which they are applied. This placement is not merely organizational; it signifies that the filter's settings are editable at any time. This means you can revisit and tweak the filter's parameters, adjust its blending options, or even remove it entirely without degrading the original image data.
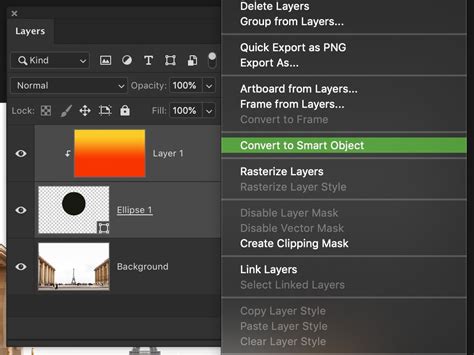
The ability to work with Smart Filters extends to most Photoshop filters, with a few exceptions, including Lens Blur, Flame Picture Frame, Trees, and Vanishing Point. To apply a filter as a Smart Filter, the first step is to convert your regular layer into a Smart Object. This is typically done by right-clicking on the layer in the Layers panel and selecting "Convert to Smart Object." Once the layer is a Smart Object, selecting a filter from the Filter menu and setting its options will automatically apply it as a Smart Filter.
To manage Smart Filters, you can expand or collapse their view in the Layers panel by clicking the triangle next to the Smart Filter icon, which is displayed to the right of the Smart Object layer. This allows for a cleaner interface when working with multiple filters. Furthermore, Smart Filters can be duplicated by Option-dragging (Mac OS) or Alt-dragging (Windows) them to another Smart Object layer, saving time when applying the same effect across different elements.
It's important to note that while you can edit individual Smart Filters, you cannot mask them individually. If you need to apply a filter to only a specific part of a Smart Object, you'll need to utilize layer masks. The entire filter effect can be controlled by a mask, but this mask applies to all Smart Filters on that layer as a unit. However, their boundaries can be loaded as selections from the Channels panel, offering another layer of control.
Understanding the Photo Filter Adjustment
Photoshop's Photo Filter adjustment layer is specifically designed to mimic the effect of placing a colored filter in front of a camera lens. This simple yet effective tool allows for the tinting and enhancement of colors in a photo, creating a specific mood or correcting color casts. While it might not be the most complex feature in Photoshop, its ease of use and direct approach to color tinting make it an indispensable part of many editing workflows.
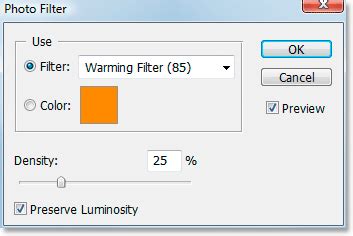
The Photo Filter offers two primary ways to select a color for tinting: through a list of preset colors or by using Photoshop's Color Picker for complete customization. The "Filter" option presents a dropdown menu with a variety of preset colors, including common warming and cooling filters that are labeled as such. The "Color" option, on the other hand, opens the familiar Color Picker, allowing you to select any hue, saturation, and brightness combination imaginable.
When applying a Photo Filter, the "Density" slider is crucial for controlling the intensity of the applied color. Dragging this slider to the right increases the amount of color, resulting in a stronger tint, while moving it to the left creates a more subtle effect. A live preview is available, so you can see the impact of your adjustments in real-time. It is highly recommended to keep the "Preserve Luminosity" option checked. This prevents the adjustment from darkening the image unnaturally, ensuring that the overall brightness is maintained while the color is altered.
The Photo Filter adjustment can be applied either directly to a layer (which is a destructive process) or, preferably, as an adjustment layer. Using adjustment layers ensures that the original image data remains untouched, allowing for non-destructive editing.
Step-by-Step: Tinting a Sunset Photo
Let's illustrate the use of the Photo Filter with a practical example: enhancing a sunset photograph. Imagine a photo taken during a spectacular sunset, where the sky was filled with pinks and purples, and the ground glowed with warm oranges. The goal is to replicate and amplify these colors to make the image more visually appealing.
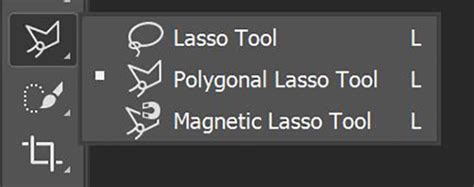
1. Selecting the Sky:Before applying any color adjustments, it's essential to isolate the area you want to affect. For the sky, you can use any selection tool you are comfortable with, such as the Lasso Tool, Pen Tool, or Quick Selection Tool. Selecting the Lasso Tool from Photoshop's Tools palette, or pressing 'L' on your keyboard, is a common starting point. Carefully draw a selection around the sky area.
2. Applying the First Photo Filter (Sky Tint):With the sky selected, add a new Photo Filter adjustment layer. Click on the "New Adjustment Layer" icon at the bottom of the Layers palette and select "Photo Filter" from the list. Since the sky was rich in pinks and purples, choose a magenta preset from the "Filter" dropdown or select a custom color using the Color Picker. Adjust the "Density" slider to achieve the desired intensity of the tint. Ensure "Preserve Luminosity" is checked. Click "OK" to apply the filter. The sky should now appear more vibrant and closer to the remembered hues.
3. Selecting the Ground:To adjust the ground, we can leverage the selection made for the sky. In the Layers panel, Ctrl-click (Win) or Command-click (Mac) on the layer mask thumbnail of the Photo Filter adjustment layer you just created. This loads the selection of the sky. To select everything except the sky, invert the selection by pressing Shift+Ctrl+I (Win) or Shift+Command+I (Mac). This will select the ground and any other unselected areas.
4. Applying the Second Photo Filter (Ground Tint):The ground, in this example, should appear warmer. Add another "Photo Filter" adjustment layer. This time, choose a warming filter. Photoshop offers "Warming Filter (85)," "Warming Filter (LBA)," and "Warming Filter (81)." Experimenting with these presets is recommended to find the best fit for your image. The "Warming Filter (85)" is often a good starting point. Increase the "Density" to warm up the ground and make its color intensity match that of the sky.
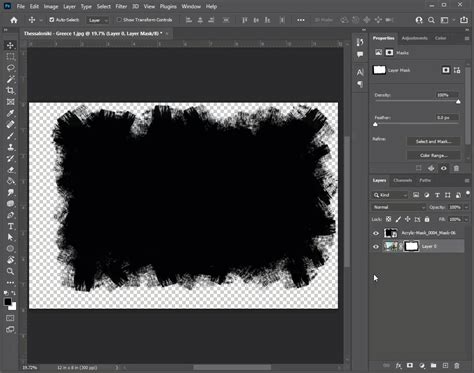
5. Refining with Layer Masks:You might encounter areas that are affected by the filter but shouldn't be, such as the water in the example. If this happens, you'll need to use the layer mask associated with the adjustment layer to hide the filter's effect in those specific areas. Select the Brush Tool, set your foreground color to black (press 'X' to swap foreground and background colors if needed), and paint over the unwanted areas on the layer mask. Painting with black on a layer mask hides the effect of the adjustment layer in that specific area, effectively revealing the original image beneath. You can adjust the brush size using the left and right bracket keys and the brush hardness using Shift+bracket keys.
Advanced Techniques and Tips
Sampling Colors Directly from the Image:While preset filters are convenient, you might want to use a color directly from your photograph. If you click the "Color" swatch in the Photo Filter dialog and then try to click on your image, you might find that Photoshop only selects white. This is because the layer mask thumbnail is active, and you're essentially clicking on the mask, not the image itself. To sample a color from the image, ensure that the Photo Filter adjustment layer's thumbnail (the little camera filter icon) is selected, not the mask thumbnail. Then, click on the desired color in your image.
Enhancing Colors with Vibrance:After applying a Photo Filter, colors might still appear a bit dull. The Vibrance adjustment can help. In the Properties panel of the Photo Filter adjustment layer, you can increase the "Vibrance" slider to boost the saturation of colors more intelligently, preventing over-saturation of already vibrant tones.
The S-Curve for Contrast:A common technique to boost contrast is using a Curves adjustment layer to create an "S-curve." This involves slightly lifting the highlights (top right of the curve) and lowering the shadows (bottom left of the curve). This makes the bright areas brighter and the dark areas darker, adding depth and impact to the image.
Curves Adjustment Layer + PSD File Demonstrated [Photoshop Color for Beginners]
Understanding Filter Categories:Photoshop offers a vast array of filters beyond Photo Filters, categorized for ease of use. These include:
- Blur Filters: Used to soften or blur specific areas (e.g., Gaussian Blur, Motion Blur).
- Distort Filters: Apply various distortions and transformations (e.g., Ripple, Spherize).
- Render Filters: Generate natural elements like clouds, fire, or lens flares.
- Noise Filters: Add or remove graininess (e.g., Add Noise, Reduce Noise).
- Artistic Filters: Mimic traditional art styles like painting or sketching.
- Pixelate Filters: Manipulate individual pixels for abstract or retro looks.
These filters can be accessed via the Filter menu. For non-destructive editing, applying them as Smart Filters to Smart Objects or using them within the Filter Gallery is highly recommended.
Filter Gallery Exploration:The Filter Gallery (Filter > Filter Gallery) is an excellent tool for previewing and experimenting with a wide range of filters simultaneously. It allows you to fine-tune parameters and combine multiple effects before committing to an adjustment.
Considerations for Different Audiences
For beginners, the Photo Filter is an accessible entry point into color manipulation. The preset options and straightforward "Density" slider provide immediate results. The key is to understand the concept of adjustment layers for non-destructive editing.
For intermediate users, exploring the "Color" option of the Photo Filter to select custom colors, utilizing layer masks for targeted adjustments, and combining Photo Filters with other adjustments like Vibrance or Curves will yield more sophisticated results. Understanding how to sample colors directly from the image is also a valuable skill.
Advanced users can integrate Photo Filters into complex workflows involving Smart Objects, multiple masks, blend modes, and custom actions. The ability to apply filters as Smart Filters and their inherent editability offers unparalleled flexibility for professional retouching and creative compositing.
Ultimately, mastering Photoshop's Photo Filter, much like any advanced editing technique, requires practice and experimentation. By understanding its core functions and exploring its integration with other Photoshop features, you can significantly enhance your ability to control and refine the color in your images, transforming them into visually compelling works of art.