In the pursuit of photographic perfection, especially when capturing challenging scenes like starry night skies, intimate indoor events, or twilight landscapes, photographers often grapple with the pervasive issue of digital noise. While modern cameras, both DSLR and mirrorless, have made significant strides in managing high ISO sensitivity with relatively little noise, there are still instances where high ISO settings are unavoidable. This is particularly true when the need to "turn it up to 11" arises, but the photographer worries about the inevitable grainy results. Fortunately, Adobe Lightroom offers a robust suite of tools to combat this "pesky grain" while preserving crucial detail, ensuring your finished photographs are crisp and clear. This guide will delve into the intricacies of noise reduction in Lightroom, empowering both novice and experienced photographers to enhance their images effectively.

Understanding Digital Noise: The Culprit Behind Grainy Images
Before we can effectively learn how to reduce noise in Lightroom, it's essential to understand what digital noise actually is. In essence, digital noise is the digital equivalent of the grain found in traditional film photography. It manifests as an unwanted visual distortion, often appearing as random speckles or patterns within an image, and is most noticeable in areas of uniform color or in the darker regions of a photograph. When discussing noise reduction in Lightroom, we typically encounter two primary types:
Luminance Noise
This form of noise directly impacts the lightness and darkness of colors within an image, leading to undesirable variations in brightness. Luminance noise closely resembles traditional film grain, giving a picture a grainy appearance. While it affects the overall texture, it generally retains most of the color integrity. Adjusting for luminance noise in Lightroom helps to smooth out this unwanted graininess while aiming to preserve the image's inherent texture.
Color Noise
In contrast to luminance noise, color noise is characterized by random splashes of discolored pixels-often appearing as red, green, or blue specks. This type of noise can be far more distracting as it directly compromises the color fidelity of the photograph. Effectively reducing color noise in Lightroom involves carefully targeting and removing these random color aberrations without altering the true hues of the image.
The Genesis of Digital Noise: Why It Appears
Understanding the root causes of noise is paramount to effectively mitigating it during post-processing. Several factors contribute to the presence of digital noise in our images:
High ISO Settings
ISO controls the camera's sensitivity to light. While higher ISO settings are invaluable in low-light scenarios, they essentially amplify the signal from the camera's sensor. This amplification, unfortunately, also boosts any inherent electronic interference, leading to a significant increase in noise.
Low Light Conditions
Shooting in dimly lit environments often forces photographers to either increase the ISO sensitivity or employ longer exposure times. Both of these common solutions can introduce more noise into the image. Mastering how to get rid of grain in Lightroom becomes particularly critical when processing shots captured under such challenging lighting.
Long Exposure Times
When a camera's sensor is exposed to light for an extended duration, it can generate heat. This heat can lead to an increase in electronic noise, especially noticeable in the shadow areas of an image, a phenomenon often referred to as "long exposure noise."
Fundamental Steps for Noise Reduction in Lightroom
Lightroom provides an intuitive and accessible workflow for reducing noise, significantly enhancing the quality of your images, particularly those captured under adverse lighting conditions.
Accessing Noise Reduction Tools
The journey begins in the Develop module, where you'll locate the Detail panel. This crucial panel is thoughtfully divided into two primary sections: Sharpening and Noise Reduction. It is within the Noise Reduction section that you will find the controls to combat unwanted grain.
Adjusting Luminance Noise
The Luminance slider is your primary weapon against luminance noise. As you drag this slider to the right, you increase the intensity of the noise reduction. The art lies in finding a delicate balance: too little adjustment, and the noise will persist; too much, and you risk sacrificing vital image details.
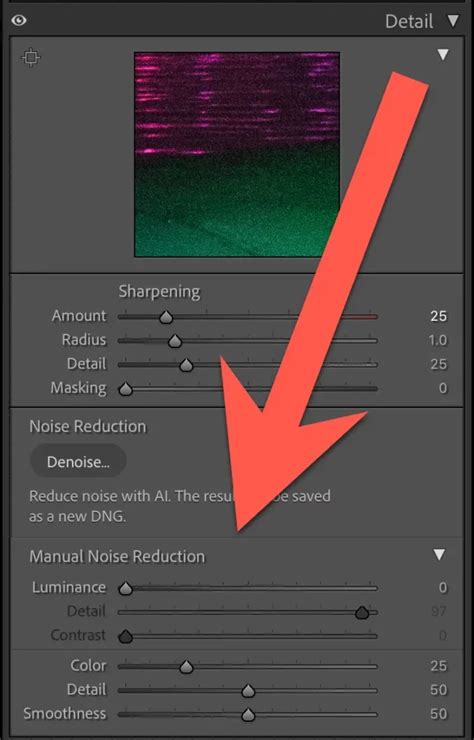
Following the Luminance adjustment, the Detail slider, situated directly beneath it, becomes indispensable. This slider is designed to reintroduce fine textural details that may have been smoothed out by the Luminance slider, effectively restoring lost definition without undoing the noise reduction efforts. Boosting this slider can help to regain some of that lost detail. For instance, setting the Detail slider to +100 can vividly illustrate its reintroducing effect, though a more moderate setting like +50 might be preferable to avoid introducing unwanted texture in areas like a grainy background or delicate feather details.
The Contrast slider, while not always in the primary rotation for noise reduction, can be a valuable addition. If the noise reduction process has inadvertently diminished the sharpness or flattened the dimensionality of your subject, the Contrast slider can help restore some of that lost sharpness and dimensionality, preventing textures from appearing "glazed over."
Managing Color Noise
The Color slider is specifically engineered to target and reduce color noise. Increasing its value by sliding it to the right effectively diminishes the visible color speckles. This tool is exceptionally useful for removing the distracting random color specks that often plague images.
Similar to the Luminance adjustments, the Detail slider here plays a role in protecting fine color details, such as the subtle hues in a sunset. The Smoothness slider helps to mitigate color mottling artifacts. It's important to remember that these sliders work in tandem with the Color Noise Reduction slider; they protect fine lines and reduce mottles but do so at the expense of the overall de-noising effect. This means there's always a trade-off between preserving detail and achieving maximum noise reduction.
The Art of Balancing Noise Reduction and Detail
The true mastery of noise reduction in Lightroom lies in achieving a harmonious balance. The goal is to eliminate as much noise as possible without compromising the image's inherent sharpness and detail. It is crucial to zoom in to at least 100% to accurately assess the noise and the impact of your adjustments. Critically examine various parts of your photo-the sky, skin tones, shadows-to ensure no area is over-processed.
Advanced Techniques for Sophisticated Noise Control
While Lightroom's built-in tools are powerful, photographers seeking even greater control and refinement can explore advanced techniques.
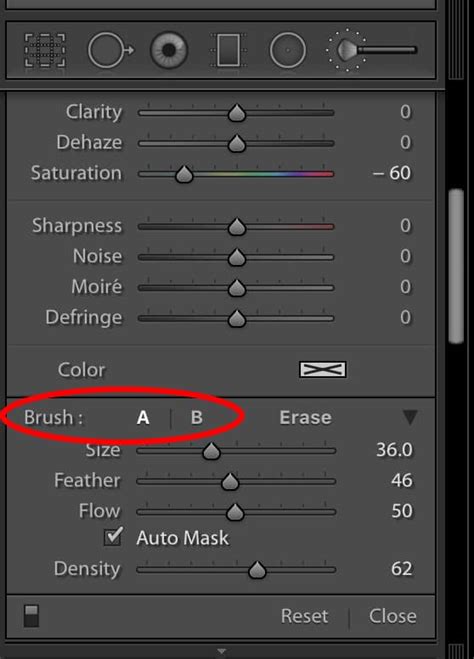
Selective Noise Reduction
Lightroom's power extends to selective adjustments. Using the Adjustment Brush and Gradient Tools, you can apply noise reduction to specific areas of an image. This is particularly beneficial for targeting noise in areas like the sky or deep shadows without affecting the overall sharpness of the main subject. The Adjustment Brush, with a medium Feather setting, allows for soft, unobtrusive application, making it ideal for refining fine details like an eye or face. When reintroducing detail, it's tempting to reach for the Sharpening slider, but this can often undo the careful noise removal. Instead, the Texture slider is a more effective tool for selectively reintroducing detail. Applying this selectively to important areas can bring back definition without reintroducing noise.
It's always advisable to take a step back and re-analyze the photo after making brush edits. Zooming out allows for a holistic view of the subject and ensures that the selective edits enhance, rather than detract from, the overall image.
Sharpening After Noise Reduction
Images that have undergone significant noise reduction can sometimes appear overly soft. Lightroom's sharpening tools, including edge masking, can help restore clarity. The key is to sharpen just enough to bring back detail without reintroducing the very noise you worked to eliminate.
Exploring Third-Party Solutions
For extremely noisy images or when seeking the utmost in detail preservation, advanced users might consider specialized noise reduction software. Tools like ON1's AI noise reduction, which intelligently analyzes and reduces noise while preserving and enhancing image details, can offer a significant leap in quality. These tools can often be used as standalone programs or as plugins within Lightroom, offering a seamless workflow.
Tips and Tricks for Superior Noise Management
Beyond mastering the tools within Lightroom, a strategic approach to shooting and editing can yield superior results.
Proactive Shooting Practices
The most effective way to combat noise is to minimize its introduction at the point of capture.
- Optimal Camera Settings: Always strive to use the lowest possible ISO setting that your shooting conditions allow. In low light, a tripod can be your best friend, enabling longer exposure times without the need for a high ISO.
- Shooting in RAW: RAW files capture a wealth of image data, providing Lightroom with significantly more information to work with during noise reduction. This translates to greater control and a higher quality outcome compared to processing JPEGs, which are already compressed and have less data.
Strategic Editing Workflow
The timing of noise reduction within your editing process can impact the final image quality.
- Early Application: It's generally recommended to apply noise reduction early in your editing workflow, ideally before making any sharpening adjustments. This helps preserve the integrity of the details before they are potentially amplified by sharpening.
- Consider the End Use: The amount of noise reduction required can vary depending on how the image will be used. Images destined for large prints might necessitate more meticulous noise reduction than those intended solely for web display.
The Importance of Practice and Personal Preference
There is no universal "correct" setting for noise reduction; it is inherently image-dependent.
- Experimentation: Regularly experiment with different levels of noise reduction and detail recovery. Understanding how each slider affects your specific image is key.
- Practice Makes Perfect: The more you practice these techniques, the more intuitive it will become to judge the appropriate amount and type of adjustment needed for various scenarios.
Lightroom Denoise Secrets: Make ISO 12,800 Look Like ISO 400!
Frequently Asked Questions About Lightroom Noise Reduction
Is it Better to Shoot at a High ISO and Reduce Noise in Lightroom, or Should I Try to Avoid High ISOs Altogether?
Ideally, shooting at the lowest ISO possible is always the best practice to minimize noise. However, in low-light situations, a higher ISO may be unavoidable. Lightroom's noise reduction tools are highly capable of reducing the noise introduced by high ISO settings, but they cannot fully restore image quality that has been severely degraded by excessive noise. Therefore, while Lightroom can salvage high ISO shots, avoiding unnecessarily high ISOs in the first place remains the preferred approach.
Does Lightroom's Noise Reduction Work Well for All Types of Images?
Lightroom's noise reduction is versatile and effective for a broad spectrum of images. However, its efficacy can vary depending on the intensity and type of noise present, as well as the inherent details and textures within the image. For extremely noisy images or those requiring exceptionally delicate noise handling, external software might offer superior results.
How Does Shooting in RAW vs. JPEG Affect Noise Reduction?
Shooting in RAW format provides Lightroom with a much richer dataset to analyze and process. This abundance of data allows for more nuanced and effective noise reduction compared to JPEG files, which undergo in-camera compression and lose a significant amount of detail. Consequently, RAW files generally yield better control and higher quality results when it comes to noise reduction.
By diligently applying these techniques and understanding the nuances of digital noise, photographers can confidently navigate challenging shooting conditions and produce clean, detailed images even when pushing their equipment to its limits. Embracing the power of Lightroom's noise reduction tools, combined with mindful shooting practices, ensures that unwanted grain will no longer be a barrier to achieving photographic excellence.