The world of digital art, particularly comic creation, thrives on the versatility and power of tools like Adobe Photoshop. For artists aiming to replicate the tactile feel of traditional media or explore entirely new aesthetic territories, understanding and utilizing custom Photoshop brushes is paramount. This tutorial delves into the creation of vintage-inspired comic artwork, offering a step-by-step guide that encompasses everything from initial ideation to the final touches of print defects and misalignments. Whether you're a seasoned Photoshop user or a newcomer to digital coloring, this guide aims to provide insights and techniques applicable to various skill levels, from aspiring comic creators to professional art directors.
The Foundation: Brushes and Their Purpose
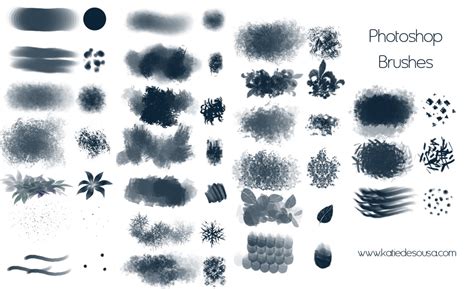
Before embarking on the creative journey, it's essential to understand the tools at hand. A well-curated brush pack can significantly streamline the artistic process, offering a diverse range of textures and effects that mimic traditional art supplies. The "Steal This Brush Pack," a free resource for Procreate, Photoshop, Clip Studio Paint, and Affinity, exemplifies this, providing everything needed to craft authentic vintage artwork.
Within this pack, each brush serves a specific purpose:
- Standard Pencil #1: An indispensable tool for sketching, ideation, and thumbnail creation, offering a familiar feel for initial concept development.
- Ramen Brush: Designed for inking, this brush is responsive, flexible, and versatile, emulating the feel of a well-loved round brush. Its subtle texture adds character to linework.
- Jumbo Marker: Ideal for quickly covering large areas with color while maintaining a hand-drawn aesthetic.
- Dry Brush: Replicates the gritty texture characteristic of mid-century art or can be used to add a sense of wear and tear to an illustration.
- Carbon Tab: Mimics the rich textures of pencil or charcoal, perfect for adding depth and shading to artwork.
- Halftone 30%: A critical brush for recreating vintage print techniques, essential for achieving specific retro styles.
- Ink Spray: Simulates the effect of ink spurting from a printing press, adding a dynamic, textured element.
- Ink Destroyer: Used to subtly wear away parts of the artwork, creating a lived-in, aged appearance.
Understanding the intended use of each brush allows artists to approach their digital canvas with confidence, knowing they have the right tools for every stage of the creation process.
The Creative Spark: From Idea to Sketch
The journey of creating any artwork, especially comic-inspired pieces, begins with an idea. Blank pages can be daunting, but a structured approach to brainstorming and ideation can unlock creativity.
01. Brainstorming and Idea Generation:The process can start with a single word or concept. Free association, mind mapping, and word association are effective techniques to generate a multitude of related ideas. For instance, starting with "steal" might lead to "money," "evil," "devil," and then "fire." The key is to let the ideas flow without judgment, exploring tangents and connections. If inspiration falters, external resources like the internet or reference materials can serve as valuable catalysts. It's important to remember that initial ideas don't need to be entirely unique; they serve as a starting point for further development.
02. The Power of Reference:A common misconception is that great artists do not use references. In reality, even the most celebrated artists throughout history have relied on visual aids. Gathering references-whether for poses, historical clothing, architectural styles, or any other element of the artwork-is a powerful tool. Compiling these references into a single file allows for easy comparison and integration into the artwork, ensuring accuracy and authenticity.
03. Paper Texture and Canvas Settings:To achieve an authentic retro look, incorporating paper textures is a crucial first step. This not only enhances realism but also helps overcome the dreaded "blank page syndrome." The artwork we aim to emulate was originally printed on physical media, making the addition of paper textures vital for authenticity. Additionally, understanding recommended document sizes and aspect ratios for different applications is essential to avoid issues like pixelation and compression, which can degrade the artwork's quality.
💡 Top Tip: When working with halftones, be mindful of resizing. Adjustments to scale can sometimes lead to undesirable optical effects, potentially requiring that section of artwork to be redone.
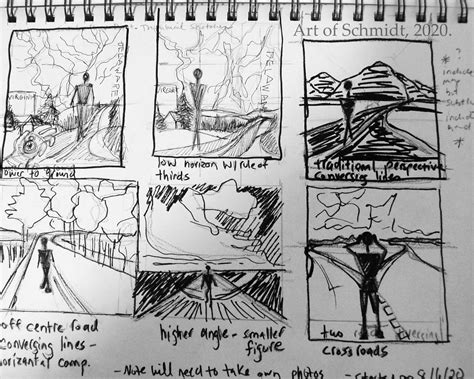
04. Thumbnail Sketching:Before committing to a full-sized drawing, creating multiple thumbnail sketches is an invaluable practice. These small, quick drawings allow for the exploration of various compositions, testing different angles, balance, and moods. Often, initial ideas can be cliché or predictable. Thumbnailing helps to exhaust these less exciting options, clearing the way for more compelling and original concepts. While there's no set number of thumbnails to create, it's important to produce enough to feel confident in the chosen direction, balancing creative exploration with practical constraints like deadlines. Familiarity with comic book conventions, such as framing and paneling, can significantly aid in storytelling through composition.
05. The Rough Sketch:Once a promising thumbnail is selected, the next step is to create a rough sketch at the full intended size of the artwork. This stage is about establishing the fundamental elements: proportions, composition, and overall layout. It's also a phase where further experimentation is encouraged. If new ideas arise during the sketching process, they can be tested and refined before moving forward.
06. Refining with a Clean Sketch:While some artists proceed directly from a rough sketch to inking, creating a clean sketch can greatly improve the final outcome. This refined sketch provides a clear structure, defining details and, crucially, establishing the light source. Planning highlights and shadows at this stage prevents guesswork during inking and leads to more intentional and polished linework. Neglecting this step can result in wonky lines and a lack of depth in the inked artwork.
Bringing Lines to Life: Inking and Halftones
With the sketch finalized, the focus shifts to adding definitive lines and foundational textures.
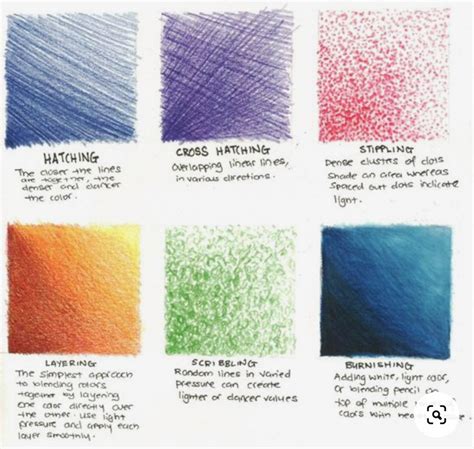
07. The Art of Inking:Inking can seem intimidating for beginners, but with the right tools and techniques, it becomes a manageable and rewarding process. The Ramen Brush from the "Steal This Brush Pack" is highly recommended for its versatility and subtle texture, effectively mimicking traditional inking tools. For those who struggle with a shaky hand or desire cleaner lines, adjusting stabilization settings in Photoshop can be a helpful aid. It's important to find a balance; excessive stabilization can remove character from the lines, making them appear too perfect and less organic. Traditional inking techniques like hatching and cross-hatching can also be incorporated to add depth and form.
08. The Impact of Halftones:Halftones are a hallmark of mid-century printing techniques and are indispensable for recreating specific vintage styles. They are essentially a way to simulate variations in tone and color using dots. While they can be used to add texture and shading to any artwork, their primary function in vintage emulation is to mimic the limitations of older printing processes.
When using halftones, a key consideration is their size. In historical printing, halftones were often made as small as possible to create the illusion of solid color blocks, as achieving different tones was difficult and expensive. In modern digital art, making halftones too small can result in an "ugly mess." The goal is to use them effectively to create visual interest and depth without overwhelming the artwork or appearing overly pixelated. Halftone brushes are great for adding texture and shading to any work. Use halftones to change up the value in key parts of artwork, to establish shadows, or even just to introduce some texture.
Master Halftone Effects for DTF Printing | Photoshop Guide
The Vibrancy of Color and Vintage Imperfections
Color breathes life into illustrations, and the vintage aesthetic is often defined by its unique printing quirks.
09. The Art of Coloring:Before diving into coloring, establishing a color palette is crucial. This proactive step prevents the need for extensive recoloring later. For those less comfortable with color theory, a helpful tutorial can provide a solid foundation. There are numerous approaches to coloring; one effective method involves filling each area with a solid color, then adding highlights using a new layer set to "Overlay" or "Screen" blend mode with a pale yellow. Shadows can be achieved with a "Multiply" blend mode using a cool blue or purple, with opacity adjusted for a natural look. The specific approach to lighting and effects will depend on the desired style, as commercial vintage art often featured less intricate detail.
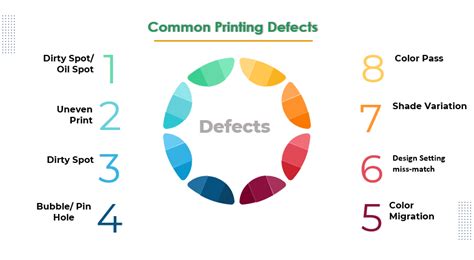
10. Embracing Print Defects and Misalignments:Print is inherently a physical medium, susceptible to errors and wear. Recreating these imperfections digitally adds a significant layer of authenticity to vintage-inspired artwork.
- Ink Splatter: Subtle stamps of color emanating from concentrated areas can simulate ink spurting during the printing process.
- Ink Wear: Applying color removal in areas likely to experience stress, such as folds or handling points, can mimic wear and tear. This should be done subtly, building up the effect gradually for a natural appearance.
- Misalignment: In older printing, colors were applied sequentially, leading to potential misregistration. This can be simulated by nudging individual color layers slightly out of alignment.
The most critical aspect of incorporating these effects is subtlety. Not all vintage artwork requires every possible defect. Consider the "why" behind each effect to ensure it enhances, rather than detracts from, the artwork's believability.
Advanced Techniques and Workflow Considerations
Beyond the core creation process, several advanced techniques and workflow considerations can elevate digital comic art.
Selections and Masking Mastery:Effective selections and masking are fundamental to professional digital art. A comprehensive course on "Selections and Masking Mastery" can provide in-depth knowledge, covering techniques for isolating subjects, creating precise masks, and non-destructively editing artwork. Jesús Ramirez, a renowned digital graphics expert and founder of the Photoshop Training Channel, offers such expertise, emphasizing step-by-step lessons and practical application.
Color Theory and Storytelling:Understanding color theory is not just about aesthetics; it's about storytelling. Color choices can evoke emotions, guide the viewer's eye, and communicate narrative elements. A solid grasp of color concepts, as highlighted in resources like "Color Theory for Artists: 7 Tips to Color Like a Pro," can transform an illustration from merely pretty to profoundly impactful.
Shading Techniques:Good shading, whether realistic or stylized, adds dimension and form. Learning effective shading techniques, as outlined in guides like "Shading Made Easy: 5 Tips," can significantly enhance the visual appeal and depth of comic artwork.
Utilizing Free Brushes and Resources:The availability of free brush packs, such as the "Steal This Brush Pack," democratizes the creation of high-quality digital art. These resources provide artists with a diverse toolkit, enabling them to experiment and develop their unique styles without significant financial investment.
Working with Layer Masks and Blend Modes:Layer masks are powerful tools for controlling the visibility of layers. Understanding how "Black Conceals and White Reveals" functions within layer masks is crucial for precise editing. Similarly, mastering blend modes like "Overlay," "Screen," and "Multiply" allows for sophisticated color and lighting effects.
Preparing for Print:When preparing artwork for print, especially when using paper textures that function in RGB mode, it's advisable to complete the artwork in RGB before flattening and converting to CMYK. This ensures that the texture effects are preserved accurately.
Simulating Print Errors:When simulating CMYK print errors, such as registration errors, it's beneficial to duplicate the color layer group before making adjustments. This provides a safety net if changes are needed later. The use of translucent ink in CMYK printing also influences the final look, and sourcing off-white paper stock with visible fibers can enhance the vintage aesthetic when combined with KraftTone paper textures.
Practical Photoshop Workflow Example:
A practical workflow for creating comic book pages in Photoshop might involve these steps:
- Create a new PSD file.
- Import or create your line art.
- Use selection tools to isolate elements (e.g., a character).
- Invert selections as needed for background elements.
- Set foreground and background colors for specific effects.
- Apply layer styles like "Stroke" to define edges or add outlines.
- Use options like "Apply Image" to composite visible layers, creating a base for color effects.
- Work with adjustment layers (e.g., "Change Color") to fine-tune hues and saturation.
- Consider duplicating layers before introducing significant effects like simulated misalignments to maintain flexibility.
- If aiming for a colored comic book image, ensure the "Color Effect" layer is visible and adjust color tones as desired.
The availability of comic strip template sets can further streamline the process, providing pre-formatted layouts for creating comic book pages efficiently.
The Evolving Landscape of Digital Art
The continuous evolution of digital art tools, including Photoshop brushes and features, empowers artists to explore new creative avenues. Artists like Daniel Presedo, a member of the Photoshop team, emphasize the ability to marry analog sensibilities with digital execution, finding a unique signature in their digital work. The freedom to experiment with brushes and presets without the fear of "messing up" is a significant advantage of digital platforms. Cartoons and comic illustrations, in particular, offer a forgiving entry point into digital painting, allowing for personal expression and style development without the pressure of immediate technical perfection.
Ultimately, while specialized brushes and textures can be inspiring, the core of great artwork lies in smart artistic choices, a solid understanding of fundamentals, and the courage to experiment. Whether emulating the charm of vintage prints or forging entirely new visual languages, Photoshop, armed with custom brushes and a creative vision, remains an unparalleled tool for comic artists. The ability to create wherever inspiration strikes, utilizing tools like Adobe Sketch and Creative Cloud Libraries, further blurs the lines between the physical and digital realms, making the creation of compelling comic art more accessible and dynamic than ever before.