In the dynamic world of digital design, efficiency and organization are paramount. Adobe Photoshop offers a suite of powerful tools designed to streamline the creation and export of design assets, ensuring a smooth workflow for both individual creators and collaborative teams. This article delves into the intricacies of Photoshop's asset generation capabilities, from basic image import to advanced techniques for exporting multiple image types and sizes, all while emphasizing the benefits of structured workflows and smart object integration.
Importing Images and the Power of Smart Objects
One of the fundamental tasks in Photoshop is bringing external images into your project. A straightforward method involves using the Move Tool to drag an image from one document to another. For instance, dragging a snail image into a document containing a cheetah, and then holding the Shift key while releasing the mouse button, will center the snail on the canvas within a new layer. To adjust its size relative to the cheetah, you can invoke the Free Transform command (Command or Ctrl + T) and manipulate the transformation handles.
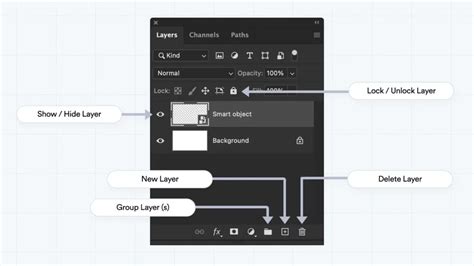
However, simply copying and pasting or even dragging and dropping rasterized images can lead to a loss of quality when scaled or transformed repeatedly. This is where the concept of Smart Objects becomes invaluable. Smart Objects are layers that contain image data from raster or vector sources. They preserve the original image's source content, enabling you to perform transformations like scaling, rotating, and skewing without degrading the pixel data. When you resize a Smart Object, Photoshop stores the original image data and applies the transformations non-destructively. This means you can scale it down multiple times and then scale it back up to its original size without any loss of quality. This is a significant advantage over standard raster layers, which will pixelate and lose detail with each transformation.
Understanding Photoshop's Image Asset Generation
For web design and multi-device applications, efficiently exporting individual images or slices from a Photoshop document is crucial. Historically, the Slice Tool was the primary method for this. The Slice Tool allowed designers to define arbitrary areas within their canvas, which could then be exported as separate image files. However, this method had limitations, particularly when dealing with complex layer arrangements. To select an image for slicing, it was often necessary to hide all underlying layers, which could be a cumbersome and time-consuming process.
Photoshop CC introduced a more powerful and flexible alternative: the Image Asset function. This feature revolutionizes how you extract individual images from your PSD files. Instead of manually defining slices, the Image Asset function leverages layer naming conventions to automatically generate image files. This means you can cut out individual images independently, without the concern of overlapping layers or the need to meticulously manage slice boundaries.
Harnessing the Image Asset Function: A Step-by-Step Guide
The Image Asset function is remarkably intuitive, requiring minimal setup to unlock significant workflow improvements.
Step 1: Add an Extension to Layer Names
The core principle behind Image Asset generation is to append a file extension to the name of the layer or layer group you wish to export. For example, if you have a layer named "test" and you want to export it as a PNG file, you would rename the layer to "test.png". Similarly, for a JPEG, you would use "test.jpg", and for a GIF, "test.gif". For scalable vector graphics, you can use "test.svg".
Step 2: Generate the Image Files
Once your layer names are appropriately suffixed with file extensions, the generation process is straightforward. With the layer(s) still selected, navigate to File > Generate > Image Assets. Upon activation, Photoshop automatically creates a folder named after your PSD file (e.g., "sample-assets" if your PSD is named "sample.psd") in the same directory as your working file. Within this folder, the image files corresponding to your renamed layers will be created.
A key advantage of this function is its automatic updating capability. Any changes made to the layer within the PSD file are reflected in the generated image asset the next time the PSD is saved. This eliminates the need to manually re-export assets every time you make an edit, ensuring your exported files are always up-to-date.
Image Asset Function vs. Slice Tool: A Comparative Advantage
The Image Asset function offers substantial benefits over the traditional Slice Tool, primarily in terms of work efficiency.
- Layer Independence: Image Assets allow you to generate images without worrying about overlapping layers or the complex divisions required by the Slice Tool. You can export any layer or group of layers as an image asset simply by adjusting its name.
- Simplified Workflow: Prior to Photoshop CC, using the Slice Tool involved creating specific areas, cutting out visible layer content, and then exporting. This often required hiding numerous layers to isolate the desired element. Image Assets bypass this entirely.
- Automatic Updates: The automatic regeneration of assets upon saving the PSD file is a significant time-saver, ensuring consistency and reducing manual repetitive tasks.
While the Slice Tool remains a viable option, especially for legacy workflows or specific complex layouts, the Image Asset function provides a more streamlined and flexible approach for modern design needs.
Optimizing Image Output: File Formats and Resolution
When exporting images, especially for web use, controlling file size and quality is paramount. Photoshop offers various file formats, each with its own strengths and weaknesses:
- JPEG: Ideal for photographs and images with smooth gradients and a wide range of colors. JPEGs offer good compression, resulting in smaller file sizes, but they do not support transparency and can introduce artifacts if compressed too heavily.
- GIF: Best suited for simple animations, graphics with limited colors (up to 256), and images requiring transparency. GIFs are generally smaller in file size than JPEGs for images with few colors but can appear posterized if used with photographic images.
- PNG: Excellent for graphics that require transparency, such as logos or icons, and for images where preserving sharp details and text is crucial. PNGs offer lossless compression, meaning no quality is lost, but they can result in larger file sizes compared to JPEGs, especially for full-color images. PNGs can also be used for 8-bit (indexed color) or 24-bit (true color) images.
The choice of format depends on the specific content and intended use of the image. For instance, a photographic background might be best saved as a JPEG, while a logo with transparency would be ideal as a PNG.
Beyond the file format, you can also suppress image size by adjusting the image resolution or by selecting the appropriate file format based on image quality.
- Resizing Image Resolution: If an image is too large for its intended display space, you can resize its resolution. By specifying the desired width and height, along with an appropriate resolution (typically 72 DPI for web use), you can minimize the image size.
- Changing File Format According to Image Quality: As mentioned, different formats offer varying levels of compression and quality. Selecting JPEG for photographic content, PNG for transparency, and GIF for simple graphics with limited color palettes will help manage file sizes effectively.
Advanced Image Asset Generation: Customization and Control
The Image Asset function offers a remarkable degree of customization, allowing you to fine-tune the generated assets to meet specific project requirements.
Controlling Output Quality and Size
You can dictate the output quality and dimensions of your generated assets directly within the layer naming.
- JPEG Quality: For JPEGs, you can specify the quality by appending a suffix like
.jpg(1-10)or.jpg(1-100%). For example, renaming a layer tomyphoto.jpg(8)will generate a JPEG at 80% quality (as the scale is 1-10). - Image Size: You can prefix the asset name with the desired output image size. This can be in pixels, inches, centimeters, or millimeters. For instance,
960px myphoto.jpgor10cm myphoto.png. Photoshop will scale the image accordingly. You can even mix units, such as1920x1080 myphoto.jpg.
Specifying PNG and GIF Options
While JPEGs have quality settings, PNGs and GIFs have different parameters related to color depth and transparency.
- PNG Bit Depth: You can specify the output bit depth for PNGs using suffixes like
.png(8)for 8-bit indexed color or.png(24)for 24-bit true color. - GIF Options: GIF generation primarily focuses on color reduction and transparency.
Organizing Assets with Subfolders
A powerful feature of Image Assets is the ability to organize exported files into subfolders. By including a forward slash (/) in your layer name, you can create a directory structure. For example, renaming a layer to 16x9/mybanner.jpg will place the generated mybanner.jpg file inside a folder named "16x9" within your assets folder. This is incredibly useful for managing assets for different screen sizes or contexts.
Default Settings for Document-Wide Generation
For consistent asset generation across an entire document, you can set default parameters. By prefixing a layer or group name with the keyword default, you can then specify settings that will apply to all generated assets from that document. For example, default hi-res .jpg(90%) would ensure all generated JPEGs are saved at 90% quality and placed in a "hi-res" subfolder.
21 PHOTOSHOP TIPS – Easy Through Advanced!
Best Practices for Asset Management and Workflow
Beyond the technical aspects of asset generation, establishing robust organizational practices is key to long-term project success.
Naming Conventions and File Structure
Before diving into asset creation, it's crucial to establish clear naming conventions and a logical file structure. This practice, often referred to as the "Big Idea -> Little Idea" system, ensures that files are easily identifiable and retrievable.
- Descriptive Names: File names should be descriptive and include relevant information such as image ratio, content, and purpose. For instance,
hero-banner-16x9.jpgis far more informative thanimage001.jpg. - Subfolder Organization: Organize your assets into logical subfolders, either categorically (e.g., "logos," "icons," "backgrounds") or by image ratio (e.g., "16x9," "4x3"). This mirrors the capabilities of the Image Asset function's subfolder creation.
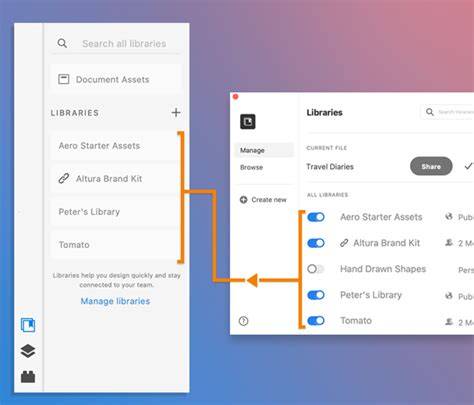
Leveraging Creative Cloud Libraries
Creative Cloud Libraries offer a centralized repository for design elements that can be accessed across all Adobe Creative Cloud applications. This includes colors, character styles, graphics, and importantly, Smart Objects.
- Reusability: Save frequently used elements, such as logos, icons, or even complex compositions as Smart Objects within a Creative Cloud Library. This allows you to effortlessly drag and drop these assets into any Photoshop project, ensuring consistency and saving significant time.
- Collaboration: Libraries facilitate seamless collaboration among team members. Everyone can access the same set of approved assets, preventing version control issues and maintaining brand consistency.
Smart Objects vs. Rasterized Objects in Libraries
When saving elements to Creative Cloud Libraries, a key decision is whether to save them as Smart Objects or rasterized objects.
- Smart Objects: As discussed, Smart Objects retain their original data, allowing for non-destructive transformations. Saving a Smart Object to a library means you can place it in multiple projects and scale it up or down without quality degradation. If the original asset in the library is updated, you can choose to update all instances of that asset in your open documents.
- Rasterized Objects: Rasterized objects are essentially flattened pixel data. Once placed in a document and transformed, they will lose quality if scaled up. While they might be smaller in file size initially, their lack of flexibility makes them less ideal for reusable assets.
Therefore, for elements that will be used repeatedly or at varying sizes, saving them as Smart Objects within your Creative Cloud Libraries is highly recommended.
Considerations for Web and Multi-Device Design
The rise of responsive web design and the proliferation of devices with different screen sizes necessitate a careful approach to asset preparation.
- Multiple Resolutions: The Image Asset function is particularly powerful in this context. By creating artboards for different screen sizes and then using Image Assets with specific naming conventions (e.g.,
mobile/icon.png,tablet/icon.png,desktop/icon.png), you can automatically generate the appropriate image versions for each context. - File Size Optimization: For web performance, minimizing image file sizes is critical. After generating your assets, consider using third-party optimization tools like TinyPNG or JPEGmini. These tools employ advanced compression algorithms to further reduce file sizes without a noticeable loss in visual quality.
Conclusion: Embracing Efficiency in Photoshop
Photoshop's Image Asset generation, coupled with the non-destructive power of Smart Objects and the organizational benefits of Creative Cloud Libraries, provides a robust framework for efficient asset management. By adopting clear naming conventions, leveraging these powerful features, and optimizing your output, you can significantly enhance your design workflow, save valuable time, and ensure the delivery of high-quality, performant digital assets. The ability to generate various image formats and sizes directly from your PSD, with automatic updates and organized subfolders, transforms a traditionally tedious task into a seamless part of the creative process.
The IT Industry Guide, by Internet Academy, emphasizes insights delivered in an easy-to-understand manner. This approach aligns with the goal of making complex design tools accessible and manageable for a wide range of users, from beginners to seasoned professionals. By mastering these Photoshop asset tools, designers can focus more on creativity and less on the repetitive tasks of image extraction and optimization.