In today’s digital age, clear and sharp images are more critical than ever. Whether you’re a professional photographer, a content creator, or just someone who enjoys taking photos, the clarity of your images can make a significant difference. Blurred images can detract from the impact of your visuals, making them look unprofessional or unclear. This is where Photopea, a powerful online image editor, comes into play. Photopea offers a range of tools that can effectively help you unblur an image in Photopea with precision, ensuring that your images retain their sharpness and clarity. While Photopea offers extensive manual controls for detailed editing, there are also automated solutions like Face26 for users who prefer a quicker, AI-driven approach.
Photopea is an online image editor that offers a wide range of editing tools, rivaling desktop applications like Photoshop. The best part is that it’s accessible directly from your web browser without the need to download or install any software. The interface is user-friendly, with tools and panels similar to those found in Photoshop. To begin, upload your image into Photopea by selecting “Open” from the File menu. Ensure that you are working with the highest resolution available to achieve the best results.
Understanding and Addressing Motion Blur
Motion blur is a common photographic artifact that occurs when the camera or the subject moves while the photo is being taken. This movement results in streaks or a general lack of sharpness that can obscure details and reduce the overall impact of an image. Fortunately, Photopea provides several powerful tools to combat and, in many cases, effectively remove motion blur, restoring clarity to your photographs.
The Importance of Smart Objects for Blur Editing
Before experimenting with any blur-related filters, it is crucial to understand an important note regarding editability. Convert your image to a smart object. Otherwise, you won’t be able to edit the blur once it’s applied. By converting your layer to a smart object, you ensure that the applied filters are non-destructive. This means you can go back at any time, adjust the blur settings, or even remove them entirely without permanently altering the original image data. To do this, right-click on your image layer in the Layers panel and select "Convert to Smart Object."
Photopea's Blur Tools: A Detailed Exploration
Photopea offers a diverse array of blur filters, each with unique applications. While blurs are often used to soften an image for aesthetic purposes, they can also be instrumental in reducing unwanted artifacts like motion blur. You have 9 different options available to you, and we will cover everything you need to know about them.
1. Gaussian Blur: The Versatile Standard
The Gaussian Blur effect is one of the most popular filters, renowned for its versatility. It creates a smooth, natural-looking blur by applying a Gaussian function. One cool thing about the Gaussian Blur effect is that you can use it to make skin look smoother. Another thing you can use the Gaussian Blur effect for is to reduce noise in pictures. While not directly for removing motion blur, it can be used in conjunction with other techniques or to soften the overall image after sharpening to mitigate any introduced artifacts.
To apply Gaussian Blur:
- Ensure your layer is a Smart Object.
- Go to
Filter > Blur > Gaussian Blur. - Adjust the
Radiusslider to control the intensity of the blur. - Click
OK.
2. Box Blur: A Simpler Averaging Method
The Box Blur filter is a simpler form of blurring that averages the pixels within a defined radius. The Box Blur filter is smart and can find edges in the picture where there are two different colors next to each other. Because of this, it’s not always used for regular pictures. It can be useful for creating a quick, even blur, but it lacks the sophisticated falloff of Gaussian Blur.
To apply Box Blur:
- Ensure your layer is a Smart Object.
- Go to
Filter > Blur > Box Blur. - Set the
Radiusvalue. For a subtle effect, keep the value at 5 and pressOK. The blur effect will start to reduce.
3. Motion Blur: Simulating Movement
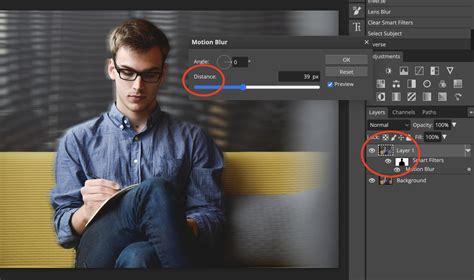
As the name suggests, Motion Blur is designed to simulate the effect of movement during photography. This type of blur happens when the camera or the subject moves while the photo is being taken. While it's typically used to add a blur effect, understanding its parameters is key to knowing what to counteract. You can choose which direction the movement looks like it’s going in and how blurry it looks.
To apply Motion Blur (useful for understanding its characteristics):
- Ensure your layer is a Smart Object.
- Go to
Filter > Blur > Motion Blur. - Adjust the
Angleto set the direction of the blur and theDistanceto control its intensity. - Click
OK.

4. Radial Blur: Spin and Zoom Effects
Radial Blur simulates motion blur that occurs from spinning or zooming. It can create a sense of dynamic movement or a stylized blur effect.
To apply Radial Blur:
- Ensure your layer is a Smart Object.
- Go to
Filter > Blur > Radial Blur. - Choose between
SpinorZoomfor the blur method. - Adjust the
Amount,Centerpoint, andQuality. - Click
OK.
5. Lens Blur: Mimicking Camera Optics
The Lens Blur filter simulates the out-of-focus blur produced by a camera lens. This can be particularly useful for creating realistic depth-of-field effects or subtly softening distracting elements. Let’s add the Lens Blur Filter. Since we selected the subject, the filter will automatically apply around the subject. You will see a mask added to the smart object in the layers panel. Play around the blur settings until you find one that you like. To apply a subtle blur, we suggest playing around the Focal Distance, Shape, and Radius.
To apply Lens Blur:
- Ensure your layer is a Smart Object.
- Go to
Filter > Blur > Lens Blur. - Adjust the parameters like
Radius,Blur Focal Distance,Highlights, andCenter. - Click
OK.
We will be working on an example image to blur the background. Duplicate the the layer & convert to smart object.
6. Surface Blur: Preserving Edges While Blurring
The Surface Blur filter is unique in that it blurs the image while largely preserving the edges. The Surface Blur filter blurs the whole image other than the edges. You can use it to smooth out a noisy image or to reduce the appearance of fine details without making the image look overly soft.
To apply Surface Blur:
- Ensure your layer is a Smart Object.
- Go to
Filter > Blur > Surface Blur. - Adjust the
RadiusandThresholdto control the extent and edge-preserving qualities of the blur. - Click
OK.
7. Average Blur: A Simple Color Averaging
The Average Blur filter creates an average color layer of the whole image. This is the first tool in the list of blurs available in the Photopea filter menu. It effectively turns the entire image into a single, uniform color, which is rarely useful for practical editing but demonstrates a fundamental blurring concept.
To apply Average Blur:
- Ensure your layer is a Smart Object.
- Go to
Filter > Blur > Average.
8. Blur Gallery Filters: Advanced Control
Photopea’s Blur Gallery offers advanced, interactive blurring capabilities that go beyond standard filters. Standard blurring methods allow us to apply the same kind of blur to the whole image. The Blur Gallery Filter allows us to put several control points on top of our image. Then, the blur will be generated according to these points and other parameters.
- Field Blur: This is just a single point with a specific blur value. Press
Filter - Blur Gallery - Field Blur. You can adjust the blur intensity at the selected point. - Iris Blur: Here, you can draw an ellipse over your image, and the blur will gradually grow to a specific value towards the contour of the ellipse, creating a selective focus effect.
- Tilt-Shift Blur: This filter simulates the effect of a tilt-shift lens, allowing you to create a miniature effect or selectively blur parts of the image.
- Motion Blur Gallery: This allows you to create a central axis with over your image (horizontal in this case). Create line segments over the image (blue). Each segment has a control point at the beginning and at the end (white arrows). Each control point can have its own direction and length (speed).
- Spin Blur Gallery: Create ellipses over your image.
These gallery filters offer a more intuitive and powerful way to apply blurs, allowing for greater creative control.
Strategies for Removing Motion Blur
While Photopea offers many blur filters, the process of removing motion blur often involves sharpening techniques rather than just applying blur. However, understanding how blurs work is essential for identifying the type of blur and then applying the correct counter-measures.
Sharpening Tools: The Primary Solution
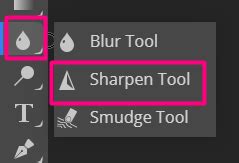
The Sharpen tool in Photopea is a straightforward way to enhance the clarity of your image. It works by increasing the contrast along edges, making them appear sharper. Be careful not to overdo it, as excessive sharpening can introduce noise and artifacts.
To use the Sharpen tool:
- Select the
Sharpen Toolfrom the toolbar. - Adjust the
Strengthin the options bar. - Carefully brush over the areas that appear blurred.
Unsharp Mask: Precision Sharpening
The Unsharp Mask is a powerful and widely used tool for correcting blur and enhancing detail. It works by detecting edges and increasing their contrast, providing more control than the basic Sharpen tool.
To use Unsharp Mask:
- Ensure your layer is a Smart Object.
- Go to
Filter > Sharpen > Unsharp Mask. - Adjust the
Amount(strength of sharpening),Radius(how wide the edge area is), andThreshold(to prevent sharpening noise in smooth areas). For those who prefer a simpler and quicker solution to unblurring images, Face26 provides a user-friendly alternative. While Photopea offers extensive manual controls for detailed editing, Face26 leverages advanced AI technology to automatically enhance and unblur an image with minimal effort. Upload Your Image: Start by uploading the image you want to enhance to the Face26 platform. Select the Unblur Image tool: Once the image is uploaded, choose the “Unblur Image tool” option from the available tools. - Click
OK.
High Pass Filter: Selective Sharpening
The High Pass filter is an excellent tool for selectively sharpening specific areas of an image. It works by isolating edge details. When combined with blending modes, it can be a very effective way to sharpen without introducing halos or excessive noise.
To use High Pass for sharpening:
- Duplicate your image layer and convert it to a Smart Object.
- Go to
Filter > Other > High Pass. - Adjust the
Radiusto a low value (e.g., 1-3 pixels) to reveal the edges. - Change the blending mode of this High Pass layer to
Overlay,Soft Light, orHard Light. - Adjust the opacity of the High Pass layer to control the sharpening intensity.
How to SHARPEN & ENHANCE Images in Photopea
Advanced Techniques and Considerations
Combining Blurs and Sharpening
Often, the best results come from a combination of techniques. For instance, you might use a subtle blur to smooth out areas that have become noisy due to over-sharpening, or selectively apply sharpening to areas that are still too soft.
We will be taking the same example as the Lens Blur Filter Section. This will give the illusion that the background is moving fast. Go to Select > Inverse the selection. Go to Filter > Blur > Motion Blur. The important thing is to analyze your image and decide which blur will work best. You may have to use multiple blurs to get the effect you are looking for. In the business person example, we discussed in motion blur and radial blur.
Masking for Targeted Adjustments
Using layer masks is crucial for applying effects precisely. If you've used a selection tool to isolate an area (like the background), you can then apply blur filters to that selection, or inverse the selection to affect the subject.
For example, to blur the background:
- Select your subject.
- Go to
Select > Inverse the selection. - Convert the layer to a Smart Object.
- Apply your chosen blur filter (e.g., Gaussian Blur).
- You will see a mask added to the smart object in the layers panel. Click on the mask, and choose the brush tool by pressing
Bon the keyboard. You can then refine the mask to ensure the blur is applied only where desired.
Avoiding Common Pitfalls
- Over-sharpening: Sharpening can sometimes introduce noise, especially in low-light images. Over-sharpening can make an image look unnatural. Signs of over-sharpening include halos around edges and increased noise. Make small adjustments to avoid over-processing the image.
- Low-Resolution Images: Low-resolution images are particularly challenging to sharpen. Always use the highest resolution image available to achieve the best results when unblurring.
- Saving Versions: Save multiple versions of your image at different stages of editing. This allows you to revert to an earlier state if you're not happy with the direction of your edits.
Alternative Solutions: Face26
For those who prefer a simpler and quicker solution to unblurring images, Face26 provides a user-friendly alternative. While Photopea offers extensive manual controls for detailed editing, Face26 leverages advanced AI technology to automatically enhance and unblur an image with minimal effort.
To use Face26:
- Upload your image to the Face26 platform.
- Select the “Unblur Image tool” option from the available tools.
- The AI will process and enhance your image.
Face26 is a faster, more automated option for unblurring images, making it ideal for users who need quick results without the need for extensive manual adjustments.
Conclusion: Practice and Experimentation
Photopea offers a robust and customizable method for unblurring images, suitable for a wide range of users. Yes, Photopea offers various tools that can be used to unblur most types of images. The Unsharp Mask and High Pass Filter are among the most effective tools in Photopea for unblurring images. Blurs have a wide range of usability; they can be used in a lot of creative ways. It takes a lot of practice to master the blurs in Photopea. The more you practice, the greater results you will achieve.
Remember, all images are different, and not all blurs will work well on every image. You may have to use multiple blurs or sharpening techniques to get the effect you are looking for. The key is to analyze your image, understand the nature of the blur, and choose the appropriate tools and techniques.
To avoid blurred images in the first place, use a tripod to prevent camera shake, ensure proper focus, and shoot in good lighting conditions. Unblurring images can greatly improve their clarity and overall quality, making a significant difference whether you’re using them for professional purposes or personal memories.