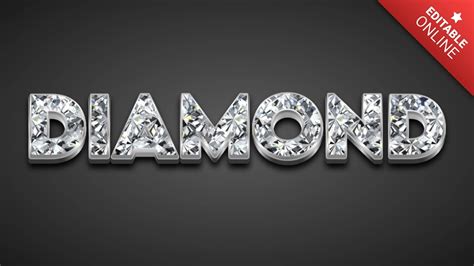
Creating eye-catching text effects is a cornerstone of graphic design, and the "bling bling" aesthetic remains a popular choice for adding a touch of glamour and luxury. This tutorial delves into the intricate process of crafting a dazzling diamond text effect in Adobe Photoshop, offering a step-by-step guide that caters to both beginners and experienced users. We will explore various techniques, from applying intricate layer styles to leveraging smart objects for maximum customization, ensuring you can achieve professional-quality results with ease.
Understanding the Core Components of a Diamond Text Effect
At its heart, a diamond text effect in Photoshop is achieved through a combination of sophisticated layer styles that simulate the facets, reflections, and inherent sparkle of precious gemstones. This involves carefully adjusting parameters within tools like Bevel & Emboss, Stroke, Inner Shadow, Inner Glow, Satin, Color Overlay, Gradient Overlay, and Pattern Overlay. The goal is to mimic the way light interacts with a diamond's surface, creating depth, shine, and an illusion of crystalline structure.
The provided resources offer a fantastic starting point, with a free downloadable PSD file that comes fully layered. This means the foundational elements of the effect are already in place, allowing you to simply replace the placeholder text within a smart object. This approach significantly streamlines the creation process, enabling you to generate "bling bling diamond text effects with just 1 click." The PSD is designed for easy editing and customization; you can modify the diamond texture color, experiment with gradients for unique color effects, and essentially change everything about the appearance.
Step-by-Step Creation: A Detailed Walkthrough
Let's break down the process into manageable steps, drawing from the detailed instructions provided. This approach moves from foundational setup to the intricate application of layer styles, ensuring a thorough understanding of each stage.
1. Setting Up Your Canvas and Initial Text
Begin by creating a new document in Photoshop. A dimension of 900x600 pixels at 72 dpi is a suitable starting point for this effect. For the background, a gradient combining light blue and dark blue hues provides a good contrast that will make the diamond text pop. Once your canvas is prepared, select the Text tool and write down your desired text. Position it centrally on the canvas. For the initial text color, white is a good choice as it will serve as a neutral base for the subsequent layer styles. Choosing a bold, chunky font is recommended, as it will better showcase the intricate details of the diamond effect. Fonts like "Divine" (a Blackletter font) or other robust sans-serif or serif fonts can work well.
2. The Foundation: Bevel and Emboss
The Bevel and Emboss layer style is crucial for giving the text a three-dimensional, faceted appearance, mimicking the way light hits a diamond's surface.
- Style: Pillow Emboss
- Technique: Smooth
- Depth: 11%
- Direction: Up
- Size: 13px
- Angle: 90 degrees
- Altitude: 30 degrees
- Gloss Contour: Ring
- Highlight Mode: Screen
- Color: White
- Opacity: 75%
These settings create the initial sculpted form of the text, providing highlights and shadows that suggest depth and curvature.
3. Refining Edges with Contour
To ensure smooth and well-defined edges, the Contour setting within Bevel and Emboss is essential.
- Contour Element: Sawtooth 1
- Range: 100%
The "Sawtooth 1" contour introduces a subtle, sharp edge definition that complements the faceted look of a diamond.
4. Adding a Gradient Stroke
A gradient stroke adds a metallic sheen and color variation to the edges of the text, enhancing the "bling" factor.
- Size: 7px
- Position: Outside
- Blend Mode: Normal
- Opacity: 100%
- Fill Type: Gradient
- Gradient Colors: A carefully selected sequence of white, yellow, and darker gold tones (#ffffff, #ffd929, #dcc65d, #fefbe5, #fce166, #c4a40d, #cdab21, #ffffff) will simulate the reflective properties of silver or gold with diamond inclusions.
- Style: Linear
- Angle: 90 degrees
- Scale: 142%
This gradient, with its specific color stops and linear application, provides a rich, multi-dimensional edge to the text.
5. Introducing Inner Shadow for Depth
An Inner Shadow helps to create a sense of depth by adding a subtle shadow within the text's contours.
- Blend Mode: Screen
- Color: White
- Opacity: 50%
- Angle: 90 Degree
- Distance: 2px
- Size: 3px
This white inner shadow, set to Screen blend mode, subtly carves into the text, further enhancing its three-dimensional form without appearing too harsh.
6. Applying Inner Glow for Radiance
The Inner Glow effect adds a soft, luminous glow from the edges inwards, contributing to the overall sparkle.
- Blend Mode: Multiply
- Opacity: 65%
- Color: Black
- Technique: Softer
- Source: Edge
- Size: 5px
- Contour: Rounded Steps
- Range: 50%
While a black color might seem counterintuitive for a glow, when used with the Multiply blend mode, it effectively darkens and deepens the inner areas, creating a more nuanced light play.
7. Crafting Satin Shadows for Richness
The Satin effect adds a sophisticated, soft shadow that can dramatically enhance the visual richness of the text, especially when combined with other effects.
- Blend Mode: Multiply
- Opacity: 50%
- Angle: 19 degree
- Distance: 11px
- Size: 14px
- Contour: Gaussian
This effect, applied with a Multiply blend mode, creates a subtle darkening that adds depth and a velvety texture, particularly noticeable after the Pattern Overlay.
8. Color Overlay for Base Toning
A Color Overlay can be used to apply a subtle base color that influences the overall tone of the text before the final pattern application.
- Blend Mode: Overlay
- Color: #b8b4b4 (a medium grey)
- Opacity: 100%
This grey overlay, set to Overlay blend mode, subtly tones down the underlying colors and provides a consistent base for the diamond texture.
9. Gradient Overlay for Luster
The Gradient Overlay is vital for adding a metallic sheen and light reflection across the surface of the text.
- Blend Mode: Linear Burn
- Opacity: 100%
- Gradient Colors: A blend of white, grey, and lighter metallic tones (#ffffff, #858585, #ffffff, #a6a6a6, #ffffff) creates a realistic metallic luster.
- Style: Linear
- Angle: 90 degree
- Scale: 97%
This gradient, applied with Linear Burn, imparts a strong sense of shine and metallic reflection.
11 Photoshop Text Effects AMAZING For BEGINNERS! (2024)
10. The Key: Pattern Overlay for Diamond Texture
This is the pivotal step for achieving the signature diamond effect. You can either create your own diamond texture pattern or download one. The provided PSD file includes such a texture.
- Blend Mode: Normal
- Opacity: 100%
- Pattern: Manually created diamond texture (or from the provided PSD)
- Scale: 30%
Applying a diamond texture pattern at this stage transforms the text into a faceted gemstone. The scale of 30% ensures the diamond facets are visible but not overwhelmingly large.
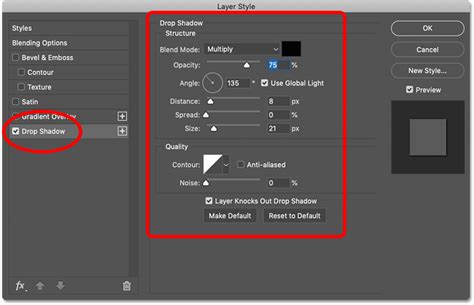
11. Final Touches: Drop Shadow for Realism
A well-placed Drop Shadow adds depth and separates the text from the background, enhancing its realism.
- Blend Mode: Multiply
- Opacity: 75%
- Angle: 120 degree
- Distance: 6px
- Spread: 56%
- Size: 21px
The spread and size of the drop shadow are adjusted to give a soft but defined shadow, grounding the text and making it appear to sit on the background.
Advanced Customization and Creative Exploration
While the above steps provide a robust method for creating a diamond text effect, Photoshop's power lies in its flexibility. The free PSD file is fully layered, allowing for extensive customization.
- Modifying Diamond Texture Color: The diamond texture color can be easily altered. Experiment with gradients to achieve interesting and unique color effects. Instead of relying solely on the default silver or white, try applying vibrant jewel tones like ruby red, emerald green, or sapphire blue using gradient overlays or color overlays on the pattern layer itself.
- Smart Object Editing: The PSD is designed with smart objects. To edit the text, simply double-click the thumbnail of the smart object layer labeled "add your text inside." After making your changes and saving/closing the smart object, the effect will update automatically. This is incredibly efficient for trying out different words or phrases.
- Experimenting with Layer Styles: Don't be afraid to tweak the settings of each layer style. Slightly adjusting the depth of the Bevel and Emboss, the angle of the light in the Drop Shadow, or the colors in the Gradient Overlay can lead to dramatically different results. For instance, reducing the opacity of the Inner Glow can create a more subtle sparkle, while increasing the size of the Stroke can give the text a thicker, more pronounced outline.
- Creating Your Own Diamond Patterns: For a truly unique effect, consider generating your own diamond patterns. This could involve creating a small, faceted shape, duplicating and arranging it, and then defining it as a pattern. This level of control ensures your diamond text is entirely original.
Alternative Approaches and Enhancements
Beyond the detailed step-by-step method, there are other ways to achieve similar effects and further enhance the realism.
The "Gangsta Route" - Silver Text Effect
Another approach focuses on creating a silver text effect, which can serve as a precursor or alternative to the diamond look.
- New Canvas: Start with a new canvas (e.g., 600x300 pixels) with a dark gray background.
- Type Text: Use a bold font (like "Divine" Blackletter) and set the text color to white.
- Inner Shadow: Apply an Inner Shadow with a low opacity to add subtle depth.
- Bevel and Emboss: Use settings to create a metallic, beveled appearance.
- Stroke: Apply a stroke with a silver gradient. Double-clicking the gradient allows you to select a preset silver gradient or create your own.
This silver text can then be further embellished with diamond textures or other gemstone effects.
Adding Sparkles and Realism
To elevate the effect further, consider these additions:
- Clouds Filter: On a new layer above your text, render clouds using black and white default colors (press 'D' to reset). Adjust the brightness and contrast to lighten them.
- Glass Filter: Apply the Glass filter (Filter > Distort > Glass) to the clouds layer, using a texture like "Tiny Lens" and adjusting distortion, scaling, and smoothness. This creates a crystalline, diamond-like scattering effect. Deselect afterwards (Ctrl+D or Cmd+D).
- Sparkle Brushes: Create a new layer named "Sparkles." Select a sparkle brush (you might need to load "Assorted Brushes" from the brush presets) and set the foreground color to white. Paint small sparkles onto the text.
- Soft Blur: Optionally, use a very soft, small round brush to paint a light blur over each sparkle for a more natural glow.
Considerations for Different Applications
The versatility of this diamond text effect extends to various applications.
- Logo Design: Bling text can be a striking element in a logo, especially for brands that aim for a glamorous, luxurious, or celebratory image. However, it's crucial to ensure it aligns with the overall brand identity and doesn't compromise readability.
- Web Design: While visually appealing, excessive use of flashy text effects like diamonds can impact website performance and readability, particularly on mobile devices. Use it sparingly for headings or special call-to-action elements.
- Print and Digital Graphics: For posters, social media graphics, invitations, or advertisements, this effect can add significant visual appeal. Always ensure the resolution is high enough for print.
Licensing and Resources
The provided PSD file is free for personal and commercial projects, with the requirement of attribution. This means linking back to the original blog is necessary when using the resource. For those looking to expand their toolkit, premium Photoshop actions are available for creating jewelry-like effects from text and custom shapes, including gold, silver, diamonds, and pearls.
Conclusion: Unleashing Your Creativity
Mastering the diamond text effect in Photoshop empowers you to add a touch of sparkle and sophistication to your designs. By understanding the interplay of layer styles, leveraging smart objects, and experimenting with advanced filters and brushes, you can create truly unique and captivating text. The provided resources and detailed steps offer a solid foundation, but the true magic happens when you begin to personalize the effect and adapt it to your specific creative vision.