Tired of battling with unwanted items or missing pieces in your photographs? So, no need to be concerned! In this tutorial, we'll walk you through the simple techniques that will help you master Photoshop's Content-Aware Fill and Generative Fill, and advance your photo editing skills. These powerful tools allow you to intelligently remove distractions, seamlessly extend backgrounds, and reconstruct missing image information, making complex edits remarkably straightforward.
Understanding the Core Principles of Content-Aware Technology
At its heart, Content-Aware technology in Photoshop is about intelligent image manipulation. The software analyzes the surrounding pixels of a selected area and uses that information to generate a fill that blends seamlessly with the rest of the image. This means Photoshop attempts to predict what should be in the empty or selected space, based on the context provided by the pixels around it. This is a significant leap from older methods, which often relied on manual cloning and healing, requiring more time and expertise.
The core idea is to make Photoshop "aware" of the content within your image. When you select an area to be removed or filled, Content-Aware algorithms examine the textures, patterns, colors, and structures of the adjacent pixels. It then synthesizes new pixels that match these characteristics, aiming to create a result that is indistinguishable from the original image.
Content-Aware Fill: The Foundation
Content-Aware Fill, first introduced in Photoshop CS5, revolutionized object removal. Previously, removing an object often involved tedious work with the Clone Stamp Tool or Healing Brush, meticulously copying and blending pixels to hide the unwanted element. Content-Aware Fill automates much of this process.
To use Content-Aware Fill, you typically follow these steps:
- Open your Image in Photoshop: Launch Adobe Photoshop and open the image you want to edit by going to File > Open and selecting your image file.
- Create a Duplicate Layer: To preserve the original image, creating a duplicate layer to work on is a good idea. In the Layers panel, right-click on the background layer and select Duplicate Layer. This ensures your original image remains untouched.
- Make a Selection: On the left side of Photoshop, choose the selection tool that best suits your image. For simple scenarios, you don't need to meticulously outline the object or character you want to remove, and the choice of selection tool is not crucial here. Tools like the Lasso Tool, Object Selection Tool, or even a simple rectangular marquee can be effective.
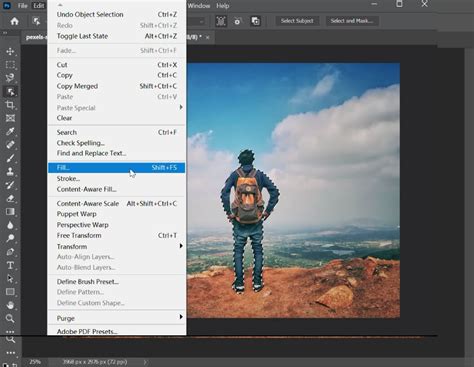
- Access Content-Aware Fill: With your selection active, navigate to Edit > Fill, and then select "Content-Aware" from the Contents dropdown menu. Alternatively, in more recent versions of Photoshop, you can access a dedicated Content-Aware Fill workspace by going to Edit > Content-Aware Fill.
- Review and Refine (if using the workspace): The dedicated Content-Aware Fill workspace provides a split view, showing your original image alongside a preview of the fill. Here, you can refine the "Sampling Area" - the area Photoshop uses to generate the fill - by painting over or excluding certain parts of the image. This allows for more control over the outcome.
- Apply the Fill: Once you are satisfied with the preview, click "OK" to apply the fill to your image.
- Inspect the Result: Zoom in and inspect the filled areas to ensure the result is satisfactory. Minor imperfections can often be fixed with traditional retouching tools like the Clone Stamp Tool or Healing Brush.

The effectiveness of Content-Aware Fill can vary depending on the complexity of the image and the selected area. For simple backgrounds or objects with clear edges against a relatively uniform backdrop, it often produces near-perfect results. For instance, removing distracting pieces of ice from a photograph, as described in one example, can be achieved with a few simple clicks. The tool analyzes the surrounding ice-free areas and intelligently fills the space.
Expanding the Capabilities: Content-Aware Scale
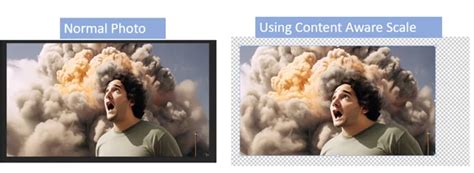
Beyond removing objects, Photoshop's content-aware technology extends to transforming images with Content-Aware Scale. This feature allows you to resize an image while preserving important details and content, unlike traditional scaling which can distort or stretch elements.
Here's how to use Content-Aware Scale:
- Select the Layer to Be Scaled: In the "Layers" panel, click on the layer you want to scale. If your image is a background layer, first convert it to a regular layer by double-clicking on it.
- Activate Free Transform: Go to Edit > Free Transform (or press Ctrl+T / Command+T).
- Enable Content-Aware Scale: In the Options bar at the top, locate the "Content-Aware" checkbox and enable it.
- Scale the Image: Click and drag the handles on the bounding box to scale your image. Hold the "Shift" key to maintain aspect ratio. For Content-Aware Scale, you can also hold "Alt" (Windows) or "Option" (Mac) to scale from the center.
- Apply the Transformation: Press Enter or click the checkmark icon in the Options bar to apply the scaling.
- Inspect the Result: Zoom in and inspect the scaled areas to ensure the result is satisfactory. Content-Aware Scale intelligently preserves elements like people or buildings while allowing areas with less detail, such as skies or flat backgrounds, to stretch or compress.
Consider expanding the background of a photograph. Content-Aware Scale can intelligently stretch the sky or a distant landscape without distorting foreground elements, creating a wider-looking scene.
Generative Fill: The Next Frontier in AI-Powered Editing
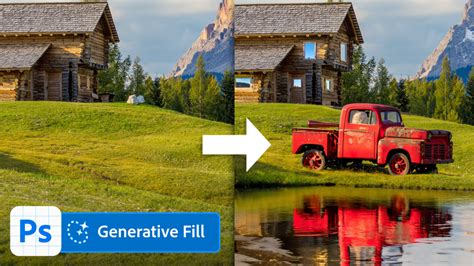
While Content-Aware Fill is powerful, Adobe has pushed the boundaries further with Generative Fill, a feature that leverages Adobe Firefly generative AI. Generative Fill goes beyond simply analyzing existing pixels; it can create entirely new content based on text prompts or by intelligently filling selected areas with contextually relevant imagery.
Generative Fill excels in handling more complex scene algorithms and often produces superior results, albeit with slightly longer processing times due to the advanced AI involved. Its intelligence lies in its ability to understand the scene and generate elements that are not just pixel-perfect matches but also contextually appropriate.
Harnessing the Power of Generative Fill
Using Generative Fill is similar in principle to Content-Aware Fill, but with an added layer of creative control:
- Open Your Image: As with Content-Aware Fill, start by opening your image in Photoshop.
- Create a Duplicate Layer: Always work on a duplicate layer to protect your original image.
- Make a Selection: Use any selection tool to define the area you want to modify or fill. This could be an area where you want to add something, remove something, or extend the image.
- Access Generative Fill: With your selection active, click the "Generative Fill" button that appears in the contextual task bar.
- Enter a Text Prompt (Optional but Recommended): A text field will appear. You can either leave it blank to let Photoshop intelligently fill the selection based on the surrounding content, or you can enter a descriptive text prompt. For example, if you've removed an object, you might prompt "fill with grass" or "fill with sand." If you want to add something, you could prompt "add a small boat" or "add a flock of birds."
- Generate Variations: Click "Generate." Photoshop will process your request and present you with a few variations of the generated content.
- Choose the Best Result: Review the variations and select the one that best fits your needs. You can generate more variations if needed.
- Inspect and Refine: As with Content-Aware Fill, zoom in to check for any imperfections and use other editing tools to make final adjustments.
Generative Fill is incredibly powerful for processing complex image scenes. For instance, if a photo of a swan has an unwanted shadow, including the shadow area in your selection and applying Generative Fill can result in a more natural-looking image where the shadow is intelligently removed or integrated.
Generative Fill vs. Content-Aware Fill: When to Use Which
- Content-Aware Fill: Best suited for straightforward object removal, filling small gaps, or extending simple backgrounds where the surrounding content provides a clear guide for the fill. It's generally faster and requires less user input.
- Generative Fill: Ideal for more complex scenarios, adding new elements to an image, significantly altering existing content, or when you need a higher degree of creative control. The AI's ability to generate novel content based on prompts makes it a more versatile tool for advanced editing.
Optimizing Your Workflow: Shortcuts and Tools
While these powerful features are accessible through menus, optimizing your workflow can significantly speed up your editing process.
Keyboard Shortcuts
Assigning keyboard shortcuts to frequently used functions like Content-Aware Fill can save valuable time. You can customize these in Photoshop's "Keyboard Shortcuts" panel (Edit > Keyboard Shortcuts). However, it's important to note that relying solely on memorizing numerous shortcuts might not always be the most efficient method, as it can be easy to mix them up.
Specialized Controllers
For photographers and designers who frequently use Photoshop, dedicated hardware controllers like the TourBox can be a game-changer. These controllers offer customizable buttons, dials, and wheels that can be programmed to trigger specific Photoshop actions, including Content-Aware Fill and Generative Fill, as well as complex macro sequences. This allows for a more intuitive and tactile editing experience, reducing the need to constantly switch between keyboard and mouse. Don't be intimidated by the complexity of TourBox macros; you can get the hang of it in just a few minutes and use them to accomplish a wide range of complex operations.
Photoshop Generative Expand AI vs Content Aware Fill
Advanced Considerations and Techniques
When working with Content-Aware Fill and Generative Fill, several advanced considerations can lead to better results:
Selection Precision
While Content-Aware Fill doesn't always require meticulous selections, the quality of your selection directly impacts the outcome. For more complex objects or areas with intricate details, using more precise selection tools like the Pen Tool can yield superior results. The Pen Tool creates vector paths, offering the cleanest edges possible, which is especially crucial for high-resolution work intended for print. Although it's not the fastest method, mastering the Pen Tool is an essential skill for professional retouching.
Working with Imperfections
Even with advanced tools, some imperfections may remain. It's often necessary to perform a final cleanup using traditional tools like the Clone Stamp Tool or Healing Brush. These tools offer fine-grained control for correcting small artifacts, blending edges, or refining textures that the automated tools might miss.
Understanding the Sampling Area
In the Content-Aware Fill workspace, the sampling area is critical. Photoshop uses this area to gather information for the fill. By default, Photoshop selects the entire image as the sampling area. However, you can refine this by painting over areas in the left panel (which shows the original image) to tell Photoshop which areas to sample from and which to ignore. This is particularly useful when dealing with images that have distinct foreground and background elements.
Version Differences
It's worth noting that the capabilities of Content-Aware Fill have evolved over Photoshop versions. While the core functionality was present in CS5 and CS6, newer versions offer more refined algorithms and the integrated Generative Fill feature. If you are using an older version of Photoshop, it may be worth considering an upgrade to access these powerful tools. A limited version of Content-Aware Fill also exists in Adobe Photoshop Elements 9 and later, offering basic functionality for panorama edge filling and object removal using the Spot Healing Brush.
Conclusion
Photoshop's Content-Aware Fill and Generative Fill are indispensable tools for any photographer or digital artist. They significantly streamline the process of object removal, image extension, and content creation, allowing for more creative freedom and professional-looking results. By understanding their underlying principles, practicing with various scenarios, and optimizing your workflow with the right tools and techniques, you can master these features and elevate your photo editing skills to new heights. Whether you're a beginner looking to quickly remove distractions or an advanced user aiming for complex compositing, these intelligent features are designed to empower your creativity.