Alpha channels are a fundamental yet often underutilized feature within Adobe Photoshop, offering profound control over image transparency and complex compositing. While layers and layer masks are more commonly known, a deep dive into alpha channels unlocks a new realm of creative possibilities for both amateur enthusiasts and seasoned professionals. This guide aims to demystify alpha channels, illustrating their creation, manipulation, and application for achieving sophisticated visual effects.
Understanding the Core Concept of Alpha Channels
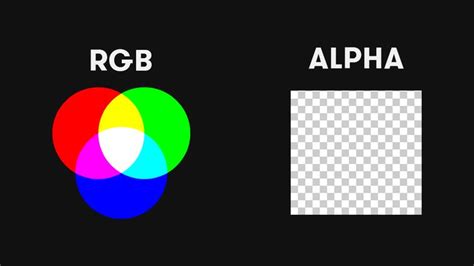
At its heart, an alpha channel is a special type of channel that works alongside the standard Red, Green, and Blue (RGB) color channels. Its primary function is to store transparency information for an image. Think of it as an invisible "mask" that dictates which parts of an image are fully visible, completely transparent, or somewhere in between. This 8-bit channel provides 256 levels of gray, where white represents full opacity (visibility), black signifies complete transparency, and shades of gray denote varying degrees of semi-transparency. For instance, a 50% gray value in the alpha channel translates to 50% visibility of the image content.
Alpha channels are typically used in conjunction with 16.8 million color RGB images, resulting in 32 bits per pixel (BPP) for the final transparent image. This allows for rich color depth combined with nuanced transparency. The robustness of alpha channels also extends to their flexibility; they can be edited, combined with other images, or utilized in various creative workflows, making them a cornerstone in the toolkit of visual professionals.
Creating Transparency with Alpha Channels: A Step-by-Step Approach
One of the most straightforward methods to create a transparent image with an alpha channel from a standard image involves "extruding" a part of the image and removing the existing background. This technique is particularly effective when dealing with images that have a distinct foreground subject against a relatively uniform background.
Step 1: Opening Your Image in Photoshop
Begin by opening your desired image in Adobe Photoshop. Navigate to File > Open..., select your file, and click "Open." The image will appear in a separate document window, ready for manipulation.
Step 2: Selecting the Background Area
The next crucial step is to select the background area of the image that you wish to remove.
- For Solid Color Backgrounds: If your image background consists of a solid color (e.g., white), the
Magic Wand Tool(shortcut:W) is an excellent choice. Click within the background area. In the tool's options bar at the top of the screen, ensure thatToleranceis set to a suitable value (e.g., 10, though this may need adjustment based on your specific image), and thatAnti-aliasedandContiguousare checked. A dashed line (marching ants) will appear around the selected background. - For Complex Backgrounds: If the background is not uniform, you might need to employ tools like the
Polygonal Lasso Tool(shortcut:L) to manually outline the background or the subject.
Step 3: Inverting the Selection
At this point, the background is selected, not the foreground subject. To select the subject instead, you need to invert the selection. Go to Select > Inverse (shortcut: Shift+Ctrl+I on PC, Shift+Cmd+I on Mac). Now, the marching ants will surround your foreground subject.
Step 4: Copying and Pasting to a New Layer
With the foreground subject selected, copy it using Edit > Copy (shortcut: Ctrl+C or Cmd+C). Then, paste it into a new layer using Edit > Paste (shortcut: Ctrl+V or Cmd+V). This action creates a new layer containing only the "extruded" subject.
Step 5: Isolating the Transparent Image
In the Layers panel (accessible via Window > Layers), you will now see your new layer at the top, with the original image beneath it. To isolate your subject and achieve transparency, hide the original background layer by clicking the "eye" icon next to it. The background area of your document should now appear transparent, often indicated by a checkerboard pattern.
Step 6: Saving the Transparent Image
To preserve your newly created transparent image, it's recommended to save it to a new file. Go to File > Save As.... In the Format dropdown menu, select PNG (Portable Network Graphics). PNG is a preferred format for web graphics and supports alpha channel transparency effectively. Other formats that support alpha channels include BMP and PSD (Photoshop Document). Click "Save."
You have now successfully created a transparent version of your image using an alpha channel, ready for use in various design projects.
Advanced Alpha Channel Manipulation in Photoshop
Beyond basic transparency creation, Photoshop offers powerful features for advanced alpha channel manipulation. These capabilities are essential for complex compositing, intricate masking, and precise control over image elements.
Working with the Channels Panel
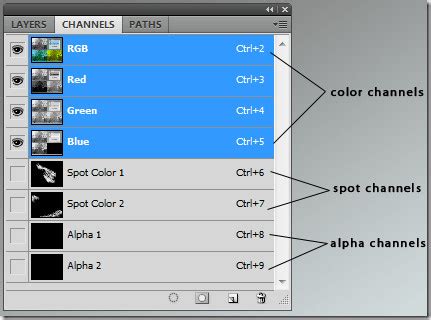
The Channels panel (accessible via Window > Channels) is where you directly interact with alpha channels. This panel displays the standard RGB channels and any additional alpha channels you create.
- Creating a New Alpha Channel: To create a new alpha channel, click the "Create new channel" button at the bottom of the Channels panel. This typically adds a channel named "Alpha 1" to your list, initially appearing as a black canvas.
Modifying Alpha Channels: Once created, alpha channels can be edited like any other grayscale image. You can apply filters, adjustments, or use painting tools (brushes, erasers) directly on the alpha channel to refine its transparency information. Remember: white in an alpha channel represents opacity, black represents transparency, and gray shades indicate semi-transparency.
- Painting with Black: Painting with black on an alpha channel increases the transparent areas of your image.
- Painting with White: Painting with white on an alpha channel increases the opaque (visible) areas.
Loading Alpha Channels as Selections: A key function of alpha channels is their ability to store selections. To load an alpha channel as a selection, you can
Ctrl+click(PC) orCmd+click(Mac) on the channel's thumbnail in the Channels panel. This action brings back the "marching ants" representing the saved selection. This loaded selection can then be used to create layer masks, apply adjustments to specific areas, or further refine the image.
Alpha Channels vs. Layer Masks
It's important to distinguish alpha channels from layer masks, although they share functional similarities.
- Layer Masks: Layer masks are directly attached to a specific layer and control the visibility of that layer only. They are edited directly within the Layers panel.
- Alpha Channels: Alpha channels are stored independently within the Channels panel. They can affect any layer in the image and can be saved, loaded, and reused across different layers or even different documents. This makes them ideal for complex masking scenarios where a mask needs to be applied to multiple elements or saved for future use.
Insanely Difficult Selections MADE EASY with Alpha Channels in Photoshop
When you save a selection as an alpha channel, it becomes an editable grayscale mask. You can then load this mask as a selection to apply targeted edits or adjustments to your image. For instance, if you want to adjust the exposure of a specific object within a composite image, you can create a precise selection of that object, save it as an alpha channel, and then load that channel as a selection to apply the exposure adjustment only to that area.
Practical Applications of Alpha Channels
The utility of alpha channels extends to numerous advanced techniques:
- Complex Compositing: When combining multiple images or elements, alpha channels are indispensable for creating seamless blends and precise cutouts. For example, masking a person from a photograph to place them into a different scene requires meticulous control over the edges, which alpha channels facilitate.
- Targeted Adjustments: As mentioned, alpha channels enable you to create highly specific selections for applying adjustments like color correction, sharpening, or blur effects to particular parts of an image without affecting the rest.
- Creating Special Effects: Alpha channels can be used to generate unique visual effects by manipulating transparency in creative ways, such as creating ghostly apparitions or intricate patterns.
- Preserving Transparency in File Formats: When exporting images that require transparency, ensuring you use a file format that supports alpha channels (like PNG or TIFF) is critical. Saving a file with an alpha channel in a format that doesn't support it will result in the transparency information being lost.
Saving and Exporting with Alpha Channels
When saving your work that involves alpha channels, the choice of file format is paramount.
- PNG: This is a widely supported, lossless format excellent for web graphics and images requiring transparency. It preserves all 256 levels of gray in the alpha channel.
- PSD: The native Photoshop format retains all layers, masks, and alpha channels, making it ideal for ongoing editing and complex projects.
- TIFF: Another lossless format that supports alpha channels, often used in print and professional photography workflows.
- JPEG: Does not support alpha channels. Saving a transparent image as a JPEG will flatten it, typically filling transparent areas with white.
When saving, ensure you select the correct file format and that the "transparency" or "alpha channel" option is enabled if prompted by the save dialog.
Troubleshooting Common Alpha Channel Issues
Occasionally, you might encounter issues when working with alpha channels. Here are a few common problems and their solutions:
- Transparency Not Appearing:
- Check File Format: Ensure you are saving in a format that supports transparency (e.g., PNG).
- Check Layer Visibility: Make sure the layers you intend to be visible are indeed visible in the Layers panel.
- Check Alpha Channel Content: Verify that your alpha channel contains the correct black and white values for transparency. White should correspond to visible areas, and black to transparent areas.
- Incorrect Transparency:
- Refine the Alpha Channel: Revisit the Channels panel and use painting tools to adjust the gray levels in your alpha channel.
- Check Layer Blending Modes: Some blending modes on layers can affect how transparency is rendered. Ensure the blending mode is set appropriately.
- Alpha Channel Not Functioning:
- Recreate the Channel: Sometimes, a corrupted alpha channel can be fixed by deleting it and recreating it from a saved selection or a layer mask.
- Verify Selection Loading: When loading an alpha channel as a selection, ensure you are clicking on the correct channel thumbnail.
The maximum number of alpha channels supported in a Photoshop image can vary depending on the file format and your computer's resources. However, most common formats like PSD and TIFF can accommodate multiple alpha channels, allowing for very intricate masking workflows.
By understanding and utilizing alpha channels, you can elevate your Photoshop skills, achieving professional-level results in image manipulation, compositing, and graphic design. They offer a powerful, non-destructive way to control transparency and craft sophisticated visual effects, opening up a world of creative possibilities.