In the dynamic world of video editing, efficiency and consistency are paramount. DaVinci Resolve, a professional-grade editing software, offers a suite of powerful tools to streamline workflows, and one of the most impactful is the ability to copy and paste attributes between clips. This technique is not just a convenience; it's a fundamental skill that can significantly accelerate your editing process, ensure a uniform aesthetic, and reduce the potential for human error. Whether you're a seasoned professional or just starting your editing journey, understanding how to effectively leverage DaVinci Resolve's copy and paste attributes functionality will elevate your projects.
The Power of Consistency: Why Copying Effects Matters
When working on any video project, from a quick social media post to a feature-length documentary, maintaining a consistent visual and auditory style is crucial for a polished final product. Manually applying the same adjustments, color grades, or effects to multiple clips can be incredibly time-consuming and prone to slight variations. This is where the "Copy & Paste Attributes" feature in DaVinci Resolve truly shines.
By copying attributes, you ensure that identical settings are applied across selected clips, guaranteeing a uniform look and feel. This not only saves precious editing time by avoiding repetitive tasks but also significantly reduces the likelihood of minor inconsistencies that can detract from the overall quality of your video. It allows you to apply effects like LUTs, color grading, zoom, cropping, or even specific plugins to multiple clips in one go, maintaining a cohesive aesthetic throughout your entire project. This efficiency boost is invaluable, especially when dealing with extensive projects that require meticulous attention to detail.
Method 1: Copy & Paste Attributes on the Edit Page
The most straightforward and frequently used method for transferring effects between clips is through DaVinci Resolve's "Copy & Paste Attributes" feature, primarily utilized on the Edit Page. This method is intuitive and offers granular control over what is transferred.
Steps for Copying and Pasting Attributes:
- Select the Source Clip: Begin by navigating to your timeline on the Edit Page. Click on the clip that already has the desired effects, color grading, or attributes applied to it. Take a moment to review these settings in the Inspector panel, noting the applied video, audio, and effects.
- Copy the Source Clip: With the source clip selected, use the keyboard shortcut to copy it. On Windows, this is
Ctrl+C; on macOS, it'sCommand+C. - Select the Destination Clip(s): Now, select the clip or clips to which you want to apply these attributes. To select multiple clips, hold down the
Ctrlkey (Windows) orCommandkey (macOS) and click on each target clip. - Initiate Paste Attributes: With the destination clip(s) selected, initiate the paste attributes command. On Windows, the shortcut is
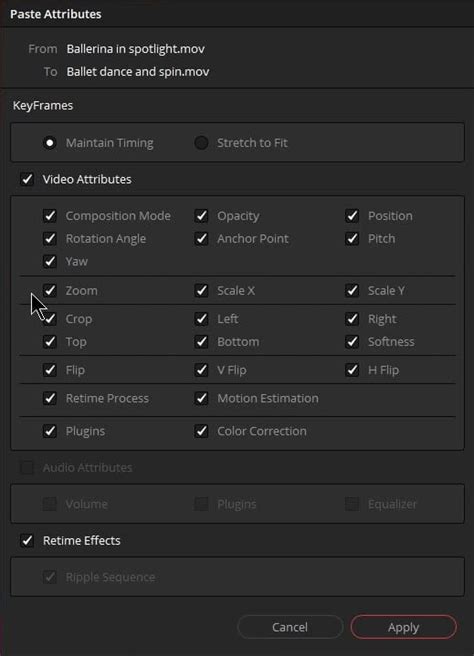
Alt+V; on macOS, it'sOption+V. - Configure Paste Attributes Dialog: A dialog box titled "Paste Attributes" will appear. This is where you have precise control over which attributes are transferred. You will see categories such as Color Correction, Transform, Cropping, Audio, Plugins, and more.
- Default Selection: By default, the dialog often selects all video attributes. However, if you only want to copy specific attributes, uncheck the boxes for those you don't want to transfer.
- Specific Attribute Selection: For example, if you only want to copy a particular color grade or zoom setting, uncheck everything else and only select the checkbox next to the desired attribute.
- Plugins: Within the Video Attributes section, you'll find an option for "Plugins." Ensure this is checked if you want to copy any third-party or Resolve-specific plugins applied to the source clip.
- Apply Attributes: Once you have made your selections in the "Paste Attributes" dialog box, click "Apply." The chosen attributes will then be applied to your selected destination clip(s).
- Review and Refine: After applying the attributes, take a moment to review your changes. DaVinci Resolve is non-destructive, meaning you can easily undo any action using
Ctrl+Z(Windows) orCommand+Z(macOS) if you're not satisfied with the result.
Pro Tip: This method is incredibly efficient for applying the same settings to a large number of clips simultaneously. Simply select all the target clips before initiating the "Paste Attributes" command.
Method 2: Leveraging Adjustment Clips for Global Effects
When you need to apply the same set of effects or a specific color grade to a sequence of clips and want the ability to update them all at once, Adjustment Clips offer an elegant solution. This method is particularly useful for applying global looks, LUTs, or overall color grading that should affect a continuous segment of your timeline.
Steps for Using Adjustment Clips:
- Access the Effects Library: Navigate to the Effects Library, typically found in the top-left corner of the Edit Page.
- Locate Adjustment Clips: Within the Effects Library, go to "Effects" and then find "Adjustment Clip."
- Add to Timeline: Drag the Adjustment Clip from the Effects Library and place it above the timeline clips you wish to affect. The Adjustment Clip should span the duration of all the clips that will receive the applied effects.
- Apply Effects to the Adjustment Clip: Select the Adjustment Clip itself. Now, in the Inspector panel, apply your desired effects, color grades, or other adjustments. Any changes made here will be applied to all the underlying clips within the Adjustment Clip's duration.
- Global Updates: The beauty of this method is that if you decide to tweak the effect or color grade later, you only need to adjust the single Adjustment Clip. All the clips beneath it will automatically update, ensuring consistent and effortless modifications.
Best for: Applying effects like LUTs, broad color grading, or transitions to multiple clips simultaneously, where a unified and easily updatable look is desired.
Stop wasting time!! Use the simple but AMAZING Adjustment Clip in Davinci Resolve 18
Method 3: Precision Color Grading on the Color Page
For dedicated color correction and grading tasks, the Color Page in DaVinci Resolve provides specialized tools that go beyond the general "Paste Attributes" function. This method is ideal for transferring precise color grades and node structures.
Steps for Copying Color Grades:
- Navigate to the Color Page: Switch to the Color Page at the bottom of the DaVinci Resolve interface.
- Select the Graded Clip: In the Color page viewer or the clip thumbnails at the bottom, select the clip that has the desired color grade applied.
- Grab Still: Right-click on the selected graded clip and choose "Grab Still." This captures a still image of the clip's current grade and stores it in the Gallery.
- Apply Grade to Target Clip(s):
- From the Gallery: In the Gallery window, right-click on the still image you just created and select "Apply Grade" on the target clip(s) you wish to grade.
- Middle Mouse Button Drag: Alternatively, you can use your middle mouse button to drag the thumbnail of the graded clip directly onto the thumbnail of the target clip(s) in the timeline.
- Node Structure Preservation: A significant advantage of this method is that it can preserve the entire node structure of the original grade, allowing for complex and layered looks to be replicated accurately.
Pro Tip: The "Apply Grade" method is exceptionally useful for maintaining exact node structures and all associated settings between clips, ensuring a perfect match for your color grading.
Method 4: Saving and Reusing Effect Presets
If you find yourself frequently using the same effect settings across various projects or clips, saving these configurations as presets is a highly efficient workflow enhancement. This allows for quick application of complex or customized effects with just a few clicks.
Steps for Saving Effect Presets:
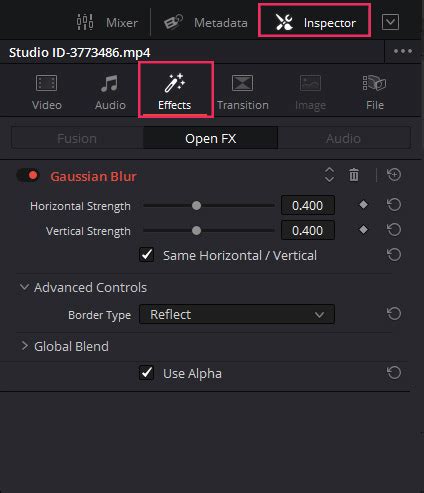
- Apply Effect to a Clip: First, apply the desired effect to a clip and adjust its settings in the Inspector panel to your liking.
- Access Effect Options: With the effect still selected and its parameters visible in the Inspector, locate the options menu for that specific effect. This is usually represented by three dots or a small gear icon, depending on the effect.
- Save Preset: Click on the options menu and select "Save Preset."
- Name Your Preset: You will be prompted to name your preset. Choose a descriptive name that will help you easily identify it later.
- Apply Preset to New Clips: To apply this saved preset to any new clip, simply select the target clip, navigate to the Inspector, find the same effect type, click its options menu, and select "Load Preset," then choose your saved preset from the list.
Method 5: Power Grades for Project-Wide Styles
For recurring visual styles that need to be applied across multiple projects, DaVinci Resolve's Power Grades offer a robust solution. Power Grades are essentially saved looks that can be accessed and applied from anywhere within DaVinci Resolve, even across different projects.
Steps for Using Power Grades:
- Create and Save a Grade: On the Color Page, apply your desired color grade to a clip. Once satisfied, right-click on the clip's thumbnail in the Color Page viewer and select "Save as PowerGrade."
- Access Power Grades: Your saved Power Grade will be stored in the "PowerGrade" folder within the DaVinci Resolve Gallery. You can access this Gallery by clicking the Gallery icon, typically found in the top-right corner of the Color Page.
- Apply Power Grade: To apply a Power Grade to any clip, in any project, simply locate your saved Power Grade in the Gallery, right-click on it, and select "Apply Grade." Alternatively, you can drag and drop the Power Grade thumbnail directly onto the target clip.
Troubleshooting Common Issues with Copying Attributes
While the "Copy & Paste Attributes" feature is remarkably powerful, there are instances where effects might not transfer as expected. Understanding these potential pitfalls can save you significant troubleshooting time.
Why Effects May Not Copy:
- Incorrect "Paste Attributes" Selection: The most common reason is that the desired attribute was not checked in the "Paste Attributes" dialog box. Always double-check your selections before clicking "Apply."
- Incompatible Clip Formats or Resolutions: Some effects or settings might be tied to specific clip properties like resolution, frame rate, or codec. If the target clip has significantly different characteristics than the source clip, certain attributes may not be compatible or may not transfer correctly. For example, some advanced Fusion effects might only transfer if both source and target clips share identical resolution and frame rate.
- Transition Limitations: It's important to note that you cannot directly copy transition effects using the standard "Paste Attributes" panel. Transitions are typically applied directly between clips. To copy transitions, you might need to right-click at the beginning or end of the target clip and select "Paste" from the context menu, or reapply them manually.
- Fusion Effects Compatibility: Certain complex Fusion compositions might have dependencies that prevent them from being universally copied and pasted, especially if they rely on specific clip metadata or external assets.
Workarounds for Specific Scenarios:
- Copying Transitions: While not directly in "Paste Attributes," you can often right-click on a transition between two clips and select "Copy," then right-click on the edit point of another pair of clips and select "Paste." Alternatively, you can save transitions as presets if the software allows.
- Fusion Effect Issues: If a Fusion effect isn't copying, ensure the source and destination clips are identical in resolution and frame rate. If they are not, you may need to adjust the effect's settings manually on the target clip or consider using an Adjustment Clip.
Beyond Keyboard Shortcuts: Enhancing Workflow with Hardware
For editors who perform extensive copy and paste operations or utilize complex keyboard shortcuts, specialized hardware can further optimize the workflow. Devices like the TourBox are designed to map frequently used commands, such as "Copy" and "Paste Attributes," to dedicated buttons, dials, and knobs. This allows for quicker access and reduces the need to memorize or contort your hands for complex shortcuts, enabling you to maintain focus on the creative aspects of your project without getting lost in the maze of keyboard commands.
Conclusion: Elevating Your Editing with DaVinci Resolve's Attribute Copying
Mastering the techniques for copying and pasting attributes in DaVinci Resolve is a fundamental skill that empowers editors to work more efficiently and maintain a high level of consistency across their projects. From the simple Ctrl+C/Cmd+C and Alt+V/Option+V on the Edit Page to the nuanced control offered by Adjustment Clips and the specialized tools on the Color Page, DaVinci Resolve provides a robust toolkit for transferring effects. By understanding these methods and their applications, you can significantly speed up your workflow, reduce repetitive tasks, and ensure a polished, professional final product. Whether you're applying a consistent color grade, replicating a specific visual effect, or ensuring uniformity in audio adjustments, the ability to copy attributes is an indispensable asset in any DaVinci Resolve editor's arsenal.
Frequently Asked Questions about Copying Attributes in DaVinci Resolve
1. Can you copy effects from one clip to another in DaVinci Resolve?Yes. DaVinci Resolve offers several ways to copy effects from one clip to another. The primary method is using the "Copy & Paste Attributes" feature on the Edit Page. Additionally, you can utilize Adjustment Clips for global effects, copy color grades directly on the Color Page, and save/reuse effect presets or Power Grades for recurring looks.
2. How do I paste attributes in DaVinci Resolve?To paste attributes: select the source clip with the desired effects, press Ctrl+C (Windows) or Cmd+C (Mac) to copy it. Then, select the target clip(s), right-click, and choose "Paste Attributes." In the dialog box, tick the specific effects you want to copy and click "Apply."
3. Does "Paste Attributes" work for multiple clips in DaVinci Resolve?Yes, it does. You can select multiple destination clips simultaneously before initiating the "Paste Attributes" command. This allows you to apply the same set of effects or attributes to several clips at once, significantly speeding up your workflow.
4. How do I copy color grading between clips in DaVinci Resolve?On the Color Page, you can copy color grading by right-clicking the graded clip and selecting "Grab Still," then right-clicking the still in the Gallery and choosing "Apply Grade" on the target clip. Alternatively, you can middle-mouse button drag the graded clip's thumbnail directly onto the target clip's thumbnail.
5. Whatâs the difference between Adjustment Clips and "Paste Attributes"?"Paste Attributes" copies effects directly to individual clips, overwriting or adding to their existing attributes. Adjustment Clips, on the other hand, act as a container that applies effects to all underlying clips within their duration without altering those clips directly. This makes Adjustment Clips ideal for global adjustments or quick, non-destructive changes across multiple clips.
6. Can I save effects as presets in DaVinci Resolve?Yes. In the Inspector panel, open the specific effect's options menu (usually indicated by three dots or a gear icon) and select "Save Preset." You can then load this preset onto any clip in future projects or even in different projects, provided you access the preset file.
tags: #copy #attributes #davinci #resolve