DaVinci Resolve has established itself as Hollywood's most popular solution for editing, visual effects, motion graphics, color correction, and audio post-production, compatible with Mac, Windows, and Linux. Blackmagic Design offers certified training designed to equip both new users and established professionals with the skills needed to enhance creativity, improve workflow speed, and successfully complete projects. This guide delves into the core functionalities of DaVinci Resolve, offering a step-by-step approach to understanding its powerful features.
Navigating the DaVinci Resolve Interface: Workspaces and Project Management
Upon launching DaVinci Resolve, users are greeted by the Project Manager window. For first-time users, this window typically displays an "Untitled project." Existing projects appear as thumbnails, showcasing previous work. By default, projects are saved to a local database on the user's computer. However, projects can be exported to external drives by right-clicking on a project thumbnail and selecting "Export Project."
To initiate a new project, users can either double-click on "Untitled project" or click the "New Project" button. Projects can be named descriptively, such as "BC" for a trip to British Columbia. Once a project is created, it's crucial to enable autosave features for a secure workflow. This is achieved by navigating to "DaVinci Resolve" > "Preferences" > "User" tab. Within the "Project Save and Load" section, enabling "Live Save" ensures that changes are automatically saved as they are made. Additionally, enabling "Project Backups" provides incremental saves at user-defined intervals, with options for hourly and daily backups. The location of these project backups can be browsed and adjusted by clicking "Browse and Save."
DaVinci Resolve is organized into seven distinct workspaces, each dedicated to a specific aspect of post-production:
- Media Workspace: This is where users can organize all footage, audio files, and other assets required for an editing project. While functional, many users opt to import and organize assets directly within the Edit page for a more streamlined workflow.
- Cut Workspace: Designed for rapid video editing, this workspace functions similarly to Adobe Rush, allowing for quick assembly of video projects.
- Edit Page: This is the primary workspace for most editors, where the bulk of the video project assembly takes place. It offers a comprehensive suite of tools for cutting, arranging, and refining footage.
- Fusion Workspace: This powerful page is dedicated to visual effects and motion graphics, akin to Adobe After Effects. Work in the Fusion page is node-based, a system also employed in the Color page.
- Color Page: As the name suggests, this workspace is for color correction and color grading, allowing users to achieve cinematic color aesthetics and precise control over the visual mood of their projects.
- Fairlight Page: This is the dedicated audio post-production environment for editing, mixing, and mastering sound.
- Deliver Page: This workspace is used for rendering and exporting the final video project in various formats and codecs.
Importing and Organizing Media: Building Your Project Foundation
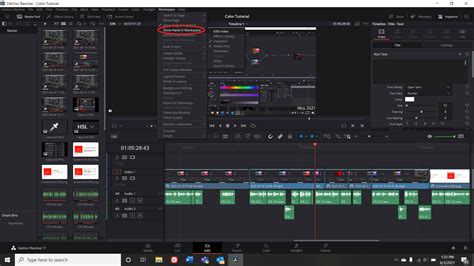
The process of importing media begins on the Edit page. Ensure the "Media Pool" is visible; if not, it can be opened by clicking on it or its corresponding icon. The "Master" panel is essential for importing project assets. Users can drag and drop media files directly from their Finder or File Explorer window into the Master panel.
A common pop-up window may appear, indicating that the imported clips have different settings than the default timeline settings. This window asks if the user wishes to change the timeline settings, stating that the action cannot be undone. While it can seem restrictive, users can indeed change timeline settings later. For now, selecting "Don't Change" is a viable option.
Alternatively, media can be imported by right-clicking within the Media Pool, selecting "Import Media," navigating to the desired files, and opening them. The "List View" in the Media Pool offers extensive information about imported media. Users can customize the displayed columns by right-clicking on a column header (e.g., "Clip Name") and unchecking unwanted information. Essential details typically include FPS (frames per second), format, resolution, and video codec. Custom column layouts can be saved for future use by selecting "Create Column Layout" and naming the layout.
To organize imported assets, users can create "Bins" (folders) within the Media Pool. Right-clicking within the Media Pool and selecting "New Bin" allows for the creation of folders like "Footage" and "Music." Media clips can then be dragged and dropped into these respective bins for better project management.
Creating and Customizing Timelines: Setting the Stage for Editing
The initial pop-up warning about unchangeable timeline settings can be disregarded. To create a new timeline with custom settings, navigate to "File" > "New Timeline." The timeline can be named appropriately, and "Use Project Settings" should be unchecked to reveal more options. Under the "Format" section, the timeline resolution can be adjusted. 1920 x 1080 HD is a standard resolution, but users can select others as needed. The "Timeline Frame Rate" can also be set, with 23.976 FPS being a common choice for cinematic projects. After configuring these settings, click "Create."
Once the custom timeline is established, project assets can be dragged from the Media Pool onto the timeline. For instance, selecting four clips and dragging them onto the timeline will place them sequentially.
To enhance timeline readability, users can adjust the view options by clicking the relevant icon. "Thumbnail View" provides visual previews of clips. The "Film Strip" option is particularly helpful, offering a sequential visual representation of the clip's content. Zooming in and out on the timeline can be achieved using "Command" or "Control" + "+" and "-" keys respectively, or by using the dedicated slider. Panels can also be resized by hovering over their edges and dragging. For instance, collapsing the Media Pool can provide more screen real estate for the timeline.
Displaying audio waveforms is crucial for audio editing. By default, audio waveforms might not be visible. Selecting "Display Audio Waveforms" under the timeline view options will reveal them. This is especially useful for dialogue clips, where the waveform visually represents the sound.
Track organization can be further refined by renaming tracks. Clicking on a track's default name (e.g., "Video 1") allows for renaming, such as "Dialogue" or "B-roll." Clips can be moved between tracks by selecting them and dragging them upwards or downwards, which can also create new tracks if needed.
When dealing with linked clips (where video and audio are connected), selecting only the audio portion for deletion can be tricky. Holding down "Alt" or "Option" on the keyboard while dragging a selection box will isolate the audio, allowing it to be deleted without affecting the video.
Basic Editing Techniques: Cutting, Transitions, and Text Overlays
With the "Selection Tool" active (indicated by a red highlight), clips can be manipulated on the timeline. Dragging a B-roll clip to overlap a dialogue clip can effectively cover jump cuts or provide visual context. The playhead, moved by clicking on the timeline or using the spacebar to play, allows for precise placement and review of edits.
To make a cut or split a clip, position the playhead at the desired point and press "Command" or "Control" + "B." The left portion of the split clip can then be deleted.
Transitions add polish to edits. Under the "Effects" panel, "Video Transitions" offers various options. A "Cross Dissolve" can be dragged and dropped between two clips. The duration of a transition can be adjusted by clicking on its edge and dragging it outwards or inwards.
Adding text overlays, such as titles or lower-thirds, is straightforward. Navigate to "Titles" in the "Effects" panel, select "Text," and drag it onto the desired clip. The text properties, including font, size, and content, can be customized in the inspector.
Visual Effects on the Edit Page: Enhancing Your Project
The Edit page itself offers capabilities for basic visual effects enhancement. For instance, visual effects can be applied directly to clips on the timeline. Discover how to enhance your project with visual effects on the edit page! This expands on the features on the edit page, allowing users to integrate visual elements without leaving the primary editing environment.
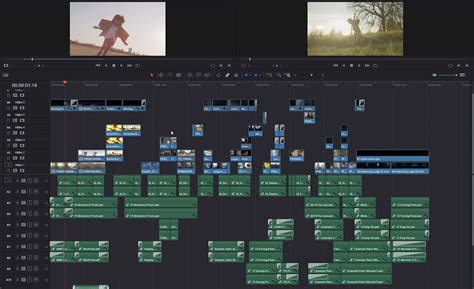
Multicam Editing: Streamlining Multi-Camera Workflows
DaVinci Resolve facilitates efficient multicam editing. This feature is particularly useful for projects involving multiple camera angles, such as interviews, live events, or dramatic scenes. The editor panel specifically designed for multi-cam editing allows for news cutting and live sports replays, with buttons designed to make camera selection and editing extremely fast. Learn about multicam editing with DaVinci Resolve! This allows editors to switch between camera angles in real-time, creating a dynamic and engaging final product.
How to Edit with Multicam in Davinci Resolve 20 2026
Color Correction and Grading: Crafting the Visual Aesthetic
The powerful Color page in DaVinci Resolve is where professionals achieve stunning visual results. Discover the powerful color page in DaVinci Resolve! This page allows users to dive deep into color correction and color grading, utilizing advanced features employed by Hollywood colorists.
The DaVinci Resolve Mini Panel is a hardware control surface designed to work in conjunction with the Color page, offering enhanced creative control and faster workflows. This powerful color panel gives you all the control you need to create cinematic images, including controls for refined color grading, such as adding windows. Official Blackmagic Design hands-on training guides take users through a series of practical exercises that teach the detailed use of DaVinci Resolveâs color correction tools.
Visual Effects and Motion Graphics: The Power of Fusion
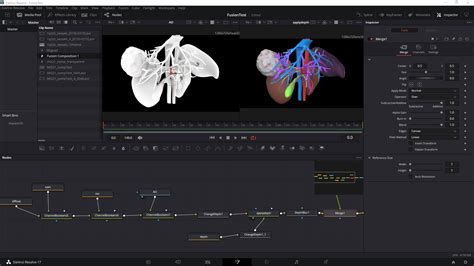
The Fusion page is where complex visual effects and motion graphics are created. Discover the powerful Fusion page where you can create cinematic visual effects and motion graphics! Here, users learn to perform common compositing tasks, leveraging a node-based workflow.
The Fusion page also offers a true 3D workspace, enabling advanced 3D compositing tools. This step-by-step training guide provides a practical introduction to advanced tools and techniques on the Fusion page. With DaVinci Resolve Studio, powerful features like 3D camera tracking and Universal Scene Descriptor (USD) nodes make the transition from 2D to 3D workflows smoother than ever. This official hands-on training guide introduces a core set of visual effects compositing tools in five easy lessons, teaching users how to create visual effects directly within DaVinci Resolve, eliminating the need for importing or exporting large media files between applications.
Audio Editing and Mixing: The Fairlight Experience
The Fairlight page is dedicated to audio post-production, offering tools for editing, sweetening, recording, mixing, and mastering audio. This hands-on training guide teaches the art of sound editing and mixing. Users can record a simple voiceover track for a scene and utilize ADR (Automated Dialogue Replacement) tools to replace dialogue. Learn how to record a simple voiceover track for a scene and then how to use ADR tools to replace dialogue.
DaVinci Resolve also supports advanced audio workflows, including channel mapping and linked groups. Discover how to work with channel mapping and linked groups in DaVinci Resolve. Furthermore, the software integrates tools for working with immersive audio formats like Dolby Atmos. Discover the world of Dolby Atmos with tools built into Fairlight!
For sound engineers working under tight deadlines, Fairlight offers incredibly fast audio editing. Used by Hollywood and broadcasters, the large Fairlight consoles make it easy to mix large projects with a massive number of channels and tracks. These consoles can be configured with legs at a 0º angle for a flat working surface or an 8º angle for a slightly inclined surface. Blank 1/3rd wide bays allow for custom console configurations. Quick access to virtually every Fairlight feature is provided.

Preparing for Delivery: Exporting Your Masterpiece
The final stage of the post-production process is rendering and exporting the project. This is accomplished on the Deliver page. Learn how to prepare your content for delivery! Users name their project, choose a save location, and select the desired format and codec. MP4 with H.264 encoding are common and good options for broad compatibility. Once settings are configured, the project is added to the Render Queue, and the "Start Render" button initiates the export process.
DaVinci Resolve for Beginners: A Starting Point
For those new to DaVinci Resolve, understanding the basics is paramount. DaVinci Resolve 19 for BEGINNERS: Free and Studio Paid Version - Are you new to DaVinci Resolve and want to learn the basics so you can start editing? This tutorial covers everything needed to get started. The interface is explained, along with methods for organization, clip import, timeline editing, and project export. The goal is to provide comprehensive information efficiently, allowing users to pause and replay sections as needed. For those who wish to follow along with the assets used in a tutorial, download links are often provided. Questions can be posed in the comments section for assistance. Before beginning, users may need to download and install DaVinci Resolve, with separate resources available for this initial step.
Advanced Tools and Hardware Integration
Beyond the core software, DaVinci Resolve integrates with specialized hardware to enhance user experience and efficiency. The DaVinci Resolve Mini Panel, as mentioned, aids in color grading. The DaVinci Resolve Editor Keyboard offers a full-sized traditional QWERTY layout in a premium metal design, featuring a metal search dial with a clutch, plus extra edit, trim, and timecode keys, designed for incredibly fast editing. For multi-cam editing, a specific editor panel is available, designed for fast camera selection and editing.
Blackmagic Design Training and Partnerships
Blackmagic Design is committed to user education through its certified training programs. These programs are designed for both new users and established professionals, teaching the skills needed to be more creative, work faster, and get the job done. The training partner program aims to attract skilled training organizations and educational institutions. Blackmagic Design collaborates with strategically chosen onsite training companies, online partners, and academic institutions to deliver comprehensive instruction. All trainers are passionate ambassadors for DaVinci Resolve, ensuring direct contact with a wide range of customers and a deep understanding of user needs.