Adobe InDesign, a powerhouse for page layout and design, offers robust tools for creating visually appealing documents. While often associated with text and image placement, its capabilities extend to sophisticated line work and graphic elements. Among these, the creation of arrows - essential for diagrams, flowcharts, annotations, and stylistic embellishments - is a frequently encountered design task. This article delves into the intricacies of generating arrowheads on strokes within InDesign, drawing upon the fundamental principles and advanced techniques that empower designers to achieve precise and impactful results.
Understanding the Fundamentals: Strokes and the Stroke Panel
At its core, an arrow in InDesign is essentially a line, or "stroke," that has been adorned with a specific arrowhead style at one or both of its ends. The primary tool for manipulating strokes and their attributes is the Stroke panel. Accessing this panel is straightforward: navigate to Window > Stroke.
When you draw a line in InDesign, by default, it will have a basic stroke applied. However, this basic stroke typically won't include arrowheads. The magic happens within the Stroke panel itself, specifically in the lower section where options for styling the Start and End of your stroke are located.
Applying Arrowheads: A Step-by-Step Approach
The process of adding an arrowhead to a line begins with the line itself.
Create a Stroke: The first step of creating an arrow is to create a stroke. This is achieved by selecting the Line Tool (often found under the Pen Tool flyout) and then pressing down your left mouse button and dragging out a line on your InDesign page.
Access the Stroke Panel: Ensure the Stroke panel is visible (
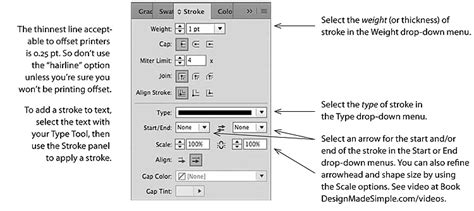
Window > Stroke).Select Start and End Options: In the bottom section of the panel, you’ll find drop-down menus clearly labeled for styling the "Start" and "End" of your stroke. These are the gateways to applying arrowheads.
Choose an Arrowhead Style: Click on the "Start" drop-down menu. Here, you will discover a diverse range of arrowhead options. These are pre-designed graphical elements that can be applied to the beginning point of your selected stroke. Experiment with different styles to find the one that best suits your design.
Styling the End Point: Similarly, applying a different style to the "End" of your stroke can create a stylish and balanced look. You can use the same arrowhead style for both ends, different styles, or even no arrowhead at one end, effectively creating a single-pointed arrow.
Beyond Basic Arrows: Customization and Enhancement
The Stroke panel is not merely a repository for pre-set arrowheads; it's a gateway to a world of customization that allows you to tailor your arrows precisely to your design needs.
Adjusting Stroke Type and Weight
The "Type" of your stroke refers to the style of the line between the arrowheads. This drop-down menu offers options such as solid lines, dashed lines, dotted lines, and more complex patterns. By selecting a different stroke type, you can create arrows with varied visual textures, moving beyond the simple solid line. Furthermore, the "Weight" option in the Stroke panel allows you to control the thickness of the line, making your arrows more prominent or subtle as required.
Color and Swatches
The color of your arrow is controlled through the Swatches panel (Window > Color > Swatches). You can select your stroke and then choose a color from your document's swatches. This ensures consistency with your overall color palette. For advanced color control, consider using spot colors or gradients, which can add further depth and sophistication to your arrow designs.
Advanced Effects
To imbue your arrows with even more visual flair, InDesign's Effects panel (Object > Effects) comes into play. This powerful panel allows you to apply a wide array of non-destructive effects to your strokes, including:
- Drop Shadows: Creating a sense of depth and separation from the background.
- Outer Glows and Inner Glows: Adding luminous or subtle halo effects.
- Bevel and Emboss: Simulating three-dimensional qualities.
- Transparency and Blending Modes: Integrating your arrows seamlessly with other design elements.
By combining different arrowhead styles, stroke types, weights, colors, and effects, you can create virtually any type of arrow imaginable, from simple directional indicators to elaborate decorative elements.
Leveraging InDesign's Power for Advanced Design
The ability to create and customize arrows is just one facet of InDesign's extensive design capabilities. As an Adobe Certified Instructor and Expert, Dan notes that InDesign is a program rich with advanced features, productivity boosters, and workflow speed tricks. For those who have mastered the fundamentals of adding text and images, exploring these advanced features can significantly enhance design efficiency and creative output.
Beyond the Stroke Panel: Alternative Methods
While the Stroke panel is the most direct method for adding arrowheads to lines, experienced designers might explore alternative approaches for specific scenarios:
Illustrator Integration: For highly complex or custom arrowhead shapes, designers often create them in Adobe Illustrator and then import them into InDesign. These custom shapes can then be placed and manipulated as graphic objects. This method offers unparalleled control over the arrowhead's form.
Glyphs and Special Characters: Some fonts contain glyphs that represent arrowheads. While not as flexible as the Stroke panel options, these can be useful for very small, inline arrows or as decorative elements within text.
how do i create an arrow in indesign
Considerations for Effective Arrow Design
When incorporating arrows into your designs, several factors contribute to their effectiveness and aesthetic appeal:
Scale and Proportion
The size of your arrowhead should be in proportion to the weight and length of the stroke. An arrowhead that is too large can overpower the line, while one that is too small might be lost. The Stroke panel's "Scale" option for arrowheads allows for fine-tuning this relationship.
Readability and Clarity
The primary purpose of an arrow is often to guide the viewer's eye or indicate direction. Ensure that your arrow is clear and unambiguous. Avoid overly complex arrowhead styles or stroke patterns that might detract from its intended message.
Consistency
Maintain consistency in your arrowhead usage throughout a document. If you choose a particular arrowhead style and stroke weight for a specific type of diagram or annotation, stick with it. This visual consistency contributes to a polished and professional final product.
Contextual Appropriateness
The style of arrowhead you choose should align with the overall tone and style of your design. A technical diagram might benefit from a clean, geometric arrowhead, while a more artistic or illustrative piece might call for something more decorative.
Embracing Advanced InDesign Workflows
The ability to effectively create and manipulate arrows is a testament to InDesign's power as a design tool. For professionals and enthusiasts looking to elevate their InDesign skills, delving into advanced features is a rewarding endeavor. Mastering aspects such as advanced font tricks, sophisticated color management, paragraph and column control, and the strategic use of styles can unlock new levels of productivity and creative expression. The course material mentioned by Dan, an Adobe Certified Instructor, emphasizes that even heavy users can discover "things that will blow your InDesign mind." This sentiment extends to every tool and feature within InDesign, including the seemingly simple act of creating an arrow. By understanding the nuances of the Stroke panel and exploring the vast customization options available, designers can transform basic lines into powerful visual communicators.
The journey of mastering InDesign is ongoing, and each feature, from the fundamental stroke to complex interactive elements, offers opportunities for deeper understanding and creative application. The seemingly simple task of creating an arrow on a line in InDesign opens up a world of design possibilities when approached with knowledge and intention.