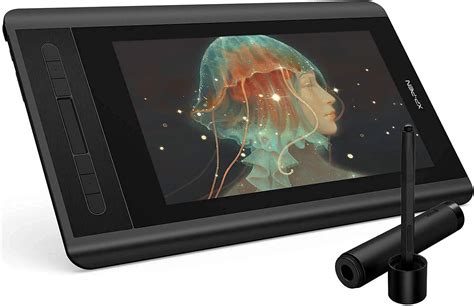
The XP-Pen Artist 12 is a powerful drawing display that opens up a world of digital art possibilities. To ensure you get the most out of your device, proper setup and understanding of its features are crucial. This guide will walk you through the essential steps, from initial connection to advanced driver customization, ensuring a smooth and productive creative workflow.
Introduction to the XP-Pen Artist 12
Thank you for choosing the XPPen Artist 2nd generation drawing display. This user manual is specially designed to detail the product’s functions and features. Please read this manual before using the product to ensure safe and proper use. Due to the latest product improvements, content may differ from the final product and is subject to change without prior notice. Note: The pictures in the User Manual are for reference only. The User Manual supplied with the device may vary depending on the model.
Product Overview
The XP-Pen Artist 12 is designed with user convenience in mind, featuring an intuitive layout and accessible controls. Key components include:
- Lanyard hole: For attaching a lanyard for portability or security.
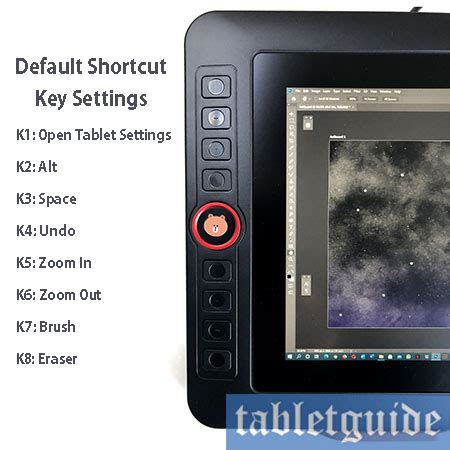
- Shortcut key(s): Customizable buttons for quick access to frequently used functions. The number and position of these keys may vary by model.
- Display/Work area: The primary surface where your artwork comes to life.
- Power key: Used to turn the device on and off, or to switch between modes.
- Indicator light: Provides visual feedback on the device's status.
- Press the power key to turn on the device. The indicator light will remain blue when the device is on. Press the power key again to turn off the device.
- The indicator light will turn and stay orange when the device is in standby mode.
- To switch to drawing tablet mode, press the power key and hold for 3 seconds. The indicator light will blink blue and orange. Press the power key again to return to normal mode.
- +/- key: Typically used for adjusting settings like brightness or contrast.
- Full-featured USB-C port: For a single-cable connection that handles power, data, and video.
- 3-in-1 USB-C port: A versatile port that combines power, HDMI, and USB connections.
Included with Your Product
When you unbox your XP-Pen Artist 12, you should find the following items:
- Drawing Display
- Stylus
- Pen Clip
- Pen Nibs (typically several replacements)
- Power Adapter
- 3-in-1 USB Cable
- Power Extension Cord
- Cleaning Cloth
- Anti-slip Gloves
- Quick Guide
Ensure all these components are present before proceeding with the setup.
Connection: Getting Your Artist 12 Online
Connecting your Artist 12 to your computer is a straightforward process, but ensuring stable power and data transfer is key.
Standard Connection via 3-in-1 USB-C Cable
The most common connection method utilizes the included 3-in-1 USB-C cable.
- Connect the USB-A end to your computer to supply power to the device. If the power supply is insufficient, the screen of the drawing display will blink. At this moment, connect the red USB-A end to another USB port of your computer, or to a power adapter and power supply. Power adapters for some models are sold separately; please purchase them if necessary or use other compatible adapters.
- Connect the HDMI end to your computer's HDMI port for video output.
- Connect the USB-A end (typically black) to your computer's USB port for data transfer.
Connection via Full-Featured USB-C Cable (Sold Separately)
For a cleaner setup, a single, full-featured USB-C cable can be used if both your computer and the Artist 12 support it. This single cable will handle power, data, and video. Ensure the USB-C cable is sold separately and is compatible with your computer's USB-C port.
Display Settings and Troubleshooting "No Signal"
If your tablet displays a "No Signal" error message, several steps can resolve this:
- Unplug and Replug: Unplug the Artist 12's HDMI and USB cords, then plug them back in securely.
- Different Ports: If possible, test out different USB or HDMI ports on your computer. This can help rule out a faulty port.
- Secure Connections: Ensure that each cord is connected well at both the tablet and computer ends.
- Refer to Manual: For more detailed troubleshooting, consult page 5 of the manual.
Yes, the Artist 12 is designed to be connected to a computer for full functionality. It requires a host device to process the drawing data and display the output.
Driver Installation: The Brains of Your Tablet
The driver is essential for your Artist 12 to communicate effectively with your computer and drawing software. It enables features like pen pressure, shortcut key customization, and calibration.
Before Installation: Important Preparations
- Disable Antivirus and Graphics Software: Before installing the driver, please turn off all antivirus software and graphics software. These can sometimes interfere with the installation process.
- Uninstall Previous Drivers: Uninstall drivers (if any) for other drawing displays/tablets before the installation. Conflicts between drivers can cause issues.
- Restart: Restart your computer after the installation is completed. This ensures all system changes are applied correctly.
- Latest Driver: For the best performance for your device, we recommend you install the latest driver from the official XP-Pen website.
Installation Steps
Windows:
- Download the latest driver for your operating system from the XP-Pen website.
- Unzip the downloaded file.
- Run the ".exe" installer as administrator.
- Follow the on-screen prompts to complete the installation.
Mac:
- Download the latest driver for macOS from the XP-Pen website.
- Unzip the downloaded file.
- Run the ".dmg" file and follow the prompts to complete the installation.
- Crucially, you need to grant accessibility permissions: Go to System Preference -> Security & Privacy -> Accessibility settings. Click the lock icon in the lower-left corner to unlock the settings. Tick the checkbox on the left of the "PenTable_Driver" application to enable accessibility. Then click the lock icon to lock the settings again.
- If there is no PenTablet_Driver on the list, you may need to manually add it: Go to Library -> Application Support -> PenDriver to add the driver.
Linux:
The installation process for Linux can vary depending on your distribution. Generally, you will use command-line instructions:
- Debian-based systems (.deb): Enter command
sudo dpkg -i <installation_file.deb>. Drag the installation file to the terminal window and execute the command. - Red Hat-based systems (.rpm): Enter command
sudo rpm -i <installation_file.rpm>. Drag the installation file to the terminal window and execute the command. - Compressed archives (.tar.gz): Unzip the file. Enter command
sudo. Drag theinstall.shscript to the terminal window and execute the command.
Introduction to the Driver Interface
The driver will run automatically after being installed. If it does not run automatically, you can launch it manually:
- Windows: Start -> Pentablet
- Mac: Application -> XP-PenPenTabletPro -> PenTablet
If the device is not connected or the connection fails, you will see a prompt within the driver. In this case, try to restart your computer or the driver, or contact XP-Pen support.
If the device is connected to your computer successfully, the device image and name will be displayed in the upper left corner of the driver. You can connect up to 3 devices via the driver at the same time. Customize a specific device's settings after switching to that device; all changes made will only apply to that device.
Configuration Saving: After changing any configuration, click the "Store" button in the lower left corner of the driver interface. Otherwise, the modified configuration is valid only for the current session.

Device Settings: Tailoring Your Tablet Experience
The driver provides extensive options to customize your Artist 12's functionality.
Work Area Settings
This section defines the mapping between the device's work area and your computer's screen display area.
- Screen Mapping:
- Full Screen: Maps the entire device work area to the entire selected monitor.
- Customize Screen Area: Allows you to define a specific portion of the screen for the tablet to interact with. This can be done by dragging to select an area, using on-screen click points, or manually entering coordinates (X, Y, Width, Height).
- Identify: Helps you identify which of your connected monitors is which by displaying numeric identifiers.
- Pen Display Mapping:
- Full Area: Uses the entire active area of your Artist 12.
- Customize Active Area: Similar to screen customization, you can define a specific portion of the tablet's surface to use. This is useful for focusing on smaller details or adapting to different workflows. Options include dragging, click points, or coordinate input.
- Proportion: Ensures that the aspect ratio of your drawing on the tablet matches the aspect ratio on the screen. If you don't select this, drawing a circle might result in an ellipse on screen.
- Rotation: You can set the device to 0°, 90°, 180°, and 270° clockwise. The 180° rotation is particularly useful for left-handed users.
- Left-handed Mode: Rotating the display 180° is ideal for left-handed users, allowing them to comfortably use the tablet.
- Display Settings (Windows Only):
- Color Temperature: Adjust the screen's color balance with presets like low blue light, 6500K, 7500K, 9300K, and a customizable USER mode.
- Brightness, Contrast: Fine-tune the screen's visual output using sliders.
Pen Settings
This is where you configure how the stylus interacts with your Artist 12.
- Application Specific Settings: The driver allows you to set custom pen and shortcut key functions for specific applications.
- Click the "+" icon on the top right of the application bar to open the application list.
- Select an application from the running applications or click "Browse" to add from installed applications.
- Click "OK" to add the selected application.
- Select an added application and click the "-" icon to delete it.
- The "All other applications" option applies your settings to any application not specifically customized.
- Pen Key Functions: Customize the function of the buttons on your stylus.
- Click "Customize" in the drop-down menu to access shortcut key settings.
- Options include setting them as Keyboard shortcuts (e.g., "Alt+A" in 3D MAX for the alignment tool), Mouse Controls (e.g., Shift + Left Click), or running specific applications.
- Windows (Command): You can add system key combinations. For example, to enter Win(Cmd)+Shift+3, you can press Shift+3, and the driver will automatically include the system key.
- Precision Mode: Limits the pen's active area to a smaller zone for more precise work.
- Mouse Mode: Makes the cursor stay put when the pen is lifted, mimicking mouse behavior.
- Pressure Settings: Adjust the pen's pressure sensitivity.
- Output and Pen Pressure Curve: Fine-tune how pressure input translates to line thickness or opacity.
- Slider: A simpler way to adjust overall pressure sensitivity.
- Current Pressure: Provides real-time feedback on your current pen pressure.
- Windows Ink (Windows Only): This function enables handwriting support in applications like Microsoft Office and Whiteboard. Ensure it is enabled if you use these features.
Shortcut Keys (Express Keys)
You can customize the shortcut keys (Express Keys) on your Artist 12. In the "Express Keys" tab, you may choose your preferred functions for the Artist 12's shortcut keys. The setting steps are the same as for pen key settings (see Pen settings).
Driver Settings:
- Disable shortcut Keys: Disables the functions and prompts of all keys on the device.
- Disable message: Prevents on-screen prompts from appearing when a key is pressed.
- Disable pressure: Turns off pressure sensitivity feedback.
- Disable tilt: Disables the stylus's tilt recognition.
- Import & Export Config: Save your customized driver settings or load previously saved configurations. Remember to click "Store" to save before importing/exporting. This function is typically limited to the same operating system.
- Diagnostic Tool: A utility to help troubleshoot driver-related issues.
XP-Pen Artist 12 Review + How to Install and Settings
Troubleshooting Common Issues
Even with a smooth setup, you might encounter occasional problems. Here's how to address them:
"No Signal" Error
If your tablet displays a "No Signal" error message, you should:
- Unplug the Artist 12's HDMI and USB cords, then plug them back in.
- If possible, test out different USB or HDMI ports on your computer.
- Ensure that each cord is connected well.
- For more information, see page 5 of the manual.
Pressure Sensitivity Not Working
If the pressure sensitivity is not working on your XP-PEN Artist 12 pen, consider the following:
- Ensure your Artist 12 is turned on and the display is visible.
- Reinstall the driver and verify that the tablet icon is present in the system tray or desktop.
- Open the driver settings and test the pen pressure gauge.
- Make sure your drawing software supports pen pressure.
- Ensure you have the latest driver installed.
- Open the tablet setting and test the pen pressure within it.
- Enable the "Windows Ink" function and then click the OK button to exit.
- For more information, see page 19 of the manual. For more information, see pages 1 and 5 of the manual.
Cursor Offset Issues
To fix cursor offset issues on the XP-PEN Artist 12, you can calibrate the tablet. Access the Calibration tab in the driver settings and follow the on-screen instructions to set up calibration for your tablet. For more information, see pages 14, 16, and 17 of the manual.
Drawing Not Working / Stylus Not Working
If drawing is not working on your XP-PEN Artist 12, consider these troubleshooting steps:
- Ensure your Artist 12 is turned on and the display is visible.
- Install the driver again and verify that the tablet icon is present in the system tray or desktop.
- Open the driver settings and test the pen pressure gauge.
- Make sure your drawing software supports pen pressure.
- Ensure you have the latest driver installed.
- Open the tablet setting and test the pen pressure within it.
- Enable the "Windows Ink" function and then click the OK button to exit.
- For more information, see page 19 of the manual. For more information, see page 14 of the manual.
- Stylus Specifics: Make sure you are using the stylus that originally came with your device. Also, check if the pen settings in the driver are configured correctly.
Computer Fails to Recognize the Device
- Check if your computer's USB port used works normally. If not, try a different USB port.
Line Latency During Drawing
Line latency can be frustrating. While the provided text mentions "These cookies are necessary…", this is a misdirection likely from web analytics data. True line latency issues are typically resolved by:
- Ensuring the latest drivers are installed.
- Closing unnecessary background applications that consume system resources.
- Checking your computer's performance capabilities; older or less powerful machines might struggle with high-resolution drawing.
- Within your drawing software, check for settings related to "smoothing," "stabilization," or "prediction," which can sometimes introduce latency but also improve line quality.

Compatibility and Usage
Is the XP-PEN Artist 12 suitable for left-handed users?
Yes, the XP-PEN Artist 12 is suitable for left-handed users. You can set up custom profiles for different applications on the XP-PEN Artist 12 by customizing the shortcut keys and rotating the display 180 degrees via the driver settings.
Driver Uninstallation
Should you need to remove the driver:
Windows:
- Go to Start -> Settings -> Apps -> Apps & Features.
- Find "Pentablet" in the list.
- Left-click "Uninstall" and follow the prompts.
Mac:
- Go to Applications.
- Find XP-PenPentabletPro.
- Click "UninstallPenTablet" and follow the prompts.
Linux:
- Debian-based (.deb): Enter command
sudo dpkg -r xp-pen-pentabletand execute. - Red Hat-based (.rpm): Enter command
sudo rpm -e xp-pen-pentabletand execute. - Compressed archives (.tar.gz): Unzip the file. Enter command
sudo. Draguninstall.shto the terminal window and execute the command.
By following this guide, you should be well-equipped to set up and utilize your XP-Pen Artist 12 drawing display to its full potential, transforming your creative ideas into digital masterpieces.