Embarking on a new software journey can be a refreshing experience, especially when transitioning from established, proprietary tools. For those seeking a powerful, free, and open-source alternative to Adobe Lightroom, darktable presents a compelling option. While its interface and workflow might initially feel alien on a MacBook, particularly for users accustomed to Mac-native applications, a deeper dive reveals a remarkably capable and flexible photo editing suite. This guide aims to demystify darktable for Mac users, from initial installation to advanced editing techniques, leveraging the wealth of community knowledge and user experiences.
Getting Started: Installation and Initial Setup
Darktable is a robust, free, and open-source photography application and raw developer. It operates similarly to Adobe Lightroom, featuring both a virtual light table for viewing images side-by-side and a darkroom for detailed editing. For Mac users, the installation process is straightforward. Navigate to the official darktable website to download the most up-to-date version. You will encounter options for different operating systems, including macOS. If you are using a Mac with an Intel chip, select the corresponding download link. For newer Macs equipped with Apple Silicon chips, choose the dedicated Apple Silicon download. Once the DMG file is downloaded, open it and drag the darktable application icon into your Applications folder.
Before diving into editing, it's crucial to configure some initial settings to ensure a consistent workflow, especially if you are following tutorials. Access darktable's preferences and navigate to the processing section. It is recommended to set "auto-apply pixel workflow defaults" to "scene-referred (agx)". While other options like "scene-referred (sigmoid)" are also viable, "scene-referred (agx)" often provides a good starting point and aligns with many tutorial workflows. This setting ensures that imported RAW images are processed with a consistent baseline, avoiding the sometimes bland default look that lacks a camera profile.
Navigating the Interface: Lighttable and Darkroom Views
Darktable is primarily divided into two main views: the Lighttable and the Darkroom.
The Lighttable View: Organizing Your Images
The Lighttable view serves as your digital contact sheet, akin to a traditional lightbox. Here, you can import, organize, and select images for editing. To load images, ensure you are in the Lighttable view. On the top left, you'll find options to import by folder or by single image. Selecting either option will open a browser mode, allowing you to choose the desired files. Folders will appear on the left side of the screen, enabling easy navigation. Once an image is selected, you can double-click it or highlight it and click the "darkroom" button on the top right to enter the editing environment.
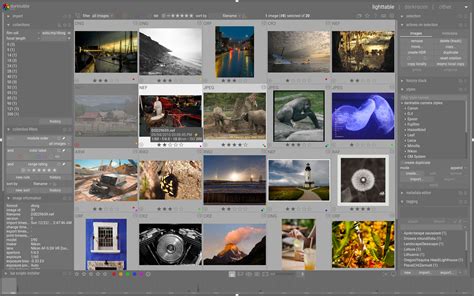
Within the Lighttable, images are organized into "Film Rolls," which are essentially virtual folders corresponding to each import session. The "Collect Images" panel on the left allows you to switch between these film rolls. You can adjust the size of image thumbnails using a slider at the bottom of the view, controlling how many images are displayed simultaneously.
Organizing and naming images is a critical step, and darktable's approach differs from some other software. Darktable does not inherently move or rename images upon import. It operates on a "read-only" basis, accessing your files directly from their location on your file system and creating "XMP" sidecar files to store edit information. This means you need a robust external system for managing your image files. A common and effective strategy is to use a directory structure based on year and month, followed by event names, with images named using a timestamp and event descriptor (e.g., YYYY-MM-DD_HHMMSS_event-name.ARW). This ensures easy sorting and identification across different applications.
The "Import images" dialog offers options like "select only new pictures" and "find new images recursively." The former is useful if you regularly add new images to existing folders, but remember that darktable will not automatically update its database; manual import is required.
Darktable also provides tools for culling, or selecting the best images from a shoot. The "culling" mode, often accessed via the 'x' key, displays two images side-by-side for comparison. Many users find it beneficial to slightly underexpose images during the culling process to better assess detail in shadows. This can be significantly sped up by setting up a custom keyboard shortcut for the Exposure module, allowing rapid adjustments with a scroll wheel or trackpad.
Keywording images is another vital task for managing your library. In the Lighttable view, the "Tagging" panel on the right allows you to add keywords, separated by commas, which are then stored in the XMP sidecar file. These tags can later be used for filtering and sorting your collection via the "Collect Images" panel.
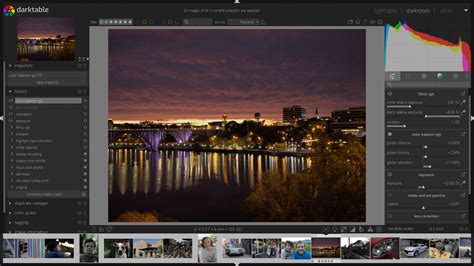
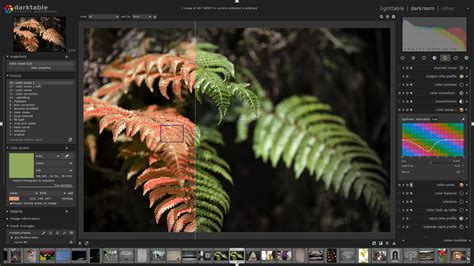
The Darkroom View: Unleashing Creative Potential
The Darkroom view is where the actual image editing takes place. This is a powerful environment, characterized by a vast array of modules designed for every conceivable adjustment. The main interface displays your selected image, with editing modules typically located on the right side of the screen.
The modules are organized into groups, such as "Basic," "Tone," "Color," "Correction," and "Effects." You can customize which modules are visible and create your own "Favourite" groups for frequently used tools, significantly speeding up your workflow. A search function within the module panel allows you to quickly find specific adjustments. Don't be afraid to experiment; any adjustments can be reset by pressing the 'i' option next to the module name, or the module can simply be turned off.
A crucial aspect of darktable's editing process is its module order, known as the pixel pipeline. Modules are processed in a specific sequence, which can influence the final output. Understanding this pipeline, particularly when working with scene-referred workflows, is key to achieving predictable results.
Essential Darkroom Modules and Concepts
- Exposure Module: This module is fundamental for adjusting the overall brightness of your image. It allows you to set mid-tones to an appropriate level, which is important for subsequent tone mapping. The module includes a picker tool for sampling areas to guide exposure adjustments.
- White Balance Module: While darktable's white balance module is technical, it's generally best left to read the EXIF data from your image. For more nuanced color adjustments, the Color Calibration module offers greater control.
- Color Calibration Module: This module allows for color corrections similar to white balance tools in other editors. It provides more options than simply "white balance" and "tint," and can read white balance information from image EXIF data.
- Tone Mappers (e.g., agx, Filmic RGB, Sigmoid): Tone mappers are critical for converting the high dynamic range of a RAW file (scene-referred) into a viewable image on your screen (display-referred). The
agxmodule, a newer addition, is praised for its handling of hue shifts and subtleties, making it a strong choice for subjects like flowers and insects. These modules offer extensive controls for contrast, saturation, and color. Using the "auto tune levels" picker withinagxcan provide a good starting point. - Demosaic Module: This module handles the initial processing of RAW data. Enabling "capture sharpening" here can apply a sharpening method early in the demosaicing process. If your camera is supported, this module can also apply a denoising profile based on your camera model and ISO.
- Lens Correction Module: This module applies corrections for vignetting and distortion based on your lens's characteristics. If your lens is supported, a correction profile will be automatically applied.
- Crop Module: Similar to other RAW editors, the crop module allows for pre-defined aspect ratios or freehand selections.
- Diffuse or Sharpen Module: One of darktable's most powerful modules, it offers a wide range of presets for sharpening, blurring, and applying local contrast. Presets like "lens deblur | medium" are often adequate for general sharpening.
- Contrast Equalizer Module: This module can perform similar functions to "Diffuse or Sharpen" but with a different interface and methodology. It's useful for adding "pop" and clarity to your images, with presets like "clarity" offering a uniform contrast change.
- Color Balance RGB Module: This module offers refined controls over saturation, vibrance, and chroma, allowing for more natural adjustments than global saturation sliders. It enables precise control over different regions of the histogram, impacting both luminosity and chroma. The "4 ways" tab within this module is particularly useful for color grading, allowing for neutralization of color casts and creative manipulation of shadows, midtones, and highlights.
- Masking Tools: Darktable's masking capabilities are exceptionally powerful. Each module allows for various mask types: Uniformly, Parametric, Drawn & Parametric, and Raster. Darktable uses vectors for drawing masks, enabling easy editing after creation. Masks are invaluable for applying adjustments to specific areas of an image, such as just the sky or a particular subject.
A Secret for Parametric Masks in Darktable
History Stack and Snapshots
On the left-hand side of the Darkroom view, you'll find the "History Stack" (marked #7 in some diagrams). This stack meticulously records every adjustment made to an image. Hovering over each entry displays the specific changes applied. This allows you to revisit, modify, or revert to previous states of your edit.
The "Snapshots" feature is another invaluable tool. You can take a snapshot of your image at any point during the editing process. This snapshot can then be compared to the current version of your image using a handy slider, allowing for immediate visual comparison of your progress. Snapshots can also be used to compare two entirely different versions of an image or even two separate photos.
Advanced Techniques and Workflow Enhancements
Module Instances and Local Adjustments
Darktable's power is amplified by its ability to duplicate modules and use masks to create localized adjustments. For instance, you can have multiple instances of the Exposure module: one for global exposure adjustments and others, combined with masks, for specific areas like vignetting or local brightening. Similarly, the Color Balance RGB module can be duplicated to isolate saturation, contrast, and color grading adjustments.
Masking in darktable is highly versatile. You can create masks using shapes, drawn paths, parametric masks based on attributes like hue and brightness, or a combination of these. This allows for highly targeted edits, ensuring that sharpening or clarity effects are applied only to in-focus areas, for example.
Presets and Custom Workflows
Many modules in darktable offer the ability to store presets based on your common use cases. This can dramatically speed up your workflow, especially for repetitive tasks. The layout of modules in the Darkroom view is also fully customizable. You can arrange modules into tabs, hide those you don't use, and create personalized workspaces tailored to your specific photographic needs.
Understanding Scene-Referred vs. Display-Referred Workflows
A key concept in modern RAW development, including darktable, is the distinction between scene-referred and display-referred color spaces.
- Scene-Referred: This workflow operates in a linear color space that more closely mimics how light behaves in the real world. It utilizes the full dynamic range of your RAW file before any tone compression or display mapping occurs. Modules like
agx,filmic rgb, andsigmoidare central to this workflow, performing the crucial task of tone mapping. Using a scene-referred workflow generally provides more flexibility and avoids clipping of highlights and shadows. - Display-Referred: This workflow operates in a non-linear color space that is closer to how colors are ultimately displayed on a screen. Older versions of darktable and many other editors primarily used display-referred workflows.
For optimal results, it's generally recommended to work within a scene-referred pipeline in darktable. This involves setting the appropriate defaults and utilizing tone mappers effectively. Even if you don't make specific adjustments to modules like agx or sigmoid, having them enabled in your workflow can lead to better overall image rendering.

Community Resources and Further Learning
The strength of darktable lies not only in its capabilities but also in its vibrant open-source community. Numerous resources are available to help users navigate its complexities:
- Official User Manual: The comprehensive user manual is an invaluable resource for understanding each module and feature in detail.
- YouTube Tutorials: A wealth of video content exists to guide users through darktable. Channels such as Bruce Williams Photography offer in-depth, long-form tutorials covering modules individually. Rico Richardson provides an amazing source of videos, while Aurelien Pierre, the lead developer, shares highly technical videos on new and upcoming modules. Boris Hajdukovic's "Editing Moments" series showcases the power of darktable through inspirational edits, and Frank Walsh also offers great darktable content.
- Online Communities and Forums: Engaging with other darktable users on forums and social media groups can provide solutions to specific problems and offer new perspectives on editing techniques.
- LUTs (LookUp Tables): For advanced color grading, resources like Open Source Photography by Marc Roovers offer quality LUT downloads that can help achieve specific stylistic looks, such as simulating Fujifilm cameras or infrared images.
Addressing Quirks and Enhancing Workflow
While darktable is incredibly powerful, its operation on macOS can sometimes feel less "native" than other applications. This is partly due to its open-source nature and cross-platform development. Some common quirks include:
- Non-Mac Native Behavior: Darktable doesn't always adhere to standard Mac conventions. For example, it doesn't use the Finder for file selection, and its scrolling behavior can occasionally be frustrating. Certain commands might require the Control key instead of the Command key.
- Performance with Large Folders: As folder sizes grow, darktable's performance can sometimes bog down, particularly during preview generation or when culling large photo shoots.
- Lack of Batch Renaming: A feature commonly found in other editors, batch renaming of files is not natively supported by darktable. Users typically rely on external tools or scripts for this task.
Despite these quirks, the power and flexibility offered by darktable make it a worthy investment of time and effort. The learning curve, while present, is significantly smoothed by the abundance of community-created tutorials and documentation. As you become more familiar with its unique interface and module system, you'll discover a profound level of control over your image development that is often unparalleled in other software. The journey from a beginner's quick edits to mastering its advanced features is a rewarding one, opening up new creative horizons for photographers on macOS.