DaVinci Resolve is a powerhouse in the realm of video editing, offering a suite of professional tools that cater to both novice creators and seasoned professionals. Among its many capabilities, the ability to rotate video clips is a fundamental yet crucial function. Whether you're correcting an improperly oriented shot, adding a dynamic visual flair, or adapting footage for different platforms, understanding how to rotate videos in DaVinci Resolve ensures your final product is polished and visually compelling. This guide will delve into the various methods for rotating clips, addressing common challenges, and exploring advanced techniques to elevate your editing.
Importing and Preparing Your Clip
The first step in any video editing process within DaVinci Resolve is to bring your media into the project. This is achieved by launching DaVinci Resolve and then importing the video file you intend to work with. Once your video file is accessible within the software, you will drag it into the timeline. This action places your clip in a sequence, making it ready for manipulation and editing. It's at this point that you can begin to address any orientation issues or explore creative rotations.

Method 1: Utilizing the Inspector Panel for Rotation
The Inspector Panel in DaVinci Resolve is a central hub for adjusting a multitude of clip properties, including its orientation. This method offers precise control over the rotation angle.
Step 1: Select Your Clip
After dragging your video into the timeline, the next crucial step is to select the specific clip you wish to rotate. Clicking on the clip in the timeline will highlight it, indicating that it is the active selection for editing.
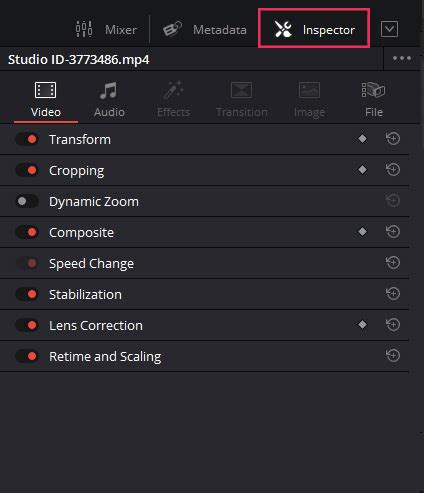
Step 2: Access the Inspector Panel
With the clip selected, navigate to the Inspector Panel. This panel is typically located on the right-hand side of the DaVinci Resolve interface. If it's not immediately visible, you can usually find an icon to reveal it.
Step 3: Adjust the Rotation Angle
Within the Inspector Panel, you will find a section dedicated to transformation controls. Look for the "Rotation Angle" parameter. You can adjust this value in a few ways:
- Direct Input: Enter a specific degree value (e.g., 90, 180, 270) into the "Rotation Angle" field. This is ideal for precise 90-degree rotations or specific angles.
- Slider Adjustment: Use the accompanying slider to incrementally adjust the rotation angle. This provides a more visual and fluid way to fine-tune the orientation.
For instance, to rotate a video 180 degrees clockwise, you would input "180" into the rotation angle field or use the slider to reach that value.
Method 2: Employing the Transform Tool
The Transform Tool offers a more direct, visual approach to manipulating your clip's position, scale, and rotation directly within the preview window.
Step 1: Import and Place Clip on Timeline
As with the Inspector Panel method, begin by importing your video into DaVinci Resolve and placing it on the timeline.
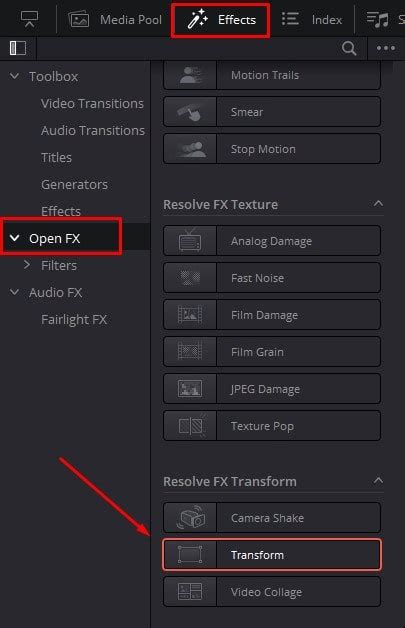
Step 2: Activate the Transform Tool
Once the video is on the timeline and selected, locate the toolbar situated above the preview window. You will see a rectangular button, often representing transform options. Click this button and select "Transform" from the drop-down menu. This action will overlay transformation controls onto your video in the preview window.
Step 3: Rotate Using the Transform Controls
With the Transform Tool active, you will see handles and controls around your video in the preview window. To rotate:
- Mouse Interaction: Hover your cursor over the rotation handles (often appearing as curved arrows when you mouse over the clip's corners or edges). Click and drag to rotate the video.
- Numerical Input: In some instances, the Transform Tool will also provide numerical input fields for rotation, similar to the Inspector Panel, allowing for precise angle adjustments.
Once you have achieved the desired rotation, confirm the changes. While the provided text mentions an "Apply" button, in DaVinci Resolve, changes made with the Transform Tool are often applied in real-time as you adjust them, or by simply deselecting the tool.
Addressing Post-Rotation Frame Issues
A common challenge after rotating a video, especially if its original aspect ratio doesn't match your project's, is that it may no longer fit the entire screen. For example, an iPad video recorded in portrait mode (1440x1920) might appear with black bars on the sides when placed in a 1920x1080 (landscape) project after a 90-degree rotation. DaVinci Resolve offers solutions to manage this.
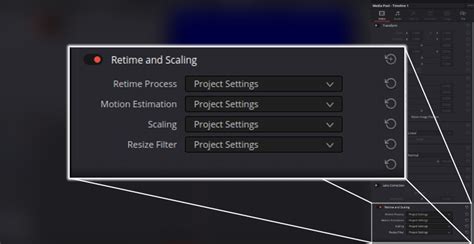
Understanding Scaling Options
When a clip's dimensions don't align with the project's, the "Retime and Scaling" settings within the Inspector Panel become relevant. After rotating your clip, if you notice it doesn't fill the frame, revisit the Inspector Panel. Within the "Retime and Scaling" section, you'll find a "Scaling" option.
The default is often "Project Settings," which attempts to fit the entire clip within the project frame without cropping. However, to make your rotated clip fill the screen, you can change this setting to "Crop." This will zoom in on the video and cut off any parts that extend beyond the project's boundaries, ensuring your rotated footage occupies the full frame.
While changing the scaling to "Crop" can resolve the framing issue, a user query mentioned uncertainty about potential video quality reduction. Generally, when scaling within DaVinci Resolve, especially when zooming in to fill the frame with the "Crop" setting, the software aims to maintain as much quality as possible. However, extreme zooming can lead to a slight loss in detail, as pixels are effectively being enlarged.
Advanced Rotation Techniques: Keyframing and Animation
For more dynamic and creative visual effects, DaVinci Resolve's powerful keyframing and animation tools allow for intricate control over rotation over time. This moves beyond a static rotation to create animated transformations.
Step 1: Select the Region for Animation
First, identify and highlight the specific portion of your video clip on the timeline where you want the rotation animation to occur. This selection defines the temporal range of your effect.
Step 2: Access Animation Controls in the Inspector
Navigate to the Inspector Panel. Here, you will find parameters for various transformations, including Rotation, Scaling, and Position. To animate rotation, you'll typically enable keyframing for the "Rotation Angle" parameter. This is often done by clicking a small diamond-shaped icon next to the parameter.
Step 3: Set Keyframes for Rotation
Once keyframing is enabled for rotation, you can set keyframes at specific points in your selected time range.
- Starting Keyframe: Position the playhead at the beginning of your desired animation segment and set the initial rotation angle. DaVinci Resolve will automatically create a keyframe.
- Ending Keyframe: Move the playhead to the end of the animation segment and adjust the rotation angle to its final value. A second keyframe will be created.
By carefully positioning these keyframes and adjusting the rotation values between them, you can control the speed, timing, and overall flow of your video's rotation. This allows for smooth transitions, dynamic spins, or even complex animated sequences where the video rotates and changes its orientation throughout the clip.
Keyframe Basics in DaVinci Resolve 20: Make Your Edits Come Alive!
Enhancing Your Rotation Workflow
To further refine your rotation process and ensure professional results, consider these best practices:
Snap to Grid for Precision
When precise alignment is critical, enabling the "Snap to Grid" option can be invaluable. This feature helps align your clip's transformations with the project's grid system, ensuring perfect accuracy and a visually pleasing composition, especially when working with multiple elements or complex layouts.
Creative Application of Multiple Rotations
Don't hesitate to experiment with layering rotations. By combining different rotation angles, perhaps with varying keyframes, you can create unique and eye-catching visual effects. This can add depth and dynamism to your video, whether you aim for a subtle shift or a dramatic transformation.
Checking for Image Distortion
It's important to be aware that excessive rotation, particularly with certain aspect ratios or resolutions, can sometimes lead to perceived image distortion or stretching, especially if the underlying footage is not designed for such manipulation. Always review your footage in the Inspector Panel after applying rotations to check for any unwanted visual artifacts and adjust as necessary to maintain image integrity.
Experimenting with Combined Transformations
Rotation is just one piece of the puzzle. For more impactful visual storytelling, consider combining rotation with other transformation tools like scaling and cropping. For instance, a clip could rotate and simultaneously zoom in, creating a powerful visual emphasis. Experimenting with these combinations can significantly enhance the visual interest of your videos.
Saving Custom Rotation Presets
If you frequently apply specific rotation settings or sequences, save time by creating custom presets. DaVinci Resolve allows you to save your configured transformation settings, which can then be quickly applied to future clips or projects, streamlining your workflow and ensuring consistency.
An Alternative: CapCut Desktop Video Editor
While DaVinci Resolve offers unparalleled depth for professional editing, for users seeking a quicker, more streamlined approach to video rotation and basic editing, the CapCut desktop video editor presents an excellent alternative. CapCut is known for its user-friendly interface and efficient tools.
Key Features of CapCut for Rotation
- Easy Rotation Controls: CapCut allows for intuitive video rotation to any angle with just a few clicks, making it simple to correct orientation for professional standards.
- Precise Angle Adjustment: The editor offers precise and user-friendly angle adjustments, enabling fine-tuning for perfect alignment.
- Real-time Review: Edits are instantly visible through real-time playback, which significantly speeds up the editing process.
- Integration with Other Tools: CapCut's rotation feature works seamlessly with its other editing tools. You can adjust exposure, apply filters, or add text overlays within the same interface.
Rotating a Video in CapCut
- Upload Video: Open CapCut, create a new project, and import your video file.
- Rotate Video: Upload the video to the timeline. In the upper right corner, select the "Basic" tab. Here, you'll find the rotation toolbar, allowing you to adjust the video to any desired angle (e.g., 180°, 270°).
- Export and Share: Once satisfied with the edits, click "Export." Here, you can customize export settings like format, frame rate, codec, and bit rate to suit your needs, whether for social media or other platforms.
CapCut offers a direct and accessible path to achieving quality results in video rotation, making it a valuable tool for those prioritizing speed and simplicity alongside effective editing.
Frequently Asked Questions
How to Use DaVinci Resolve to Rotate Video to 90 Degrees?
In DaVinci Resolve, you can rotate a video by 90 degrees (or any angle) using either the Inspector Panel by adjusting the "Rotation Angle" parameter or by utilizing the Transform Tool directly in the preview window. For a potentially simpler workflow, consider the CapCut desktop video editor, which also offers straightforward rotation capabilities.
How to Rotate an Image in DaVinci Resolve?
The process for rotating an image in DaVinci Resolve is identical to rotating a video clip. Import the image, place it on the timeline, select it, and then use either the Inspector Panel's "Rotation Angle" setting or the Transform Tool to adjust its orientation. CapCut also provides an easy-to-use interface for rotating images.
How to Rotate a Video Clip in DaVinci Resolve?
To rotate a video clip in DaVinci Resolve, insert the video into your timeline, select it, and then navigate to either the Inspector Panel or activate the Transform Tool. From there, you can modify the rotation angle to achieve your desired orientation.