DaVinci Resolve offers powerful tools for integrating 3D text into your video footage, creating dynamic and engaging visual effects. Whether you're aiming for text that appears to float seamlessly within a scene or a dramatic fly-through effect, understanding the core techniques is key. This guide will walk you through the process, from basic setup to advanced refinements, using both dedicated tracking nodes and template-based approaches.
The Power of 3D Text in Video Production
Animating text in a 3D space is a perfect way to get creative and make your videos look impressive. This technique is particularly effective when combined with footage that features camera movement, such as drone shots or dolly sequences. The illusion of depth and interaction between the text and the environment adds a professional polish to intros, title sequences, and overall visual storytelling.
Understanding the Core Concepts: Tracking
At the heart of placing 3D text convincingly within moving footage lies the concept of motion tracking. Tracking data allows DaVinci Resolve to understand how the camera is moving and, consequently, how to position your 3D elements so they appear to be anchored to specific points in the scene. There are two primary methods for achieving this in DaVinci Resolve: using the CameraTracker node or the PlanarTracker node. While the CameraTracker is excellent for general scene tracking, the PlanarTracker is often preferred for precisely matching text to a specific surface or area within the frame.
Method 1: Utilizing the PlanarTracker for Precise Text Placement
The PlanarTracker node offers a granular approach to motion tracking, allowing you to isolate and follow specific planar surfaces within your video. This method is ideal when you want your 3D text to adhere to a particular wall, floor, or any flat area that moves with the camera.
Step-by-Step Guide to Planar Tracking 3D Text
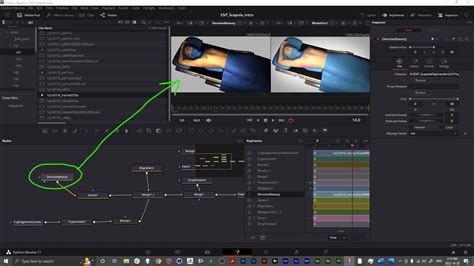
Accessing the Fusion Page: Begin by navigating to the Fusion page. You can do this by right-clicking on your clip in either the Cut page or the Edit page and selecting "Open in Fusion Page."
Adding the Text 3D Node: Once in Fusion, press
Shift + Spacebarto bring up the "Select Tool" menu. Search for "Text 3D" and click "Add" to incorporate it into your node tree.Previewing the Text Node: With the Text 3D node selected, press the number
1key. This will display the node's output in the left viewer, while your video footage should be visible in the right viewer.Introducing the Renderer3D Node: Any time you're working with 3D elements in DaVinci Resolve, a
Renderer3Dnode is essential. PressShift + Spacebaragain and search for "Renderer3D," then add it. Connect the output of your Text 3D node to the input of the Renderer3D node.Merging the 3D Element with Footage: To combine your 3D text with the original video, you'll need a
Mergenode. Drag the output of the Renderer3D node to the output of your initialMediaInnode (representing your video footage). This action will automatically create a Merge node, connecting the elements.Implementing the Planar Tracker: Now, select the
MediaInnode and pressShift + Spacebarto search for and add aPlanar Trackernode. Ensure it is connected into your existing node tree.Configuring the Tracker Settings: In the Inspector panel for the Planar Tracker, change the "Motion Type" to "Translation, Rotation, Scale." This crucial setting ensures that your text not only follows the movement in the video but also adjusts its rotation and scale to maintain a consistent perspective relative to the footage.
Defining the Tracking Area: In the right viewer, draw a rectangle shape over the area you want the tracker to follow. Choose a spot that has clear contrast or a distinct object, providing the tracker with reliable data to lock onto.
Baking in the Transform Data: Once you have your tracking data, you can disconnect the
PlanarTrackernode from your main tree byShift + draggingit. With the PlanarTracker node still selected, choose "Create Planar Transform" in the Inspector. This action generates a new, independentPlanarTransformnode that contains the baked-in tracking data.Applying the Transform: Drag this new
PlanarTransformnode into your node tree, positioning it between theRenderer3Dnode and theMergenode. This connection ensures that your 3D text will now stick to the tracked point in the video.
Refining the 3D Text Animation
With the text locked to your tracked point, you can now focus on animating its movement and appearance in the 3D space.
Positioning in 3D Space: Select the
PlanarTransformnode. To introduce movement, add aDVE(Digital Video Effects) node by pressingShift + Spacebarand connecting it between thePlanarTransformand theMergenode.Animating Depth (Z Move): With the DVE node selected, you can animate its properties. Set a keyframe for the "Z Move" parameter at the starting point of your desired animation. Then, move the playhead to the end of the animation and set a second keyframe. Adjust the "Z Move" slider to position your text in the 3D space, perhaps dragging it off-screen to create a fly-through effect.
Refining Animation with the Spline Editor: To ensure smooth and natural-looking motion, open the Spline Editor. This powerful tool allows you to manipulate the interpolation between keyframes. Select the DVE node and use the bezier handles to create curved animation paths rather than linear ones. This results in a more organic acceleration and deceleration, particularly useful when the camera is flying through the text.
Adding Rotation: For an extra layer of realism and dynamism, you can add subtle rotation. With the DVE node still selected, adjust the Y-axis (or X/Z axes as needed) in the Inspector to introduce rotation in the 3D space.
Method 2: Leveraging the CameraTracker for Broader Scene Analysis
The CameraTracker node is a more automated solution that analyzes the entire clip to reconstruct the camera's movement in 3D space. This is particularly useful for complex camera paths and when you want to place text that adheres to the overall scene motion rather than a specific planar surface.
Step-by-Step Guide to Camera Tracking 3D Text
Accessing the Fusion Page: As before, right-click your clip and select "Open in Fusion Page."
Adding the Camera Tracker Node: Make sure your viewer is enlarged for better workspace. Hover over the node editor area, right-click, go to "Add Tool," then "Tracking," and select
Camera Tracker. This method automatically connects the node. Ensure your Inspector window is open.Initiating Auto Track: In the Inspector's "Track" tab, enable "Bi-directional tracking" for more robust results. You can adjust the "Detection Threshold" if needed, but the default often works well. Click "Preview Auto Track Location" to visualize track points, then hit "Auto Track." The software will analyze the entire clip.
Solving the Track and Cleaning Data: Navigate to the "Solve" tab. Think of this as the data refinement stage. Click "Solve" first. Examine the "Average Solve Error." A high number (e.g., above 1.0) indicates a less accurate track. To improve it, look at the track points listed. Reduce the "Maximum Track Error" slider gradually. As you do, you'll see fewer points selected. The goal is to minimize the number of erroneous track points without discarding too many good ones. Select a subset of points that represent the area where you want your text to be positioned.
Exporting Tracking Data: Go to the "Export" tab. Before exporting, in the "3D Scene Transform" section, click "Set from Selection (Based on the points that you did select)" to update the origin of the tracking data to your chosen area. Then, click "Export."
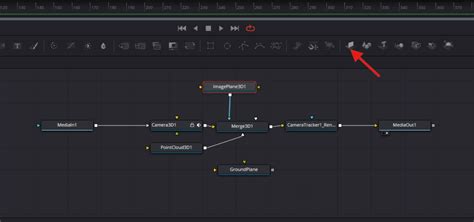
Connecting the Exported Nodes: DaVinci Resolve will generate a set of new nodes. You can typically delete the "Ground Plane" and "Point Cloud" nodes as they are not essential for text placement. Your core nodes will be
Merge 3D,Camera, and theCameraTrackerSolvedResult. Connect the output of theCameraTrackerSolvedResultto theOutnode. You can keep the originalCameraTrackernode in your tree without it being actively connected, as a backup.Creating and Placing Your Text: Now, create your text. Add a
Textnode (not Text 3D in this case, as the CameraTracker provides the 3D environment) and connect its output to theMerge 3Dnode. In the text node's Inspector, type your text, adjust font, size, and color. Expand the "Extrusion" settings to give your text depth and a 3D appearance.Positioning and Scaling: Use the "Transform" settings within the text node for final adjustments. Crucially, only use the X and Y positioning here. Adjusting the Z-depth slider can interfere with the tracking accuracy. For scaling, use the "Size" control within the main text settings, not the Z-depth transform.
How To MOTION TRACK Objects In Davinci Resolve
Enhancing Realism: Lighting and Compositing
To truly integrate your 3D text into the scene, lighting is paramount.
Adding Lights: Right-click in an empty area of the node editor and go to "Add Tool" > "3D Light." Choose a light type, such as "Spotlight," and connect it to your
Merge 3Dnode.Positioning and Adjusting Lights: In the viewer, select the light. Use the transform controls to position it in 3D space. You might need to enable lighting in the
CameraTrackerSolvedResultnode's settings to see the effect. Adjust the light's intensity, color, and falloff in the Inspector to match the lighting in your footage.Using Multiple Lights: For more complex lighting scenarios, you can add multiple lights. An "Ambient Light" can provide overall fill, ensuring that even the extruded parts of your text are visible. Experiment with the intensity of different lights to achieve the desired look. Reducing the intensity of a primary light and increasing ambient light can create a softer, more diffused illumination.
Leveraging Templates for Efficiency
While understanding the manual node-based workflow is invaluable, DaVinci Resolve templates offer a significant time-saving advantage. Motion Array and other providers offer libraries of pre-made DaVinci Resolve macros and templates, including sophisticated 3D floating and flying text effects.
Using a template as a jumping-off point can save a lot of time and still yield professional results. These templates often come with pre-built animations and customizable parameters, allowing you to quickly drop in your text and adjust settings like color, font, and animation speed. Some popular template categories include:
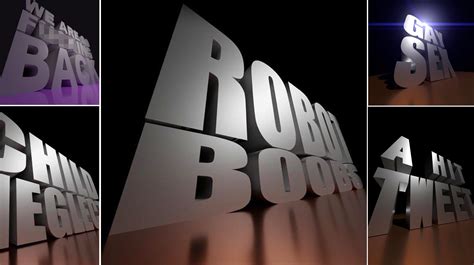
- Projected Image Styles: Text designed to look like a colorful projected image.
- Metallic and Sci-Fi Themes: Ideal for projects requiring a futuristic or technological aesthetic.
- Dynamic Animations: Templates featuring fly-throughs, floating, spinning, and fly-by effects.
- Cinematic Titles: Templates that emulate classic movie trailer looks.
By starting with a template, you can focus on the creative aspects of your project rather than spending extensive time building complex node structures from scratch. You can then further customize these templates to perfectly match your vision.
Final Polish and Refinement
Regardless of the method chosen, always review your animation at normal playback speed. Ensure that the perspective looks correct and that the text doesn't intersect unnaturally with solid objects in the scene. The Spline Editor is your best friend for smoothing out any jerky movements or creating more dynamic animation curves. By carefully adjusting keyframes and using bezier handles, you can achieve incredibly fluid and professional-looking 3D text animations that elevate your video content.