Lightroom's suite of editing tools, while not as expansive as Photoshop, offers a robust set of options for everyday photo corrections. Beyond basic adjustments like white balance, exposure, and black and white conversions, the Spot Removal tool stands out as a remarkably quick and efficient method for eliminating blemishes and imperfections that can detract from an otherwise excellent photograph. This tutorial delves into the intricacies of this powerful tool, empowering photographers of all levels to refine their images with precision and ease.
Accessing and Understanding the Spot Removal Tool
To begin your journey with the Spot Removal tool, navigate to the Develop module within Lightroom. The quickest way to activate it is by pressing the keyboard shortcut 'Q'. Once the Spot Removal panel is open, you might feel an urge to immediately start clicking on every perceived flaw. However, a foundational understanding of its two primary modes-Clone and Heal-and their associated sliders is crucial for achieving optimal results.
Each of these modes, Clone and Heal, is governed by three adjustable sliders: Size, Feather, and Opacity.
Size: This slider dictates the dimensions of the editing brush. While you can intuitively drag the slider left or right, a more precise approach involves typing specific numerical values between 0 and 100. Alternatively, you can efficiently adjust the brush size by scrolling your mouse wheel, observing the brush dynamically grow or shrink until it perfectly matches your needs. The bracket keys ([ and ]) also offer a quick way to increase or decrease brush size.
Feather: This setting controls the gradual transition of the edit into the surrounding pixels. A Feather value of 100 signifies a very gradual fade at the edge of the tool's influence. While this can sometimes create a softer blend, it often results in a harsh, easily detectable edge around your edits, which is generally not recommended for seamless retouching. A value around 50 is often a good starting point, allowing for subtle blending that can be further adjusted to taste.
Opacity: This slider determines the transparency of your edits. A 100% opacity means the edit is fully opaque, completely covering the original pixels. Lowering the opacity allows for a more subtle effect, where the underlying image details can still show through, which can be useful for toning down distractions rather than completely removing them.

The Clone Tool: Copying and Pasting Perfection
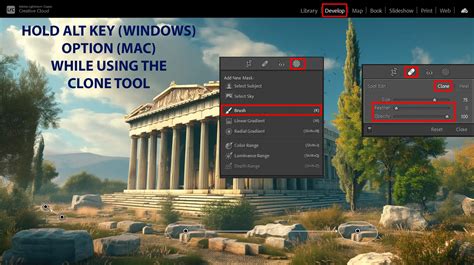
The Clone tool, a long-standing feature in photo editing software, is fundamentally straightforward: it copies a portion of an image and places it directly over another area. This is particularly useful for removing distracting elements or replicating patterns. Lightroom attempts to simplify this process by intelligently sampling a similar portion of your image as a starting point. However, its initial automated selection may not always be ideal.
When using the Clone tool, you'll notice an "Overlay" setting. This manifests as a white circle indicating the source area from which the Clone Tool is copying, and a second circle showing where the copied content is being applied. The visibility of these overlays can be controlled via the "Tool Overlay" option in the lower-left of the Develop module, offering choices like Auto, Always, Selected, and Never.
If you find yourself unable to see these indicators, pressing the 'H' key will toggle them on and off. Once the circles are visible, you can easily fine-tune the source area. By dragging the bright circle representing the source, you can select a more appropriate part of the image to sample from, ensuring a better blend and a more natural-looking result. This manual adjustment is key to overcoming Lightroom's initial automated sampling, which can sometimes be less than ideal, as seen in examples where a stick on a squirrel's image might be initially poorly cloned.
When using the Clone tool, especially for larger or more complex removals, it's often more effective to work in smaller, manageable portions. Attempting to remove an entire large object at once might mean there isn't a suitable area to sample from, leading to less-than-ideal results.
The Heal Tool: Blending for Seamless Integration
While similar in function to the Clone tool, the Heal tool operates with a slightly different philosophy. Instead of a direct copy, the Heal tool samples textures and tones from a source area and then blends them with the target area, aiming for a more integrated and less noticeable repair. The Heal tool shares the same Size, Feather, and Opacity sliders as the Clone tool, but its underlying mechanism means the Opacity slider might not function in precisely the same way.
To use the Heal tool, you simply click on the spot you wish to remove, or click and drag to cover a larger area. Lightroom then automatically samples and blends. The Heal tool is particularly adept at fixing imperfections like sensor dust, skin blemishes, or small distractions, where a perfect pixel-for-pixel copy might look unnatural. It excels at matching the surrounding tones and textures, making the repair less apparent.
Advanced Techniques and Visualization
One common challenge when using the Spot Removal tool is accurately identifying all the imperfections. This is where the "Visualize Spots" feature becomes invaluable. With the Spot Removal tool active, clicking the "Visualize Spots" button in the lower-left corner of the Develop module (or pressing the 'A' key) transforms your image into a black-and-white representation, highlighting areas of high contrast. This makes it significantly easier to spot subtle dust motes, blemishes, or other tiny flaws that might otherwise be missed, especially on large, uniform areas like skies or smooth surfaces.
The Visualize Spots feature is particularly useful for identifying sensor dust, which can appear as small, dark spots. By inverting the image and adjusting the contrast, these dust specks become much more prominent. You can also use a slider to adjust the sensitivity of this visualization, allowing you to fine-tune the detection of spots. While this tool is excellent for finding many types of imperfections, it's important to remember that some flaws, especially those blended into complex textures or subtle color variations, might still be best identified by careful visual inspection of the normal image.
How to Use the Spot Removal Tool | In A Lightroom Minute | Adobe Lightroom
Refining Your Edits: Precision and Control
Even with the best intentions, initial edits with the Spot Removal tool might not always be perfect. If you encounter an undesirable result, such as a harsh shadow or an unnatural-looking patch, several options are available for refinement.
Adjusting the Source Area: For both Clone and Heal modes, you can manually reposition the source sampling area. After an edit has been made, you'll see circles indicating the repaired area and the source area. You can click and drag the source circle to a more suitable location, observing a live preview of the effect. This manual control is critical for achieving seamless results, especially when dealing with complex backgrounds or textures.
Deleting and Redoing: If an edit is fundamentally flawed, you can easily delete it by selecting the associated pin (the circle indicating the edit) and pressing the 'Delete' key. This allows you to start over with fresh settings or a different approach. You can also delete multiple pins at once, which is a significant time-saver when dealing with numerous imperfections in a small area, such as skin blemishes on a portrait.
Drawing Lines and Shapes: The Spot Removal tool isn't limited to simple clicks. You can also draw lines or shapes to cover larger or more irregularly shaped areas that need correction. This is particularly useful for removing larger distractions or repairing damaged sections of an image.
When to Use Lightroom vs. Photoshop
While Lightroom's Spot Removal tool is incredibly powerful for many common retouching tasks-from removing skin blemishes and stray hairs to eliminating distracting objects like branches or trash, and even cloning out sensor dust-it's important to recognize its limitations. For highly complex retouching jobs, intricate object removal, or situations requiring extensive manipulation of image content, Photoshop's more advanced tools, such as the Content-Aware Fill and sophisticated Clone Stamp options, may be necessary. However, for the vast majority of everyday edits, the options available within Lightroom are more than sufficient for both professional and casual photographers. The convenience of performing these edits directly within the same workflow as your raw processing and catalog management makes Lightroom the preferred choice for many.
The integration of Generative AI, such as Adobe Firefly's Generative Remove feature in Lightroom Classic, further expands Lightroom's capabilities, allowing for even more sophisticated and seamless object removal by intelligently filling in the removed areas.
Portability and Future Developments
The desire to perform detailed spot healing on mobile devices, such as iPads, is a growing sentiment among photographers. While current mobile versions of Lightroom may not offer the full suite of desktop Spot Removal features, the potential for such functionality is significant. The touch interface and accurate pen tools on modern tablets make them ideal for detailed work. The current workaround often involves using companion apps like Adobe Photoshop Fix, but this can lead to creating flattened files that are not the original, full-resolution versions, hindering a truly non-destructive workflow. The evolution towards more organic and intuitive input methods suggests that enhanced mobile retouching capabilities in Lightroom are a likely and welcome development.
The ability to perform spot healing directly within Lightroom's mobile ecosystem, maintaining a non-destructive workflow and working with original files, would be a tremendous time-saver for photographers who rely on mobile editing. This would allow for tasks like dust spotting and blemish removal to be seamlessly integrated into the mobile editing process, aligning with the increasing power and capability of these devices as primary computing platforms.
Understanding the Underlying Mechanics
Lightroom's non-destructive editing paradigm means that all adjustments, including those made with the Spot Removal tool, are recorded as invisible "layers" or instructions within the catalog and history tab. This ensures that your original image data remains untouched. While this is a significant advantage, heavy use of certain tools, particularly the Spot Removal tool when applied to numerous areas or with complex settings, can sometimes impact system performance.
When printing photos at full resolution, imperfections that were barely noticeable on a computer screen can become glaringly apparent. These can range from dust on a camera sensor to subtle blemishes on skin or small wisps of cloud in an otherwise clear sky. The Spot Removal tool, in conjunction with the Visualize Spots feature, provides an efficient means to address these print-critical imperfections.
The Heal tool in Lightroom Classic functions by repairing a selected area by sampling from both the immediate spot and a different area of the same image. This allows for a more nuanced blend than a direct clone. When selecting larger portions of an image using longer strokes, ensuring the right sample area match isn't always immediate. This is where manual adjustment of the sampled area becomes crucial. By dragging the handle of the sampled area, you can guide Lightroom to a more appropriate source, with a live preview showing the results of your adjustment. For precise control, you can also use Control/Command + click to create a circular spot and then drag to set the source of that spot.
Ultimately, mastering Lightroom's Spot Removal tool is about understanding its capabilities, practicing its different modes, and knowing when to leverage its advanced features like Visualize Spots. With a bit of practice, this tool will become an indispensable part of your photographic workflow, allowing you to present your images in their best possible light.