Sound is a crucial part of any great video. It’s key to sync your audio and video each time you edit. In this tutorial, you’ll learn how to add and synchronize audio tracks in DaVinci Resolve, transforming your video projects from silent films into immersive experiences. We'll explore production steps you can take during recording, handy tips and tricks to capture amazing audio that’s easy to work with, and the essential techniques for seamless integration within DaVinci Resolve.
The Importance of Separate Audio Recording
While your camera can record audio, and for basic productions, this will often suffice, for a true cinematic experience, you'll get better results from recording audio and video separately. The primary reason is the quality of the microphone itself. Most camera microphones simply aren’t as high-quality as dedicated, standalone audio microphones. This fundamental difference in hardware directly impacts the clarity and richness of the sound captured.
Secondly, you'll face challenges with microphone placement when relying solely on your camera's built-in audio. Imagine recording a scene with two people speaking in hushed voices. To capture their dialogue clearly with a camera-mounted microphone, the camera will need to be several feet away from the speakers. Yet, this distance will inevitably result in poor-quality audio, often picking up unwanted room noise and lacking the intimacy of closer sound capture.
Ultimately, when recording audio and video separately, you create two distinct files. This necessitates syncing your tracks in post-production. These factors-superior microphone quality and flexible placement-strongly suggest it's best to use a separate audio recorder to capture your sound.
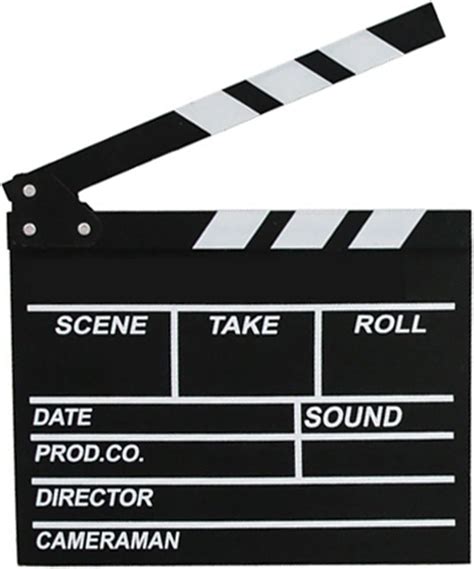
Preparing for Synchronization: The Clapboard Method
You’re thinking of how to sync audio in DaVinci Resolve. As you've just learned, quality improves dramatically when you record audio and video independently. However, doing so means you will have to sync the two tracks. This is where preparation during the recording phase becomes invaluable.
A simple clapboard is an essential tool when you think of how to sync audio in DaVinci Resolve. The most helpful step happens before you press record. Set yourself up for success in advance by using a clapboard as you record.
What is a clapboard? A clapboard is the hinged board that you might associate with film directors. On it, you can write key details: the scene name, the time, the date, and so on. But most important is the hinged piece. This clapping motion offers key clues to you as an editor. You can watch it on-screen.
Using a clapboard is quite simple. You'll begin by starting both your audio and video recordings. Then, on a chosen cue, you will snap the clapboard together directly in view of your lens.
Note: Don’t have a clapboard? No worries. Any marking tool that makes a clear sound and is visually obvious on your video will work. You can even clap your hands while standing in front of the camera if you have no other tools. DaVinci Resolve will sync audio with ease.
Manual Audio Synchronization in DaVinci Resolve's Edit Page
As we look at how to sync audio in DaVinci Resolve, you'll see a video clip in use too. This manual method is precise and gives you complete control over the synchronization process.
Add Clips to the Timeline: To see how to sync audio in DaVinci Resolve, start by adding your audio and video clips to the Timeline. You can see them below, where I’m working in the Edit mode. Be sure that you’re zoomed in on the Timeline. To do that, you can use the Zoom slider below the left side of the video preview image. This way, you can move frame by frame through your video.
Identify the First Contact Point: Next, you’ll want to identify the first contact point. What is the contact point? Think of it as the moment that the clapboard’s moving arm contacts the rest of the board. It’s where the clapping sound is generated. To find the first contact point, move the red Playhead to a point shortly before the clapping motion begins in the video. Then, begin moving forward in your video, frame by frame. Stop at the moment where the clapboard comes together.
Align Audio and Video: Finally, you’ll want to use DaVinci Resolve to sync audio and video. In your audio track, you’ll see a sharp, quick sound wave appear. With the Playhead still in place from step #2, click and drag your audio track beneath the video track in the Timeline. Move your audio track into alignment with the video track on your Timeline. When you release it and press Play, watch the results. Dialogue and more will align perfectly. Your audience will never know that you used DaVinci Resolve sync audio tools!
Link the Clips: Finally, select both tracks in the Timeline. To do that, click on one, hold down Shift, and then click the other. Right-click on both selected tracks and choose "Link Clips." This is a key step when you sync audio in DaVinci Resolve. By linking clips, both now move together when you move either track, ensuring they remain synchronized throughout your project.
Today, you learned how to use manual DaVinci Resolve sync audio and video tools. Be sure to check out our full tutorial on DaVinci Resolve auto-sync features for circumstances where this manual approach might be less efficient. Knowing how to sync audio in DaVinci Resolve is one of many handy editing techniques that you can use every day.
Adding Audio Tracks: The Edit Page Approach
Beyond synchronization, you'll often need to add entirely new audio tracks, such as music or sound effects. DaVinci Resolve offers straightforward methods for this, primarily within the Edit page for basic additions.
We will begin this article by providing a guide for the most basic option in DaVinci Resolve to add an audio track to an MP4, using the regular Edit page. Similar to multimedia editing programs, the Edit track in DaVinci Resolve is where the main editing timeline is located. Fortunately, adding your audio file to the main editing timeline of DaVinci Resolve is easy to do.
- Open DaVinci Resolve and Navigate to the Edit Page: Launch DaVinci Resolve and ensure you are on the "Edit" page, indicated by the tab at the bottom of the interface.
- Import Your Audio File: Go to "File" > "Import File" > "Import Media," or use the keyboard shortcut CTRL+I (Windows) or CMD+I (Mac). Locate your audio file on your computer, select it, and click "Open."
- Add to Timeline: Your imported audio file will now appear in the "Media Pool" in the top-left corner of the screen. Simply click and drag the audio file from the Media Pool onto an audio track (e.g., Audio 1, Audio 2) in your timeline.
With your audio file now added to the Edit tab of DaVinci Resolve, you can continue working on your project or start editing the audio file using the tools available in the Edit page. This includes trimming, adjusting volume, and applying basic fades.
Advanced Audio Editing with the Fairlight Page
For more advanced audio editing, mixing, and the addition of multiple complex audio tracks, DaVinci Resolve provides the dedicated "Fairlight" page. This is essentially a full digital audio workstation (DAW) integrated within Resolve.
If you want to apply more advanced editing works in DaVinci Resolve, or you want to add a second audio track to your editing project, you have to use the more advanced music and audio editor option in the software with the Fairlight page. Unfortunately, the advanced nature of Fairlight options may be overwhelming for beginners. As such, it is only advisable to use this option if you are already experienced with intermediate to advanced-level audio editing.
Here’s a general workflow for using the Fairlight page:
- Navigate to the Fairlight Page: Click the "Fairlight" tab at the bottom of the DaVinci Resolve interface.
- Add an Audio Track: If you need a new track, right-click in the track header area (where track names are displayed) and select "Add Track." You can choose the track type (e.g., mono, stereo) and name it.
- Import or Access Audio: Audio files can be imported using the same "Import Media" function or by dragging them from the Media Pool onto the Fairlight timeline.
- Patching Inputs (for Recording): If you intend to record audio directly within Fairlight (like voiceovers), you'll need to patch your microphone input. Go to "Fairlight" > "Patch Input/Output" to assign your microphone to a specific track input.
- Arming Tracks for Recording: To record on a specific track, click the "R" button (Arm for Record) on that track's header.
- Recording: Position the playhead where you want to start recording and click the main record button in the top toolbar.
- Editing and Mixing: Once your audio is on the timeline, Fairlight offers a vast array of tools for editing, mixing, applying effects (EQ, compression, reverb, noise reduction), and much more.
Once the file has been added to the program, you may now play it to preview if the audio works properly. Once your audio has been imported to the Fairlight tab, you can now enjoy editing, mixing, and applying audio effects to the media file you have added. However, be sure to use only adjustments with which you are familiar, as experimenting with these effects may negatively impact your audio.
Advanced Audio Techniques in Fairlight
If you are already familiar with audio mixing, it is a good option to separate the tracks for the vocals, music, and effects. For improved consistency, you can use audio volume normalizing. This function allows you to set a limit for all audio tracks in your program, ensuring their maximum volume is consistent. Finally, audio fade-in and fade-out work great as well to enhance the transition between different audio tracks in your project. This works great when used with videos featuring different subjects, as it allows you to balance your audio and video content. It can even be useful if you are only editing an audio file, as a fade-out effect will enhance the way your audio finishes.
DaVinci Resolve Fairlight Overview for Beginners
Recording Voiceovers Directly in DaVinci Resolve
Recording a voiceover used to mean you had to stop editing and jump over to the Fairlight audio page. While this worked, it was an extra step that pulled you away from your timeline. Fortunately, newer versions of DaVinci Resolve have streamlined this process.
A new voiceover tool has been added directly to the Edit page, so you can record your narration without ever having to switch screens.
Recording Voiceovers in DaVinci Resolve (Version 20+)
Here’s how to record audio and voiceovers in DaVinci Resolve 20:
Open the Voiceover Tool: First, make sure you’re on the Edit page (you can press the Shift + 4 keyboard shortcut to access it quickly). In the top-left corner of your timeline, look for a Microphone icon. This is the new voiceover tool. Click on it to open the recording panel.
Choose Your Microphone: Once the panel opens, you need to tell Resolve which microphone to use. Look for the "Audio Input" setting. Click the dropdown menu and select your microphone from the list. If you’re not sure which one it is, it should include your microphone’s brand name, like “Blue Yeti.” If you have multiple mics and aren’t sure which is which, quickly test them by speaking into each and watching the audio meter in the panel. Be careful not to accidentally select your laptop’s built-in mic, because it won’t have crisp audio. If you’re looking for better audio capture, a shotgun mic from a brand like Sennheiser is your best bet. Below the input, you’ll see a "Record Track" option. This just tells Resolve which audio track to put your recording on. For Record Track, choose your empty audio track to avoid overwriting one with content. Add another audio track by right-clicking under your current tracks and pressing "Add Track," if you need to.
If your microphone isn’t showing up in the Input list, the problem is usually with your computer’s settings:
- On a Mac: Go to System Settings > Sound > Input. Select your microphone and turn the input volume up. You may also need to go to Security & Privacy > Microphone and give DaVinci Resolve permission to access it.
- On a PC: Right-click the speaker icon on your taskbar and go to Sound settings > Input. Select your microphone as the default device. Like on a Mac, you may also need to check your privacy settings to ensure Resolve has permission to use it.
Record Your Voiceover: Move the playhead on your timeline to where you want the recording to start. When you’re ready to go, click the Record button at the bottom of the Voiceover panel. Resolve will give you a short countdown, and then it will start recording your voice as the video plays. Just speak naturally into your microphone. When you’re finished, click the record button again to stop. You’ll see a new audio clip appear on your timeline.
Note: There’s no need to “arm” the track in DaVinci Resolve 20. Once the voiceover panel opens, you can see whether Resolve is picking up your mic under the Record button. I always give a quick “1, 2, 3 testing” to ensure I see a healthy signal.
If the audio clip is flat or there’s no sound, here’s what to check:
- Is the track armed? First, double-check that the R button in the Voiceover panel is red.
- Is the right mic selected? Go back to the Input setting in the Voiceover panel and make sure you have selected the correct microphone, not something like your laptop’s built-in mic.
- Is your mic on and plugged in? Plug your USB cable in properly and, if your microphone has a physical mute button or power switch, check that it’s on. You should see the green audio meter bounce when you talk. If you don’t, Resolve isn’t hearing anything.
Once you’re finished recording, don’t forget to add subtitles to your project and edit your audio.
Recording Voiceovers in DaVinci Resolve (Older Versions, e.g., 19)
If you haven’t updated your software yet, you can still record audio directly into your timeline using the Fairlight page.
- Open the Fairlight Page and Add an Audio Track: To start, head over to the Fairlight page. This is Resolve’s audio workspace, where you’ll find the voiceover option in DaVinci 19. Add a new audio track by right-clicking under your current tracks and pressing "Add track." Choose mono if you’re using a single mic setup.
- Patch Your Microphone Input: Next, you need to tell DaVinci which microphone to use. In the top menu, go to "Fairlight" > "Patch Input/Output." A window will pop up. On the left side, choose your microphone under Input, and on the right side, select an audio track to record on to (like “Track Input: Audio 1”). Click "Patch" to confirm.
- Arm the Track for Recording: The next step is to arm the track for recording. Look to the left side of your timeline where it lists the track names. Find the track you patched to and click the small "R" next to it. The button will light up red, meaning your track is ready to record.
- Hit Record: Move your playhead to where you want the recording to begin. Then press "Record" on the top toolbar. Everything you say into the mic will record onto your armed track. When you’re done, press "Stop," and you’ll see a new waveform appear in the track.
It’s also a good idea to record a few seconds of “room tone” (just silence) at the end of your recording. You can use this to fill gaps or smooth out edits later. It’s way better than digital silence.
Tips for High-Quality Voiceovers and Audio
Want your voiceovers to sound clean and professional? Here are a few easy tips to get better results, applicable whether you're using the new voiceover tool or the Fairlight page.
1. Prepare Your Recording Space
Before you hit record, take a minute to prep your space. It makes a big difference.
- Pick a Quiet Room: Turn off anything that makes noise, like AC units and fridges. Get the room as silent as possible and record away from your computer to avoid catching the hum. You could even try recording under a blanket or using couch cushions to absorb echoing sounds-simple tricks can be magic sometimes!
- Use a Good Mic: A dedicated USB mic will record better audio than your laptop’s built-in option. Place it about 6-8 inches from your mouth and slightly off to the side to avoid popping sounds. This “off-axis” placement is a trick that really cuts down on those harsh “P” and “B” sounds without a pop filter, especially if you’re in a pinch.
- Do a Quick Test: Record a short sample and listen on headphones. Make sure your mic sounds clear and that there’s no background noise sneaking in.
2. Remove Background Noise with Voice Isolation (DaVinci Resolve Studio)
If you’re using DaVinci Resolve Studio, there’s a built-in tool called "Voice Isolation" that’s great for cleaning up noisy recordings.
Go to the Fairlight page and select your audio clip. In the Inspector, find "Audio Effects" and add "Voice Isolation" from the "Noise Reduction" category. Adjust the "Strength" slider until the background fades but your voice is still clear.
3. Make it Sound Better with EQ
EQ (Equalization) and compression help your voice sound clearer and more balanced. To brighten your voice, head to the Fairlight page and open the Mixer or check out a tutorial on EQ. Double-click the EQ button on your audio track. To get rid of muddiness, add a high-pass filter to Band 1. Muddiness often lives in the lower mids, so dial up the Frequency on Band 1 slowly until it sounds better. Generally, move this to around 80 to 120 Hz-any more and it starts to negatively affect the audio.
To remove higher-pitched noises (like hisses), add a low-pass filter. Those high-pitched noises are usually in the very top end. Head to Band 6 and dial down the Frequency until your audio sounds cleaner (somewhere around 17k Hz tends to work best). Don’t turn it down too much, as it’ll make your audio sound muddier.
4. Clean Up Your Audio with DaVinci Resolve Plugins
If your audio still needs work, you can try using a third-party plugin for DaVinci Resolve. Two that work well with Resolve are iZotope RX and DX Revive. iZotope RX is great for fixing clicks, harsh “S” sounds, and background noise, while DX Revive uses AI to make muffled or distant audio sound sharper and clearer.
Workflow Efficiency and External Tools
Whether you’re recording a quick voiceover or full narration, clean audio makes a huge difference. With DaVinci Resolve’s built-in tools and a little setup, you can get great results.
Although adding an audio track in DaVinci Resolve is easy, the program’s traditional video editing background still makes it less beginner-friendly compared to some alternatives. For users who find the complexity of Resolve daunting for simpler audio tasks, external converters can offer a more accessible entry point.
Compatible with both Windows and macOS computers, AnyMP4 Video Converter Ultimate features a dedicated Audio tab in its beginner-friendly Edit window. Despite the lack of a dedicated timeline, you can still adjust the added audio’s volume and synchronization to the video via delay adjustments. By following a simple three-step guide within such software, you can add an audio track to your editing project without needing to navigate DaVinci Resolve’s more complex editing timeline interface.
Conclusion: Mastering Your Sound in DaVinci Resolve
There’s no doubt that sound plays a crucial role in the quality of visual content. Even if you’re not a professional content creator, you can learn some video editing tricks for personal projects or family videos, and adding music is one of the best ways to improve your content. DaVinci Resolve is an all-in-one solution that allows you to edit videos with visual effects, add music to your content, apply color correction, and edit audio in post-production.
Knowing how to sync audio in DaVinci Resolve, whether through manual alignment with a clapboard or by leveraging its advanced tools, is fundamental to creating polished and professional videos. By understanding the importance of separate audio recording, preparing diligently during production, and mastering the editing capabilities within DaVinci Resolve’s Edit and Fairlight pages, you can significantly elevate the auditory experience of your projects.
Whether you're creating content for YouTube, social media, or client projects, music and clear audio help set the tone and hold your audience’s attention. And by using creator-friendly video tools like DaVinci Resolve for editing, you streamline your workflow while ensuring your videos are polished, professional, and engaging.