Photoshop, the industry-standard image editing software, offers a powerful suite of tools for manipulating both raster and vector elements. Among these, the Path Selection Tool stands out as a crucial instrument for working with vector shapes and paths, enabling precise control over the outlines that define editable areas and graphic elements within your projects. Understanding its capabilities is essential for anyone looking to refine selections, create complex shapes, or manage vector artwork efficiently. This guide will delve into the intricacies of the Path Selection Tool, from basic usage to advanced techniques, empowering you to harness its full potential.
Understanding Paths and Vector Graphics in Photoshop
Before diving into the Path Selection Tool, it's vital to grasp the fundamental concepts of paths and vector graphics within Photoshop. Unlike raster images, which are composed of a fixed grid of pixels, vector graphics are defined by mathematical equations that describe points, lines, and curves. This means vector paths can be scaled infinitely without losing quality, making them ideal for logos, illustrations, and elements that require sharp, scalable edges.
A path in Photoshop is an outline that can consist of one or more straight or curved segments. These segments are connected by anchor points.
- Anchor Points: These are the points that mark the endpoints of path segments. They act as control points for shaping the path.
- Segments: These are the straight or curved lines connecting anchor points.
- Direction Lines and Direction Points: For curved segments, anchor points have associated direction lines and direction points that control the curvature and flow of the path.
- Smooth Points: Anchor points where the connected curve segments flow smoothly into each other.
- Corner Points: Anchor points where the connected curve segments meet at a sharp angle.
A path doesn't have to be a single continuous line; it can comprise multiple distinct and separate path components. When you select a path component or segment, all its associated anchor points, direction lines, and direction points become visible, allowing for detailed editing.
Accessing and Using the Path Selection Tool
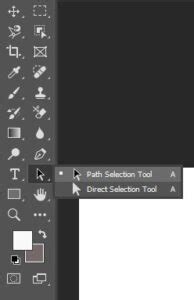
The Path Selection Tool is your primary instrument for interacting with entire paths or path components. It's represented by a black mouse cursor icon and is typically found in the toolbar, usually located on the left side of the Photoshop interface by default. You can also access it by pressing the 'A' key on your keyboard, which cycles through the different selection tools.
To create a new Photoshop file, you can click "New" on the title screen, or click "Open" and select an image or Photoshop file to open. Once your file is ready and you have paths or shapes within it, you can begin using the Path Selection Tool.
Selecting and Moving Paths
- Select the Tool: Choose the Path Selection Tool from the toolbar.
- Click to Select: Click directly on a path or a shape component. This will select the entire path component. If the path has multiple components, clicking inside one will select just that component.
- Move: Once a path or component is selected, click and drag it to reposition it within your canvas.
It's important to note that the Path Selection Tool specifically operates on vector paths and shapes. It does not affect raster (pixel) objects of an image. You cannot move pixel-based elements using this tool. To move raster objects, you would need to select them using tools like the Lasso Tool, Marquee Tool, Direct Selection Tool, or Magic Wand Tool.
Path Selection & Direct Selection Tool - Toolbar Explained & Demonstrated [Photoshop for Beginners]
Deleting Paths
To remove a selected path or shape, simply select it using the Path Selection Tool and press the "Delete" key on your keyboard.
Working with Multiple Paths
The ability to select and manipulate multiple paths simultaneously is a significant time-saver, especially when working on complex designs or repetitive tasks.
Selecting Multiple Paths
There are several ways to select more than one path:
- Shift + Click: Click on the first path, then hold down the Shift key and click on each additional path you want to include in your selection.
- Marquee Selection: With the Path Selection Tool active, click and drag a selection box around the paths you wish to select. This is particularly useful when paths are clustered together.
- Direct Selection Tool (for anchor points): While the Path Selection Tool is for entire paths, the Direct Selection Tool (the white arrow) allows you to select individual anchor points. Holding Shift while using the Direct Selection Tool enables you to select multiple anchor points across different paths.
Why Select Multiple Paths?
Selecting multiple paths unlocks powerful workflow enhancements:
- Efficiency: Move, resize, or align multiple elements at once without repeating steps for each individual path.
- Consistency: Ensure that related elements are positioned and spaced uniformly.
Real-Life Scenarios:
- Product Catalogs: Imagine you're clipping out five separate products from a single photo shoot. Selecting their respective paths together allows you to adjust their positions or scale them uniformly.
- Complex Illustrations: When working on detailed illustrations, you might have separate paths for different elements like a shoe's sole, heel, and strap. Selecting these paths simultaneously lets you tweak their shadows or overall placement in unison.
Aligning and Distributing Paths
When you have multiple paths selected, you gain access to alignment and distribution options. These controls are typically found in the Options bar at the top of the Photoshop interface, just below the menu bar. They are represented by icons showing two boxes aligned along a solid line, indicating the axis of alignment.
Alignment Options:
You can align objects horizontally or vertically along various axes:
- Horizontal Alignment: Left, Center, Right.
- Vertical Alignment: Top, Center, Bottom.
To align objects, select them using the Path Selection Tool, and then click the desired alignment button in the Options bar. The objects will align relative to each other based on their bounding boxes.
Distribution Options:
To distribute components evenly, you need to select at least three components. Distribution ensures that the spacing between selected objects is uniform. Similar to alignment, distribution options are available for both horizontal and vertical spacing.
Combining and Subtracting Shapes
The Path Selection Tool also plays a role in modifying shapes and paths through Boolean operations. When you have two or more overlapping shapes or paths selected, you can combine or subtract them.
- Select Overlapping Shapes: Use the Path Selection Tool to select the shapes you want to combine or subtract.
- Choose Operation: In the Options bar, you'll find buttons that resemble overlapping squares. Clicking these buttons and then selecting an option like "Combine," "Subtract," or "Intersect" will modify the selected shapes. The specific outcome depends on which button you click and how the shapes overlap.
This functionality is particularly useful for creating intricate custom shapes by merging simpler ones or removing sections from existing forms.
Advanced Path Manipulation
Beyond basic selection and movement, Photoshop offers advanced tools and techniques for refining paths, often in conjunction with the Pen Tool and its variations.
Editing Path Segments and Anchor Points
While the Path Selection Tool selects and moves entire paths or components, the Direct Selection Tool (the white arrow) is used for editing individual anchor points, direction lines, and path segments.
- Moving Anchor Points: Select an anchor point with the Direct Selection Tool and drag it to a new position.
- Adjusting Curves: Select a curved segment or an anchor point on a curved segment. Dragging the direction points or direction lines allows you to alter the curvature and flow of the path. Adjusting one part of a curve can intuitively affect related segments.
- Deleting Segments: Select a path segment with the Direct Selection Tool and press the "Delete" key.
- Converting Anchor Points: The Convert Anchor Point Tool allows you to change smooth points into corner points and vice versa. Clicking an anchor point with this tool can transform it, altering the path's continuity.
Extending and Connecting Paths
You can extend open paths or connect separate paths using the Pen Tool.
- Extending a Path: Select the Pen Tool, hover over the endpoint of the path you want to extend, and click to add a new segment. If you want a curved segment, drag when you click.
- Connecting Paths: To connect two paths, select the Pen Tool, hover over the endpoint of one path until a small merge symbol appears next to the pointer, and then click on the endpoint of the other path.
Adding and Deleting Anchor Points
Adding anchor points provides more control over a path's shape, while deleting them simplifies it.
- Adding Points: By default, when you hover the Pen Tool over a selected path, it changes to the Add Anchor Point Tool, allowing you to click and add a new point.
- Deleting Points: Hovering the Pen Tool over an existing anchor point turns it into the Delete Anchor Point Tool, enabling you to click and remove it.
It's generally advisable to use the fewest points necessary, as a path with fewer points is easier to edit, display, and print.
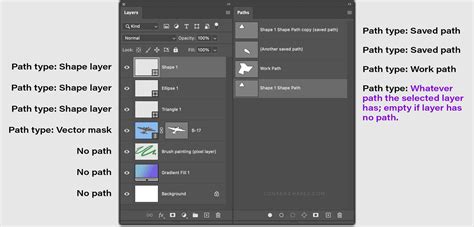
The Paths Panel: Your Path Management Hub
The Paths panel is an indispensable tool for organizing and managing all the paths within your Photoshop document.
Key Functions of the Paths Panel:
- Viewing Paths: All paths created in your document are listed here. This includes work paths (temporary paths created with tools like the Pen Tool) and saved paths.
- Selecting Paths: Click on a path's name in the panel to select it.
- Saving Paths: Work paths are temporary and will be lost if not saved. To save a path, drag it to the "Save path" icon at the bottom of the panel, or double-click its name and give it a descriptive title. Saved paths are persistent and will remain with your document.
- Duplicating Paths: Drag a path to the "New path" icon or hold down the Alt (Windows) or Option (Mac OS) key and drag the path to duplicate it.
- Deleting Paths: Drag a path to the trash can icon or select it and press the Delete key.
- Renaming Paths: Double-click on a path's name to rename it. This is crucial for staying organized, especially when working with many paths.
- Creating Selections: With a path selected in the panel, you can click the "Load path as a selection" icon (a dotted circle) to convert the path into a pixel-based selection. Alternatively, you can press
Ctrl+Enter(Windows) orCommand+Return(Mac OS). - Converting Paths to Vector Masks: Paths can be used to create vector masks, which are non-destructive ways to hide or reveal parts of a layer.
Working with Shape Layers and Vector Masks
When you create a shape layer using a shape tool or the Pen Tool, the path is automatically created as a vector mask associated with that layer. In the Paths panel, this will appear as a vector mask linked to its parent layer. You can remove a vector mask from a layer and even convert it to a rasterized mask if needed.
Customizing Path Appearance
For better visibility and aesthetic appeal, you can customize the color and thickness of your path lines.
- While Creating: When using the Pen Tool or a shape tool, click the gear icon () in the Options bar. Here, you can specify the color and thickness of the path lines.
- Preferences: You can also adjust these settings under Photoshop's Preferences. Navigate to
Edit > Preferences > Guides, Grid, & Slicesand look for the "Path" options. - Anti-aliasing: To turn off anti-aliasing for guides and paths, go to
Preferences > Performance > Graphics Processor Settings, click "Advanced Settings," and uncheck the "Anti Alias Guides and Paths" option.
Customizing path appearance can significantly improve your workflow, especially on high-resolution monitors or when dealing with intricate designs.
Transforming Paths
Once a path is selected, you can transform itâscale, rotate, skew, distort, or apply perspective.
- Enter Free Transform: With a path selected, go to
Edit > Free Transform Pathor use the shortcutCtrl+T(Windows) orCommand+T(Mac OS). - Transform Controls: Bounding box handles will appear around the path.
- Scaling: Drag the handles. Hold Shift to constrain the aspect ratio. The "Link" icon in the Options bar toggles this constraint.
- Rotating: Move your cursor outside the bounding box until it becomes a double-headed arrow, then drag to rotate.
- Reference Point: You can change the point around which transformations occur by clicking on the reference point locator in the Options bar.
Saving Paths with Images
Paths can be saved with your Photoshop documents, ensuring they are available when you reopen the file. Certain file formats support paths:
- Windows: JPEG, JPEG 2000, DCS, EPS, PDF, and TIFF.
- Mac OS: Similar formats are supported.
Saving paths with your image is crucial if you intend to use them for further editing, creating selections, or exporting to other applications that can interpret vector data.
Common Mistakes and Best Practices
- Mixing Tools: Be mindful of the difference between the Path Selection Tool (black arrow) for whole paths and the Direct Selection Tool (white arrow) for anchor points and segments.
- Accidental Movement: When selecting multiple paths, ensure you are intentionally moving them. Holding Shift too long can sometimes lead to unintended path jumps if not careful.
- Over-complication: While adding anchor points offers control, try to avoid adding more than necessary. A simpler path is generally easier to manage.
- Work Path Persistence: Remember that work paths are temporary. Save them if you need to retain them.
- Layer Organization: For complex projects, keep related paths on the same layer or group them logically within the Layers panel. Naming your paths in the Paths panel is also a highly recommended practice for sanity's sake.
- Locking Paths: To prevent accidental movement of paths, you can lock the layer they reside on.
Conclusion: Practice Makes Perfect
Mastering the Path Selection Tool and other path-related features in Photoshop is a skill that develops with practice. Like learning any new technique, consistent application will build your proficiency. Whether you're creating precise selections, designing intricate vector artwork, or fine-tuning existing paths, understanding and utilizing the Path Selection Tool will significantly enhance your Photoshop workflow and the quality of your final output. Experiment with different tools and techniques, and soon you'll find yourself navigating the world of vector editing with confidence and efficiency.