Working with colors in Adobe Photoshop is a fundamental skill for any digital artist, designer, or photographer. The software offers a powerful array of tools and features to manipulate and blend colors, allowing for everything from subtle adjustments to dramatic artistic transformations. At the heart of this capability lies the concept of Blending Modes, which are essentially mathematical equations that dictate how layers interact with each other. Understanding these modes, alongside other blending techniques, can unlock a new level of creative control and efficiency in your Photoshop workflow.
The Science Behind Blending Modes
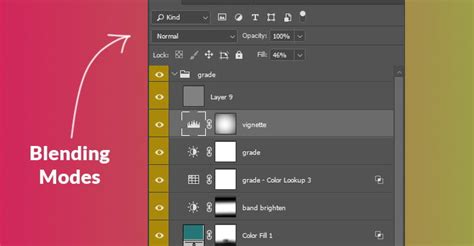
Blending Modes are a core component of Photoshop's layer system, providing a sophisticated way to combine the visual information of two or more layers. You may have encountered them in the past, perhaps through an experimental process, discovering their effects without fully grasping the underlying mechanics. Blending Modes are mathematical equations that blend layers based on their hue, saturation, luminosity, or a combination of these components. This allows you to apply overlays, textures, or target adjustments to specific areas of your image without the need for complex layer masks. Crucially, Blending Modes are an excellent way to create nondestructive effects; the blend you apply does not change the original pixels, only the visual output.
Each of the 31 Blending Modes in Photoshop (with 27 being Layer Blending Modes) operates with a specific algorithm, a mathematical equation that utilizes color information to determine how a pixel will blend. To simplify, think of Blending Modes as taking an input value and applying an equation. For any Blending Mode to function, you need at least two layers: the layer below is referred to as the Base layer, and the layer on top is the Blend layer. Photoshop then blends the pixels by performing a blend operation on each pixel of the Blend layer against its corresponding pixel in the Base layer. For easier comprehension, we can often refer to pixels as colors, which can help in visualizing the process.
Historically, Photoshop has evolved its blending capabilities. In 2002, Photoshop 7 introduced five Blending Modes along with the Fill slider. The following year, Photoshop CS added the Hard Mix Blending Mode. While officially known as Blending Modes, the terms "Blend Modes" are often used interchangeably, and even Adobe itself uses these terms within its application labels.
Opacity vs. Fill: A Crucial Distinction
A key aspect to understanding Blending Modes is the difference between Opacity and Fill. For 19 out of the 27 Blending Modes, adjusting Fill has the same effect as adjusting Opacity. However, for the remaining modes, this distinction becomes crucial, as it extends the capabilities of Blending Modes significantly. This difference allows for more nuanced control over how a blend interacts with the base layer, enabling effects that might otherwise be unattainable.
For instance, the Hard Mix Blending Mode's behavior can vary dramatically depending on whether you adjust Opacity or Fill. Similarly, the Linear Light blend can look different when the "Transparency Shapes Layer" box is unchecked. These variations highlight the importance of experimenting with both Opacity and Fill to achieve precise results. Each example often contains two Blend layers: a grayscale luminosity layer and a color layer, demonstrating how these adjustments impact the final composite.
Exploring the Blending Mode Categories
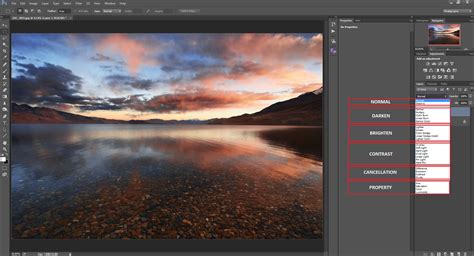
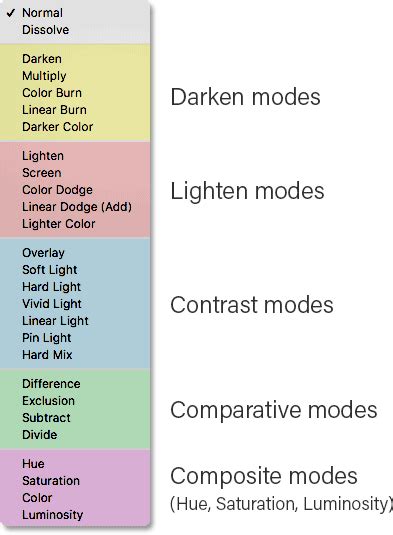
Photoshop's Blending Modes are organized into logical categories, each with a distinct purpose and effect. Understanding these categories provides a framework for choosing the right mode for your specific creative goal.
Normal and Dissolve: The Fundamentals
The "Normal" Blending Mode is the default for all Photoshop layers. In this mode, the blend layer simply appears on top of the base layer, with no mathematical interaction. The Dissolve Blending Mode also doesn't blend pixels in the traditional sense. Instead, it reveals the pixels below only when the layer's Opacity or Fill is reduced. The intensity of this revelation is based on a pseudo-random noise dither pattern, determined by the Opacity. Dissolve shows either the blend color or the base color-never a combination of the two.
Darken Category: Intensifying Shadows
As the names suggest, the Blending Modes in the Darken category are designed to make the resulting colors darker. For all modes within this category, white acts as a "neutral color," meaning it has no effect on the blend.
- Darken: This mode compares the base and blend colors pixel by pixel and keeps the darker of the two. It does not blend pixels but rather selects the darkest.
- Multiply: One of the most popular Blending Modes, Multiply multiplies the luminosity of the base color by the blend color. The resulting color is always darker. The degree of darkening depends on the luminosity values of the blend layer, allowing for a wide range of darkening effects.
- Color Burn: This mode decreases the brightness of the base color based on the value of the blend color. The result is darker than Multiply but less saturated than Color Burn. It can be accessed with the keyboard shortcut Alt + Shift + A (Windows) or Option + Shift + A (macOS).
- Linear Burn: This mode decreases the brightness of the base color based on the value of the blend color, resulting in a darker image. It produces a darker result than Multiply but is less saturated than Color Burn.
- Darker Color: This mode is very similar to Darken. It also does not blend pixels but compares the two colors as a whole and keeps the darker of the two.
Lighten Category: Enhancing Highlights
The Lighten category offers modes that are the opposite or complementary to the Darken category. Here, black serves as the neutral color.
- Lighten: This mode looks at both the base and blend colors and keeps the lightest of the two. If both colors are identical, no change is applied.
- Screen: Another highly popular Blending Mode, Screen always results in a brighter color. It essentially inverts the blend color, then multiplies it with the base color, and then inverts the result.
- Color Dodge: This mode brightens the base color to reflect the blend color by decreasing the contrast.
- Linear Dodge (Add): This mode produces similar but stronger results than Screen or Color Dodge. It looks at the color information in each channel and brightens the base color to reflect the blend color by increasing the brightness. The keyboard shortcut is Alt + Shift + W (Windows) or Option + Shift + W (macOS).
- Lighter Color: This mode is very similar to Lighten. It does not blend pixels but compares the base and blend colors and keeps the brightest of the two.
Contrast Category: Mid-tone Adjustments
The Contrast category offers modes that blend elements from both the Darken and Lighten categories, primarily affecting mid-tones. For these modes, 50% gray is the neutral color.
- Overlay: This is one of Photoshop's most commonly used Blending Modes. It uses Screen at half strength for colors brighter than 50% gray and Multiply at half strength for colors darker than 50% gray. 50% gray itself becomes transparent. Overlay can be thought of as shifting mid-tones, and its calculations are based on the brightness of the colors in the base layer.
- Soft Light: This mode is very similar to Overlay, offering a gentler application of contrast.
- Hard Light: This mode combines Multiply and Screen using the brightness values of the Blend layer to make its calculations. Hard Light sounds like it would have something in common with Soft Light, but it operates quite differently, often producing a more intense effect.
- Vivid Light: This mode can be considered an extreme version of Overlay and Soft Light. The result with Vivid Light is strong, and you will likely need to reduce either the Fill or Opacity. The keyboard shortcut is Alt + Shift + V (Windows) or Option + Shift + V (macOS).
- Linear Light: Similar to Vivid Light, the result with Linear Light is strong, and you will likely need to reduce either the Fill or Opacity. The keyboard shortcut is Alt + Shift + J (Windows) or Option + Shift + J (macOS).
- Pin Light: This is an extreme Blending Mode that performs a Darken and Lighten blend simultaneously. The keyboard shortcut is Alt + Shift + Z (Windows) or Option + Shift + Z (macOS).
- Hard Mix: This mode is unique as it blends differently when Fill is adjusted compared to Opacity. It can produce posterized effects by adding RGB values and clamping them to 0 or 255. The keyboard shortcut is Alt + Shift + L (Windows) or Option + Shift + L (macOS).
Inversion and Comparative Blending
This category includes modes that work by inverting or comparing color values in unique ways.
- Difference: Blending with white inverts the colors of the base layer. This can be extremely useful for aligning layers with similar content.
- Exclusion: This mode is very similar to Difference. Blending with white inverts the base color values, while blending with black produces no change. The resulting contrast is lower than with Difference.
- Subtract: The Subtract Blending Mode subtracts pixel values from the base layer. Black has no effect. This mode is not available in the Lab Color Space and was introduced in Photoshop CS.
- Divide: With Divide, all colors are turned into a percentage. Black (0%) results in black because dividing by zero is undefined. Divide produces the opposite effect as Subtract. White has no effect. This mode is also not available in the Lab Color Space and was introduced in Photoshop CS.
Component Blending
These modes blend based on specific color components like hue, saturation, or luminosity.
- Hue: This mode applies the hue of the blend layer to the base layer while retaining the base layer's saturation and luminosity. It will not apply a change if the base layer is a neutral gray.
- Saturation: This mode applies the saturation of the blend layer to the base layer while retaining the base layer's hue and luminosity. It will not apply a change if the base layer is a neutral gray.
- Color: This mode applies the hue and saturation of the blend layer to the base layer while retaining the base layer's luminosity.
- Luminosity: This mode applies the luminosity of the blend layer to the base layer while retaining the base layer's hue and saturation.
Special Modes
Certain modes have unique functionalities, often related to how they interact with transparency or the canvas.
- Behind: The Behind Blending Mode paints only on the transparent pixels of a layer. This means that if a pixel is opaque, the Behind mode will not affect it.
- Clear: The Clear Blend Mode erases pixels, functioning similarly to the Eraser Tool. In Photoshop 2020 and newer, you can hold the ` key (tilde) to erase with the brush you are currently using. The Clear Blend Mode is available for the Shape Tools (when fill region is selected), Paint Bucket Tool, Brush Tool, Pencil Tool, Fill command, and Stroke command.
Group Blending: Pass Through
When working with groups of layers, you'll notice a default Blending Mode that isn't "Normal." The "Pass Through" Blending Mode tells Photoshop to treat all the layers within a group as if they were part of a regular layer stack, effectively ignoring the group structure for blending purposes. This can be used to create amazing effects when compositing.
Beyond Blending Modes: Other Color Blending Techniques
While Blending Modes are powerful, Photoshop offers other tools and techniques to achieve sophisticated color blends.
The Smudge Tool and Mixer Brush Tool
Photoshop provides tools designed for more painterly blending. The Smudge tool allows you to drag and smear colors, mimicking the effect of smudging wet paint. You can select the Smudge tool from the toolbar (if it's not visible, click and hold the Blur tool). To get the most out of it, consider enabling "Sample All Layers" in the options bar to smudge using colors from all visible layers. You can also choose to "Finger Paint," which uses the foreground color at the beginning of each stroke.
Learn How to Use the Smudge Tool in Adobe Photoshop: A Training Tutorial
The Mixer Brush tool offers even more control, simulating the behavior of real-world paint mixing. It features a reservoir for storing paint and a pickup mechanism to draw paint from the canvas. You can load paint into the reservoir by Alt-clicking (Windows) or Option-clicking (macOS) on the canvas. The brush tip will then reflect any color variation in the sampled area, or you can choose "Load Solid Colors Only" for a uniform color. You can then control how much paint the brush loads and how much it picks up from the canvas by adjusting "paint wetness."
Using Opacity and Fill Sliders
As mentioned earlier, the Opacity and Fill sliders are fundamental to controlling the intensity of any blend. If a chosen Blending Mode is doing too little or too much to alter the image, simply move the Opacity slider left to decrease or right to increase the effect. The Fill slider offers a more nuanced control for certain Blending Modes, as discussed previously.
Layer Masks and Gradients
Layer masks provide a precise way to control where a blend is applied. You can create a new layer mask by clicking the button at the bottom of the Layers panel. Then, by applying a gradient within the mask (e.g., a white-to-black gradient), you can achieve a smooth transition between two layers or effects. This is particularly useful for blending borders or specific areas of an image.
Gaussian Blur and Vector Feathering
For softening edges and creating gradual transitions, the Gaussian Blur filter is invaluable. Navigating to Filter → Blur → Gaussian Blur allows you to adjust a slider to achieve the desired level of softness. For vector graphics, you can achieve a similar effect by adding a feather radius to vector shapes. When two vector shapes of different colors are near each other, the feathering will cause them to blur along their edges, blending wherever they overlap.
Practical Considerations and Workflow Tips
When working with Blending Modes, remember that they can behave differently depending on your document's color mode (Image > Mode). You will achieve the desired results in RGB mode, but CMYK may differ significantly.
For specific color blending scenarios, such as achieving a yellow/red blend, using the Normal blend mode at 50% opacity might seem like a solution, but it makes the entire top layer uniformly transparent. For true color mixing, such as the classic blue + yellow making green, simply using standard blend modes might lead to unexpected results like a muddy gray. In such cases, understanding the mathematical underpinnings of each mode is crucial, or you might need to employ alternative techniques or adjustments.
Photoshop uses "Standardized" values to calculate blends, where luminance ranges from 0 (black) to 1 (white). However, RGB values range from 0 to 255. Photoshop converts these values, so black remains 0, but white becomes 1. To convert an RGB luminance value to a standardized value, you divide it by 255.
When working with 32-bit images, you'll notice that only 15 Blending Modes are available. You can also utilize Photoshop keyboard shortcuts for Blend Modes. Pressing Shift + (plus sign) will cycle down to the next Blending Mode. Be aware that if you have a painting tool active, this shortcut might change the Blending Mode of the tool rather than the layer. These shortcuts will not work if the focus is on the Blending Mode drop-down menu in the Layers Panel.
Ultimately, Photoshop offers a vast toolkit for color blending. Experimentation is key. Try out several modes that sound like they match your goals. Understanding the core principles of how Blending Modes operate, alongside the versatility of tools like the Smudge and Mixer Brush, will empower you to achieve virtually any color blending effect you can imagine.