DaVinci Resolve is a powerhouse in the realm of video editing, renowned for its exceptional color correction, grading, and visual effects capabilities. While many editing software options exist, DaVinci Resolve remains a top choice for professionals and enthusiasts alike. The creation and editing of video content demand significant investment of time, resources, and effort. Consequently, content creators are perpetually seeking innovative strategies to expand their audience and amplify their content's reach. A widely adopted method for enhancing audience engagement involves the integration of captions and subtitles into videos. Services like Verbit offer efficient and accurate captioning, subtitling, and transcription solutions that seamlessly integrate into post-production workflows, including those built around DaVinci Resolve.
The fundamental concept of "captioning" generally involves the conversion of audio into on-screen text. However, several distinct styles of captioning are available, allowing creators to select the most appropriate option based on the unique requirements of their video projects. Captions are designed to convey all audio elements present in a video recording. Beyond the spoken dialogue, captions also represent non-speech audio cues such as sound effects, laughter, and even significant pauses.
Closed captions are a type of caption that viewers have the ability to enable or disable at their discretion. In contrast, open captions are permanently embedded within the video file, meaning viewers cannot turn them on or off. Due to their comprehensive nature, captions are the preferred choice for creators prioritizing the accessibility of their content.
Subtitles, on the other hand, are solely focused on providing textual representations of spoken dialogue. This makes subtitles particularly beneficial for viewers consuming content in a language that is not their native tongue, as they can still perceive background noises and other auditory elements.
Methods for Adding Subtitles in DaVinci Resolve
DaVinci Resolve offers several distinct methods for incorporating captions and subtitles into your video projects.
Manual Subtitle Creation
One approach is to manually add subtitles directly within the editing software. As one might anticipate, manually creating DaVinci Resolve subtitles can be a laborious and time-consuming undertaking. Furthermore, if the individual responsible for creating these DaVinci Resolve captions lacks sufficient transcription training, the final project may contain a notable number of transcription errors.
Here's a step-by-step guide to manual subtitle creation within DaVinci Resolve:
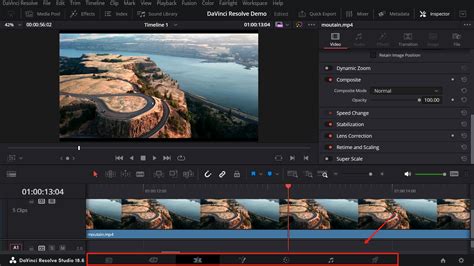
- Navigate to the Edit Workspace: Begin by switching to the Edit page within DaVinci Resolve.
- Locate the Effects Panel: In the top-left corner of the interface, you'll find the Effects panel.
- Add a Subtitle Track: Within the Effects panel, open the "Titles" category and scroll to the bottom. You will find an effect labeled "Subtitle." Drag this effect onto the timeline, positioning it on a track above your video clips. Alternatively, you can right-click above your Timeline and select "Add Subtitle Track."
- Add Your Subtitle Text: Select the newly added subtitle block on your timeline. Then, navigate to the Inspector panel, typically located on the right side of the screen. Under the "Caption" tab, you can input the desired subtitle text that corresponds to the spoken dialogue or audio cue.
- Adjust the Timing: To ensure your subtitles are synchronized with the audio, hover your mouse cursor over the right edge of the subtitle block on the timeline. Click and drag to extend or shorten the subtitle segment until it precisely aligns with the spoken words in your audio track.
- Repeat for Additional Subtitles: Move the timeline indicator to the point where the next subtitle should begin. You can then click the "Add New" button within the Inspector panel to create a new subtitle segment. Alternatively, you can right-click on the subtitle track and select "Add Subtitle." Repeat this process for all the dialogue and audio cues in your video.
- Stylize Your Subtitles: Once your subtitles are in place and timed correctly, you can customize their appearance to enhance readability and match your project's aesthetic. In the Inspector window, select the "Track" tab. Here, you have extensive options to change the font, adjust its size, modify line spacing, add a stroke, or apply other effects like drop shadows or background colors. You can also choose to "Use Track Style" to apply the same formatting to all subtitles within that track.
This manual method provides complete control over every word, punctuation mark, and timing, allowing for perfect synchronization with pauses, overlapping speech, or rapid dialogue.
Automatic Subtitle Generation (DaVinci Resolve Studio Exclusive)
For users of the Studio version of DaVinci Resolve, an advanced automatic subtitle generation feature is available, powered by sophisticated speech-to-text technology. This feature significantly streamlines the subtitling process by converting audio directly into text.
Here's how to utilize the automatic subtitle generation in DaVinci Resolve Studio:
- Access AI Tools: Navigate to the "Timeline" menu on the Fairlight page (or in the Edit page depending on your Resolve version) and select "AI Tools."
- Create Subtitles from Audio: Choose the "Create Subtitles from Audio" option. A pop-up window will appear.
- Configure Settings: In this window, you will need to configure several settings:
- Language: Select the primary language spoken in your video.
- Caption Preset: Choose a preset that best suits your needs.
- Maximum Characters Per Limit: Define the maximum number of characters that will appear on a single line of subtitle. The default of 18 is often a good starting point, but this can be adjusted based on your preference and the display area.
- Generate Subtitles: Click "Create" and allow DaVinci Resolve to process the audio. The duration of this process will depend on your system's processing power and the length of your video, ranging from a few seconds to several minutes.
- Review and Stylize: Once the automatic subtitles are generated, they will appear as a subtitle track on your timeline. It's crucial to review these automatically generated captions for accuracy, as speech recognition technology is not always perfect. You can then select the subtitle track and use the "Inspector" panel (specifically the "Track" tab) to stylize the subtitles as described in the manual method - adjusting font, size, color, and other visual properties.
- Animate Subtitles (Optional): To further enhance engagement, you can add subtle animations to your subtitles. Navigate to the Effects panel, search for "Word Highlight," and drag and drop this effect onto your subtitle track. This effect can highlight the word currently being spoken, providing a dynamic visual cue. You can customize the background color of this highlight to match your video's aesthetic.
This automated approach offers a significant time-saving benefit, though it necessitates a review and potential editing process to ensure complete accuracy.
Importing and Exporting Subtitle Files
DaVinci Resolve also provides robust functionality for importing and exporting subtitle files, streamlining workflows that involve external captioning services or pre-existing subtitle assets.
Importing SRT Files
If you have a subtitle file prepared in a common format like SRT (SubRip Text), you can easily import it into your DaVinci Resolve project. SRT files are widely used because they contain precise timestamps, correct line breaks, and accurate punctuation, generated by captioning tools or services.
To import an SRT file:
- Navigate to File Menu: Go to the "File" menu in DaVinci Resolve.
- Select Import: Click on "Import" and then select "Subtitle."
- Locate and Select File: Browse your computer to find your SRT subtitle file and select it.
- Add to Timeline: The imported subtitle file will appear in your media pool. Drag and drop this file onto your timeline. DaVinci Resolve will automatically convert it into a subtitle track.
- Stylize (If Necessary): While imported SRT files contain timing and text, you may need to restyle them to match your project's visual theme. Select the subtitle track and use the Inspector panel's "Track" tab to adjust font, size, color, and other stylistic elements.
Exporting Subtitles
DaVinci Resolve allows you to export your subtitles in several ways, catering to different distribution needs. You can export them as "soft subs" (separate files that can be toggled on/off by the viewer) or "burned-in" or "hard subs" (permanently embedded into the video, visible to all viewers).
To export subtitles:
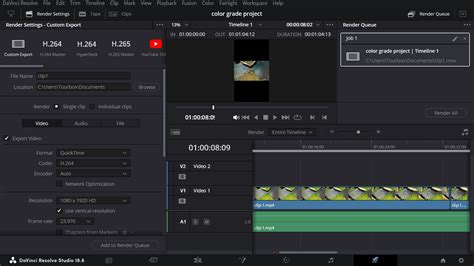
- Navigate to Deliver Page: Switch to the "Deliver" page in DaVinci Resolve.
- Configure Render Settings: In the "Render Settings" panel, choose your desired export format and configure other video settings as needed.
- Export Subtitle Option: Look for the "Subtitle Settings" option, usually located in the bottom-left corner of the window.
- Choose Export Method: From the dropdown menu, select your preferred export method.
- Export Subtitles: This option allows you to export subtitles as a standalone file (e.g., SRT, VTT, SCC), which is ideal for platforms like YouTube where users can choose to display or hide captions. Ensure the "Export Subtitles" option is checked.
- Burn Into Video: If you choose to embed subtitles directly into the video stream, they will be permanently visible. This is often used for broadcast purposes or when ensuring subtitles are always present.
When exporting as a separate file, it provides greater flexibility for viewers, especially on platforms like YouTube, where they can choose to enable or disable subtitles. Embedding subtitles permanently ensures they are always visible, but viewers cannot turn them off.
Third-Party Solutions and Workflow Enhancements
While DaVinci Resolve offers comprehensive built-in tools for subtitling, third-party software and services can further enhance efficiency and expand capabilities.
Professional Captioning Services
For creators who require highly accurate transcriptions and captions, particularly for content with complex audio, accents, or technical jargon, professional services like Verbit offer a robust solution. These services often combine advanced AI for initial transcription with human review to ensure exceptional accuracy. The resulting caption files, compatible with DaVinci Resolve and other platforms, can be easily integrated into your workflow. This approach is particularly beneficial for creators seeking to maximize accessibility and reach a broader audience.
When users upload a video to Verbit’s platform, their advanced artificial intelligence creates an initial transcript draft. This draft is then reviewed and edited by professionally trained human transcribers before being converted into a caption file with accurate time codes that correspond to the video’s audio track. Users can then download their captions in various file formats like SRT, SCC, and WebVTT, which are compatible with major video editing and hosting platforms. Video creators can save additional time by uploading their finished videos to Verbit's platform after editing, rather than adding captions directly within DaVinci Resolve.
Specialized Subtitle Software
Third-party subtitle software, both free and paid, can offer alternative workflows. For instance, CapCut is a fast editing software that can export subtitles in SRT format, which can then be imported into DaVinci Resolve. This can be a good option for those looking for a streamlined way to create SRT files outside of DaVinci Resolve itself.
Another notable mention is AnyMP4 Video Converter Ultimate, an all-in-one software that goes beyond conversion. It supports numerous video and subtitle formats, including SRT, ASS, and SSA, and features auto-syncing subtitle timing. This tool allows for modification of font style, size, color, outline, position, and opacity within its subtitle editor, offering a comprehensive solution for subtitle management.
DaVinci Resolve Plugins and Extensions
Extensions like Simon Says offer seamless integration for creating automatic subtitles directly within DaVinci Resolve. This plugin can transcribe clips in numerous languages and color-code them by speaker, allowing for easy import as subtitles or captions. While some extensions might have specific compatibility requirements (e.g., DaVinci Resolve Studio for Windows users), they represent a powerful way to automate and enhance subtitling workflows.
To use Simon Says within DaVinci Resolve:
- Activate Timeline: Make a timeline active in Resolve.
- Access Script: Navigate to "Workspace" > "Scripts" > "Simon Says."
- Select Option: Choose "2 Subtitle-Caption Timeline."
- Export Project File: Wait for the project file to export.
- Transcribe in Simon Says App: Open the Simon Says app, where you'll find a new project. Upload the exported timeline for transcription.
- Transcribe and Export: Click "Transcribe" and wait for the process to complete. Then, click "Export," choose SRT subtitles, and download the file.
- Import into Resolve: Unzip the downloaded SRT file and import it back into your DaVinci Resolve project.
This method can significantly reduce the time spent on transcription and subtitling, especially for longer videos.
Optimizing Your Subtitling Workflow
To maximize efficiency when working with subtitles in DaVinci Resolve, consider these tips:
- Keyboard Shortcuts: While DaVinci Resolve's native subtitle editing may not have extensive default shortcuts, you can map custom shortcuts for frequently used actions like "Add Subtitle." Exploring tools like TourBox, which allows mapping Resolve shortcuts and custom functions to physical buttons and knobs, can provide a console-like control experience for timeline adjustments, color grading, and video playback.
- Cinema Mode: Engage "Cinema Mode" to declutter your workspace and focus solely on the timing and accuracy of your subtitles.
- Inspector Panel for Batch Edits: Utilize the Inspector panel for making simultaneous alterations to multiple subtitle clips, saving time on repetitive styling tasks.
- Save Track Styles as Presets: After achieving a desired subtitle appearance, save your style as a preset within the "Track" tab of the Inspector. This allows you to quickly apply consistent styling to future projects or different subtitle tracks.
- Efficient Timeline Navigation: Use keys like 'G' to snap to the beginning of subtitle clips and 'H' to jump to the end for quicker navigation along the timeline.
- Industry Standards: Adhere to industry standards for the number of characters per line and the duration of subtitles, which are typically dependent on the character count. This ensures readability and compliance with broadcast or platform requirements.
- Post-Editing Captioning: For optimal workflow, consider adding captions and subtitles as one of the final steps in your post-production process. This prevents the need to reshuffle subtitles if subsequent video edits alter the timeline.
The Ultimate Text Animation Guide for DaVinci Resolve
By mastering these various methods and leveraging available tools, you can effectively add subtitles to your videos in DaVinci Resolve, enhancing their accessibility, reach, and overall viewer engagement. Whether you opt for manual creation, automated generation, or external services, DaVinci Resolve provides a flexible and powerful platform for all your subtitling needs.