In the professional world, precision is paramount. Even the smallest oversight can erode credibility, and few errors are as treacherous as spelling mistakes and typos. Adobe InDesign, a powerful tool for graphic design and layout, offers robust spell-checking features to help users maintain the integrity of their work. This guide will delve into everything you need to know about InDesign's spell check, from setting the correct language to utilizing its dynamic spelling and autocorrect functions, and even exploring helpful scripts. By mastering these tools, you can streamline your workflow and ensure your documents are free from basic errors, allowing you to focus on the creative aspects of your design.
Setting the Language Correctly in InDesign
Before diving into spell checking, it's crucial to ensure that InDesign is using the correct language dictionary for your text. The spell checker relies on this setting to identify potential errors. If the language is set incorrectly, InDesign might flag correctly spelled words as errors or miss actual misspellings. Fortunately, InDesign offers several ways to manage language settings, catering to different needs and workflows.
Setting the Language for All New Documents
To establish a default language for all future documents you create, follow these steps:
- Ensure that no documents are currently open in InDesign.
- Navigate to the top menu and click on
Window > Type and Tables > Character. - In the Character panel that appears, locate the
Languagemenu. If you don't immediately see the Language option, click on the icon with four horizontal lines in the top-right corner of the panel and selectShow Options. - From the dropdown menu, select the desired language.
From this point forward, any new document you create will automatically adopt the language you've selected as its default. This is particularly useful if you primarily work in a single language.
Setting the Language for the Current Document
If you need to change the language for a specific document that is already open, the process is quite similar:
- With your document open, go to the top menu and click on
Type > Character. - In the text panel that appears, you can select the desired language from the
Languagemenu.
It is highly recommended to set the language before you begin inputting text into your document. If you've already entered text, you may need to reapply the language setting by associating a style with the text or using the Find/Change function, which will be discussed later.
Setting the Language Through Styles
For users who prioritize consistency and efficient document management, using Paragraph and Character Styles is the recommended approach. Styles offer greater control over your document's formatting and can save significant time, especially when making global changes.
- To set the language using styles, ensure that no text or text box is currently selected.
- Double-click on either a Character Style or a Paragraph Style that you wish to modify or create.
- Within the style settings, navigate to the
Advanced character formatssection. - Here, you will find the
Languagemenu, where you can select the appropriate language for text formatted with this style.
This method ensures that all text assigned to a particular style will automatically inherit the specified language, simplifying language management across complex documents.
Setting the Language Through Find/Change
The Find/Change feature provides a powerful and quick way to update language settings, especially for existing documents where styles may not have been applied consistently or if you need to make a rapid adjustment.
- Ensure that nothing in your document is selected.
- Go to the top menu and click on
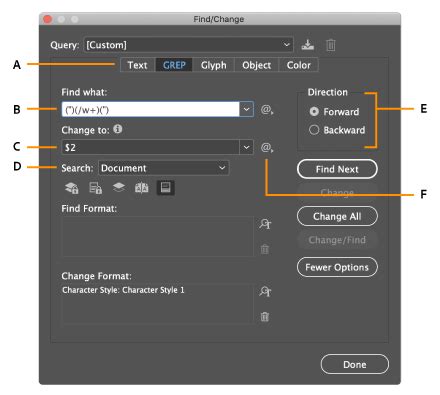
Edit > Find/Change. - In the
Find/Changedialog box, click on theFind Formatbox. This will open an additional panel forFind Format Settings. - In the left-hand menu of this panel, select the
Advanced Character Formatstab. - Here, you can select the language that is currently associated with the text you want to change. It's often best to select
[No language]or the language that is currently applied to the majority of your document's text. - Repeat the same procedure for the
Change Formatbox. However, when you reach the language selection, choose the language you want to apply to your document. - Click
Change Allto update the language of the entire document.
It's important to be aware that this procedure will modify all text. The only exceptions are those parts of the text that already had a different language explicitly set, different from the one specified in the "Find Format" box. This method is particularly useful when dealing with translated documents or when you need to quickly standardize the language across a document.
Spell Check in InDesign: The Manual Approach
The most direct method for checking spelling in InDesign involves manually initiating a spell check. This process can be applied to a selected block of text, an entire story, all stories within a single document, or even across all open documents, offering flexibility based on your needs.
To initiate a spell check:
- Ensure you are in
Normalview mode. - Navigate to
Edit > Preferences > Spell Check. - In the
Spell Check Preferencespanel, you can customize what the spell checker looks for. It is advisable to select all available options, includingWords with spelling errors,Repeated words,Lowercase words, andLowercase phrases, to ensure a thorough check. - Once your preferences are set, select the portion of the text you wish to check. This could be a single word, a paragraph, a text frame, or the entire document.
- With the text selected, right-click on it and choose
Spelling > Check Spelling.... - A dialog window will appear, presenting you with potential spelling errors one by one. For each identified word, you will have several options:
- Change to Suggested Correction: Select this to replace the misspelled word with one of the provided suggestions.
- Add to User Dictionary: If the word is correctly spelled but not recognized by InDesign's dictionary (e.g., a proper noun, a technical term, or a specialized acronym), you can add it to your personal user dictionary. If you are importing proper nouns, ensure you check the
Case Sensitivebox at the bottom of the User Dictionary dialog to ensure the dictionary only recognizes these words when they are capitalized. - Ignore All: This option tells the spell checker to skip this particular word for the current spell-checking session. The word will be ignored until the next time you perform a spell check.
- Skip: Similar to 'Ignore All', but only skips the current instance of the word.
- Dictionary…: This button allows you to directly access and manage your user dictionary.
By systematically going through each suggestion, you can effectively correct spelling errors and refine the accuracy of your document.
Dynamic Spelling in InDesign: Real-Time Error Detection
Dynamic Spelling is a highly efficient feature that allows you to identify and correct potential spelling errors as you type. Similar to the functionality found in most word processors, InDesign can underline words that it suspects are misspelled, providing immediate visual feedback. This proactive approach significantly reduces the likelihood of typos slipping through.
To enable and configure Dynamic Spelling:
- Close all open documents in InDesign.
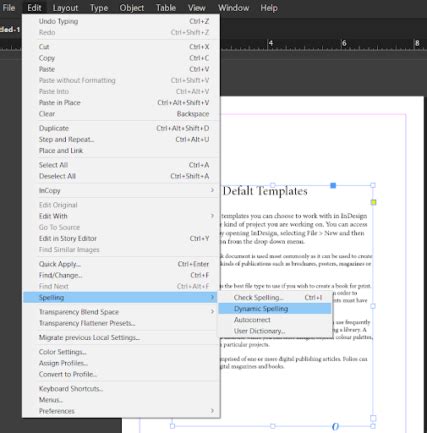
- Navigate to
Edit > Preferences > Spell Checking > Dynamic Spelling. - Ensure that
Dynamic Spellingis enabled. - From this panel, you can customize the appearance of the underlines used to flag errors. Words that InDesign's dictionary does not recognize or that are flagged as containing errors will typically be indicated with a red underline. Grammatical suggestions or potential issues might be shown with a green underline. These are default colors, but you have the flexibility to change them to suit your preferences.
With Dynamic Spelling active, misspelled words will be underlined throughout your document in real-time. To correct them:
- Right-click on the underlined word.
- A context menu will appear, offering spelling suggestions.
- Select the desired correction to replace the word.
- You can also use these options to quickly add words to your user dictionary, preventing them from being flagged as errors in the future.
Autocorrect in InDesign: Automating Common Corrections
Autocorrect is a feature designed to automatically fix common typing mistakes and capitalization errors as you work. While some users find autocorrect features on their devices to be overly intrusive or prone to making incorrect changes, InDesign's implementation is generally more refined and controllable.
To activate and configure Autocorrect:
- For Mac users: Click on
InDesign > Preferences > Autocorrect.... - For Windows users: Click on
Edit > Preferences > Autocorrect.... - In the
Autocorrectdialog box, you will find options such asEnable AutocorrectandAutocorrect Capitalization Errors. Enable these as needed. - When
Autocorrectis enabled, a list of predefined "errors" and their corresponding corrections will appear. InDesign will automatically correct these specific instances. - You can customize this list by clicking
Addto input your own frequently made errors and their desired corrections. This allows you to tailor the Autocorrect feature to your specific typing habits and needs.
While the potential for unintended corrections exists with any autocorrect feature, InDesign's approach, particularly its ability to correct capitalization errors and its customizable nature, can be a valuable tool for streamlining the writing and editing process. It's important to review the Autocorrect settings and add/edit entries to ensure it functions as intended for your workflow.
How to Spell Check in InDesign
Managing Your User Dictionary
A robust user dictionary is essential for effective spell checking. InDesign allows you to add words that are not in its standard dictionary, ensuring that proper nouns, technical terms, or specialized vocabulary are not flagged as errors.
To manage your User Dictionary:
- Navigate to
Edit > Spelling > User Dictionary.... - In the
User Dictionarydialog box, you can add new words. Type the word you wish to add into the provided field. - If you are adding proper nouns or acronyms that should only be recognized when capitalized, make sure to check the
Case Sensitivebox at the bottom of the dialog. This ensures that the dictionary only recognizes these words when they are entered with the correct capitalization. - Click
Addto include the word in your dictionary. - You can also edit or remove existing words from the dictionary.
- Once you are finished making changes, click
Done.
Remember that InDesign often treats UK English and US English as distinct dictionaries. If your work involves both variants, you will need to manage your word lists accordingly, potentially uploading custom words to both dictionaries if necessary.
Scripts for Enhancing Document Checking
Beyond InDesign's built-in features, a variety of scripts can further enhance your ability to check and manage documents. These external tools can automate tasks and provide deeper insights into your text.
List of Misspelled Words Script
Developed by Theunis DeJong, this script generates a comprehensive list of all words in your document that are not present in the InDesign dictionary. This can be an excellent supplementary check to catch any words missed by the standard spell checker.
Find Hyphenation Script
Offered by in-tools.com, this script is designed to locate all hyphenated words within a story. Proper hyphenation is crucial for readability and professional layout, and this script helps ensure consistency and correctness.
Text Counter Script
Created by Kasyan Servetsky, this script is particularly useful for proofreading services or when outsourcing work. It counts the number of text boxes, paragraphs, words, and characters, presenting this information in a convenient panel. This provides valuable data for project management and client communication.
Adjust Price Script
This script by Peter Kahrel allows for the systematic adjustment of prices within your document. You can modify currency symbols, formats, separators, and even apply character styles, which is invaluable for financial documents or e-commerce layouts.
Swap Thousand and Decimal Indicators Script
Another useful script from Peter Kahrel, this tool enables you to swap thousand and decimal indicators (e.g., commas and periods in numbers). This is essential for adapting documents to different regional number formatting conventions, such as switching between English and non-English styles.
These scripts, along with many others available for InDesign, can significantly improve efficiency and accuracy, offering specialized solutions for various document checking needs and contributing to a more polished final product. Exploring the vast ecosystem of InDesign scripts can unlock new levels of productivity and control over your creative projects.