Brochures, particularly trifold designs, remain a cornerstone of effective marketing. They offer a tangible and visually engaging way to communicate essential information about products, services, or events to customers. For businesses looking to impress with their next campaign, a well-designed brochure template is invaluable. This tutorial delves into the process of creating a versatile and easily editable pamphlet template in Adobe InDesign, highlighting key tools and techniques that empower both designers and clients to customize with ease. While pre-made templates offer a quick start, understanding the underlying principles of creating one from scratch provides greater control and creative freedom.
Understanding Brochure Design Fundamentals
Before diving into the technical aspects of InDesign, it's crucial to grasp the foundational elements of brochure design. A brochure is essentially a folded document designed to inform and persuade. Trifold brochures, a popular format, divide a single sheet into three panels, creating six distinct surfaces for content. The key to a successful trifold lies in its panel dimensions and the order in which they are read.
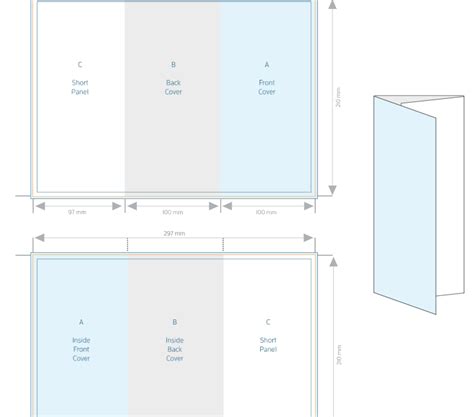
When a trifold brochure is opened flat, it typically resembles a standard Letter or A4 size sheet. However, for the folding mechanism to work seamlessly, the panels are not of equal width. The innermost panel, which tucks inside, must be slightly narrower than the outer panels to ensure a clean fold without buckling or overlapping. This precise measurement is critical for professional printing and a polished final product.
Setting Up Your Document in Adobe InDesign
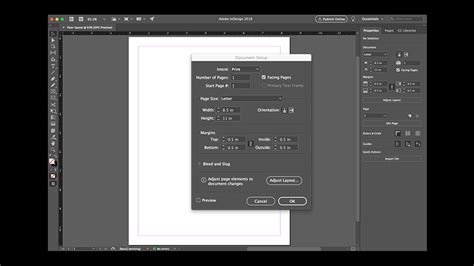
The journey to creating a professional pamphlet template begins with meticulously setting up your InDesign document. For this tutorial, we will focus on creating a trifold brochure based on a standard Letter-sized page (8.5 x 11 inches or 215.9 x 279.4 mm).
- New Document Creation: Navigate to
File > New > Document. - Document Setup:
- Intent: Select "Print" from the dropdown menu.
- Page Size: Choose "Letter" (or "A4" if preferred).
- Orientation: Set to "Landscape."
- Pages: For a trifold, you will typically need 6 pages to represent each panel. However, you can adjust this number as pages can be easily added or removed later.
- Facing Pages: Uncheck this option for simpler panel management in a trifold setup.
- Margins: Setting appropriate margins is vital for containing your content and providing visual breathing room. A common practice is to set margins of 18 mm for the top and outside edges, and 20 mm for the inside and bottom edges. This provides ample space for text and design elements.
- Bleed: A bleed is an area that extends beyond the trim edge of your document. This ensures that no unprinted white edges appear when the document is cut to its final size. For printing, a bleed of 5 mm on all sides is generally recommended, though it's always best to confirm specific requirements with your printer. For the inside edge, a bleed of 0 mm is often sufficient, as it aligns with the fold.
Mastering Panel Dimensions for Trifold Accuracy
Achieving the correct panel dimensions is paramount for a functional trifold brochure. While it might seem intuitive to divide the total width by three, the inward-folding panel requires a specific adjustment.
- Calculating Panel Widths: For a Letter-sized page (11 inches or 279.4 mm wide), divide the total width by three: 279.4 mm / 3 = 93.13 mm.
- The Fold Adjustment: To accommodate the tuck-in fold, the innermost panel needs to be slightly narrower. Subtract approximately 1 mm from this calculated width. So, the inner panel will be around 92.13 mm.
- Distributing the Remainder: The remaining width from the adjusted inner panel is then distributed to the other two panels. This results in two outer panels that are slightly wider than the inner panel. A common distribution results in two panels of approximately 94.13 mm and one panel of 93.13 mm.
To implement these precise dimensions within InDesign:
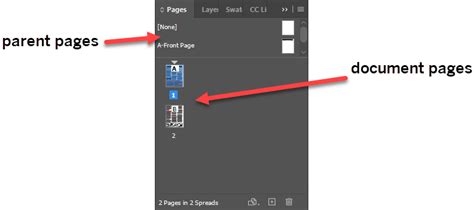
- New Parent Pages: Go to the "Pages" panel (
Window > Pages). Right-click on "A-Parent" and select "New Parent." In the "New Parent" window, set the "Width" to 97 mm. This will serve as a base for your primary panels. - Creating the Inner Panel Parent: Right-click on "B-Parent" (or create a new one) and select "New Parent." Set its "Width" to 94 mm. This will be used for the slightly narrower inner panel.
- Applying Parent Pages: Right-click on the "A-Parent" and select "Apply Parent." In the "Apply Parent" window, under "To Pages," enter "1, 6" to apply this parent to the first and last pages (which will be your outer panels). Repeat this process, applying the "B-Parent" to pages "3, 4" (the inner panels).
- Arranging Spreads: Ensure "Allow Document Pages to Shuffle" is unchecked in the "Pages" panel. Drag and combine pages to create your spreads: Pages 1-3 as the first spread, and Pages 4-6 as the second spread. This visual layout mirrors how the brochure will appear when laid flat.
Organizing Your Design with Layers
Effective organization is key to managing complex InDesign documents. The Layers panel (Window > Layers) is your best friend for this. We will set up three essential layers:
- Vectors: This layer is for all vector-based graphics, such as shapes, lines, and logos.
- Images: This layer will hold all your placed photographs and raster images.
- Text: This layer is dedicated to all text content, including headlines, body copy, and captions.
By separating these elements onto different layers, you can easily isolate, edit, or hide specific components of your design without affecting others. Double-click on existing layers to rename them, and use the "New Layer" button to create additional ones.
Leveraging Paragraph Styles for Consistency
Paragraph styles are a powerful feature in InDesign that ensures typographic consistency throughout your document. They allow you to define and save formatting for text, such as font, size, color, leading, and paragraph spacing, and then apply these styles with a single click.
- Accessing Swatches: Go to
Window > Color > Swatches. - Creating Color Swatches: Click the "New Color Swatch" button. Define your brand colors or desired palette. Having these pre-defined swatches makes it easy to apply consistent colors to text, shapes, and backgrounds.
- Creating Paragraph Styles: Go to
Window > Type & Tables > Paragraph Styles.- Click the "Create New Style" button.
- Name your first style "Title." Configure its font, size, and color.
- Create additional styles for subheadings, body text, captions, and pull quotes.
By defining these styles upfront, you establish a clear typographic hierarchy and ensure that all elements of the same type share the same formatting, making your brochure look professional and cohesive.
Designing the Visual Elements: Shapes and Images
With the document structure and styles in place, we can now begin adding visual content.
Incorporating Vector Shapes
Vector shapes are ideal for creating graphic elements, backgrounds, and structural components of your design.
- Select Vector Layer: Ensure the "Vectors" layer is active in the Layers panel.
- Drawing Rectangles: Use the Rectangle Tool (M) to draw shapes. On Page 3, draw two rectangles that cover the entire panel. On Page 4, draw two more rectangles that fill the panel.
- Creating Slopes: To add dynamic visual interest, use the Direct Selection Tool (A) to select specific points of your rectangles. For instance, on Page 3, select the top-right corner of the bottom rectangle and use the Up Arrow key to move the point upwards, creating a steep slope. Repeat this on Page 6, but create a slope on the opposite side and at a different height for visual variation.
Placing and Manipulating Images
Images bring life and context to your brochure. InDesign's frame tools provide a flexible way to manage them.
- Rectangle Frame Tool: Select the Rectangle Frame Tool (F). This tool creates a placeholder frame for your images.
- Placing Images: With a frame selected, press
Command-D(orCtrl-Don Windows) to open the "Place" dialog box. Navigate to your image file and click "Open." - Resizing and Scaling:
- Direct Selection Tool (A): Use this tool to select the image within the frame.
- Control Panel: Activate the "Constrain Proportion" button in the Control panel to maintain the image's aspect ratio. Set the scaling percentage to 70% for this example.
- Color Overlays: To achieve a consistent color tone across different images, you can apply color overlays. Select the image frame, then use the Swatches panel to set a color, such as purple, as an overlay. This can help unify the visual theme.
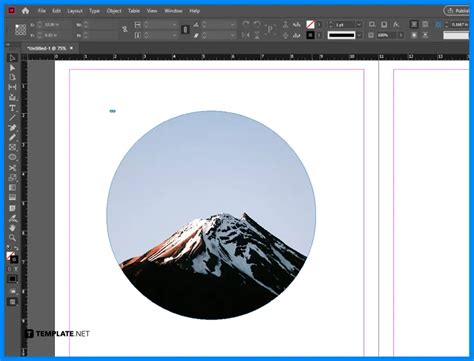
- Circular Image Frames: On the inside panels (Pages 4-6), use the Ellipse Frame Tool (F). Draw a circle and set its Stroke color to "[Paper]" in the Swatches panel. Place an image within this frame.
- Resizing Images within Frames: Use the Direct Selection Tool (A) to select the image inside the frame. Drag the eight points around the image to resize it. Hold
Shiftwhile dragging to resize proportionally. - Adding Decorative Elements: Use the Ellipse Tool (L) to draw small circles (e.g., 6 mm width and height). Set their Fill color to Black and Stroke color to "[Paper]".
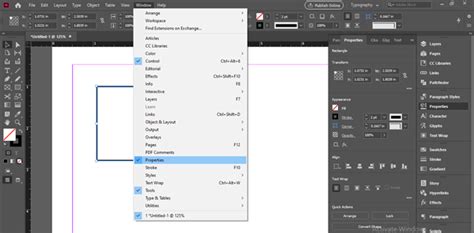
- Aligning Elements: The Align panel (
Window > Object & Layout > Align) is crucial for precise placement. Select multiple objects and use the "Align Horizontal Center" and "Align Vertical Center" buttons to perfectly center them within their frames or across the page. - Duplicating and Replacing: To quickly replicate elements, select them, press
Option(orAlton Windows), and drag to duplicate. To replace an image within a frame, select the frame, pressCommand-D, and check the "Replace Selected Item" option in the "Place" dialog.
Adding Logos and Text
Logos are critical for brand recognition, and text provides the core information.
- Placing Logos: Select the "Vectors" layer. Press
Command-Dto place your logo file. Resize it proportionally by holdingShiftwhile dragging a corner point. Place logos on relevant pages, such as the cover and inside panels. - Creating Text Boxes: Use the Text Tool (T) to draw text boxes.
- On the cover page, create two text boxes: one for the main title and another for a smaller tagline.
- Apply your pre-defined "Title" and other paragraph styles to format the text consistently. Use the Swatches panel to set text colors (e.g., purple for the title, orange for the tagline).
- Body Text and Statistics: On interior pages (e.g., Page 5), create text boxes for body copy. For visual elements like statistics, you can use circles created with the Ellipse Tool (L). Apply specific fill and stroke colors. You can also use the Type on a Path tool or text frames within shapes to integrate text creatively.
- Pull Quotes: To highlight important snippets of text, create a text box and assign it the "Pull-quote" paragraph style. Adjust its placement and styling as needed.
- Captioning: For images or statistics, create smaller text boxes for captions. Format them using a dedicated "Caption" paragraph style and set the color to "[Paper]" for contrast against darker backgrounds.
InDesign Tutorial - Paragraph Styles & Character Style Basics
Advanced Layout Techniques: Tables and Formatting
Brochures often require structured data, which tables are perfect for.
Creating Tables
- Insert Table: On Page 2, use the Text Tool (T) to create a text box. With the text box active, go to
Table > Insert Table. - Table Dimensions: Specify the number of "Body Rows" and "Columns." For example, 10 rows and 2 columns.
- Table Formatting:
- Double-click the table to activate its editing mode. Select all rows and columns.
- In the Control bar, you'll see table editing options. Here, you can adjust line weights and visibility. For instance, deactivate all vertical lines and some horizontal lines to create a cleaner look.
- Open the Table panel (
Window > Type & Tables > Table). Select all rows and set the "Row Height" to "At Least 10 mm" to ensure adequate spacing.
- Populating Tables: Use the Text Tool (T) to add content to your table cells. Apply the "Copy" paragraph style for standard text.
Fine-Tuning Text Formatting
Beyond paragraph styles, individual text elements can be fine-tuned:
- Control Bar/Character Panel: Use these to adjust kerning, tracking, leading, and other character-level attributes for precise typographic control.
- Paragraph Panel: Access advanced paragraph settings like hyphenation and justification.
Preparing Your Brochure for Print: Exporting
The final step is to export your InDesign document into a print-ready format.
- Export Command: Go to
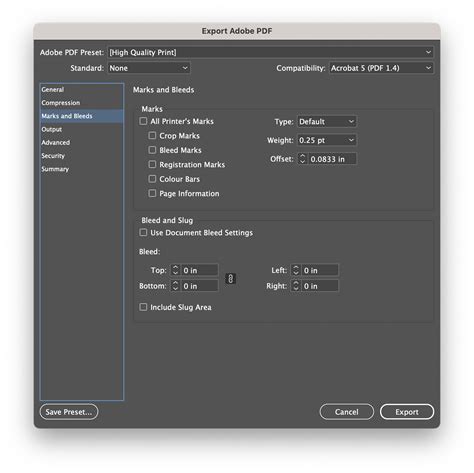
File > Export. - File Format: Choose "Adobe PDF (Print)" from the "Format" dropdown menu.
- PDF Preset: In the "Export Adobe PDF" window, select "Press Quality" as the Adobe PDF Preset. This setting ensures high resolution and appropriate color profiles for professional printing.
- Marks and Bleeds: On the left-hand side menu, select "Marks and Bleeds."
- Check "All Printer's Marks" to include essential printing indicators like crop marks, registration marks, and bleed marks.
- Check "Use Document Bleed Settings" to ensure the bleed area you defined during setup is included in the export.
- Export: Click "Export." Save your file with a descriptive name, such as "Pamphlet Template.pdf."
This process generates a high-resolution PDF file that your commercial printer can use directly, ensuring accurate color reproduction and proper trimming.
Exploring Pre-Designed Templates and Resources
While this tutorial empowers you to create a brochure from scratch, pre-designed templates can be a valuable resource for inspiration or for projects with tight deadlines. Many platforms offer a wide array of customizable brochure templates:
- Envato Elements: A subscription service providing access to a vast library of InDesign brochure templates, along with other design assets. Examples include stylish, multi-page, landscape-oriented, and corporate designs.
- GraphicRiver: Offers individual template purchases, allowing you to buy specific brochure designs.
- Canva: A user-friendly online design tool that also features a gallery of trifold brochure templates, accessible even without professional design software.
These templates often come with pre-set layouts, color schemes, and placeholder images, allowing for quick customization. Look for templates that are:
- Visually Appealing: Designs that align with your brand or campaign message.
- Versatile: Templates that can be easily adapted to different content types.
- Editable: Files that are well-organized and use features like paragraph styles for straightforward modification.
Some notable template examples include:
- Furniture Brochure: Emphasizes visuals with concise text.
- Multipurpose Pamphlet: Offers multiple color layouts and extensive page counts.
- Vela Landscape Brochure: A large, well-designed template in landscape orientation.
- The Art of Coffee Brochure: Features unique image masks and thematic color palettes.
- Fashionable Brochure Template: Utilizes Smart Object layers for easy image replacement.
When selecting a template, consider its orientation (portrait vs. landscape), size (A4, US Letter), and the overall design aesthetic. Many templates are also available for other DTP software like Adobe Photoshop, Affinity Publisher, or Xara Designer.
The Enduring Value of Brochures
In an increasingly digital world, brochures continue to hold significant marketing power. Their tactile nature and the ability to present detailed information in a structured, visually appealing format make them an effective tool for:
- Informing Customers: Clearly outlining products, services, and company information.
- Cost-Effective Promotion: Providing a tangible marketing piece at a relatively low cost.
- Brand Building: Reinforcing brand identity through consistent design and messaging.
By mastering the creation of professional brochure templates in Adobe InDesign, you equip yourself or your clients with a powerful asset for impactful marketing campaigns. Whether you design from scratch or customize a pre-existing template, the principles of clear layout, consistent typography, and high-quality imagery remain paramount to creating a brochure that effectively communicates and persuades.