If you're new to video editing, you might have heard of DaVinci Resolve. What you may not know is that it's quickly becoming the go-to recommendation for beginners. While it has a steeper learning curve than other editors like Premiere Pro, DaVinci Resolve offers more control and flexibility once you learn the ropes. On top of that, it also has a free version you can download instantly. If you’re just getting started with video editing and looking for a beginner tutorial, you’re in luck. In this post, we’ll cover the basics of how to use DaVinci Resolve and explore the main tools you can use to start editing a project.
Note: The screenshots used in this article are from DaVinci Resolve 18.6. If you’re using a different version, some settings and tools may be in other locations.
Getting Started: Creating Your First Project
To create a simple video with DaVinci Resolve, there are a few fundamental steps you need to understand. In a basic editing workflow, you need to create a project, add your media, cut and edit your clips, and export the final product. Let’s find out how each of these steps works in DaVinci Resolve.
Creating a New Project
- Select "Untitled Project": To begin, open the DaVinci Resolve app. You’ll see an option to select "Untitled Project" or use the "New Project" button to create a new project file.
- Name Your Project: Next, give your project a descriptive name and then hit "Create."
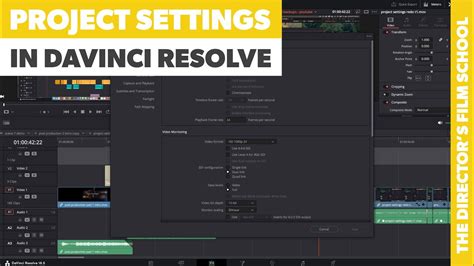
- Adjust Project Settings: Before you move on to importing your media, it’s wise to set your project settings. Navigate to "File" > "Project Settings" or click the gear icon located at the bottom-right of the screen. For beginners, you can largely ignore most of these settings for now. The crucial adjustments at this stage involve ensuring your "Timeline frame rate" and "Timeline resolution" match the video files you intend to import. These settings can be found under the "Master Settings" section.
Navigating the DaVinci Resolve Interface
Before you import and edit your video files, it’s important to understand how DaVinci Resolve’s interface and layout are structured. DaVinci Resolve is organized into distinct workspaces, each dedicated to a specific step in the editing workflow. These workspaces are accessible via tabs located along the bottom of the screen and include Media, Cut, Edit, Fusion, Color, Fairlight, and Deliver. For this basic tutorial, we’ll focus on the Media, Cut, and Edit pages.
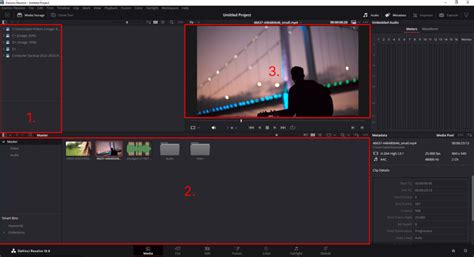
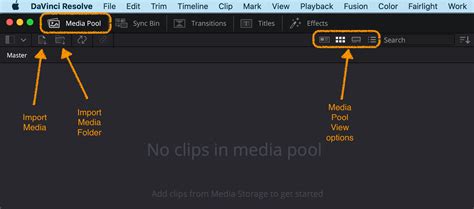
The Media Page: Organizing Your Assets
The Media page is your central hub for importing and organizing all your media files, including video footage, audio tracks, and graphics. Its primary purpose is to help you get everything ready and neatly arranged for the subsequent editing process.
Here's how the Media page is typically arranged:
- Media Storage: Located in the top-left pane, this section displays your computer's file directory. You can use this to navigate through your drives and quickly locate the media you wish to import.
- Media Pool: The bottom-central pane is where all your imported media is displayed. To maintain order, you can organize your media into "bins," which function like folders within DaVinci Resolve.
- Viewer: The Source Viewer, found in the top-central pane, allows you to preview clips as you import and organize them, ensuring you have the correct files.
The Cut Page: Swift Editing for Shorter Projects
The Cut page is designed to provide simple, intuitive tools for quickly cutting and assembling your video assets. It's particularly useful for rapid edits and shorter projects where complex features are not a primary concern. On this page, you'll find all the essential tools needed to construct a basic sequence from your raw media files.
Let's examine the Cut page:
- Timeline: The Timeline is the main editing area on the Cut page, situated along the bottom of the screen. This is where you'll add, cut, and arrange your media clips. DaVinci Resolve features a dual timeline: the upper timeline offers a broad overview of your entire project, while the lower timeline allows for precise editing adjustments.
- Media Pool: Located in the top-left corner, this pane functions identically to its counterpart on the Media page. You can drag and drop clips directly from the Media Pool onto your timeline.
- Viewer: This is the video preview screen that occupies a significant portion of the Cut page. Here, you can observe the real-time effects of your edits. You have the flexibility to switch between "Source Tape" and "Timeline" modes to view your sequence as it's being built.
- Toolbar: Positioned just above the Timeline, you'll find a toolbar equipped with a stack of icons. These icons represent basic tools for selecting, moving, and cutting clips within your Timeline.
- Transitions, Titles, and Effects: Along the top of the Media Pool pane, you'll notice buttons for "Transitions," "Titles," and "Effects." These allow you to apply specific video effects from the Resolve library, helping you create more polished and professional-looking videos.
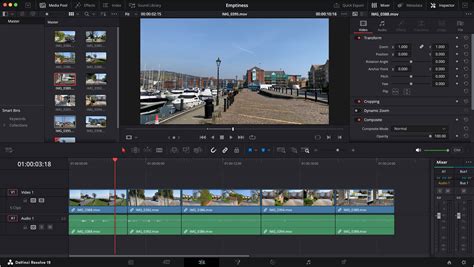
The Edit Page: Professional Control and Precision
The Edit page is a fully-featured workspace tailored for professional video editing. This is where most editors dedicate the majority of their time, utilizing a comprehensive suite of tools for fine-tuning footage, transitions, effects, and much more.
Here's a look at the Edit page:
You should now be familiar with the Media Pool and Timeline. Here are some new sections to note:
- Source and Timeline Viewers: In contrast to the Cut page, the Edit page features two viewers. On the left, the Source Viewer displays the clip you are currently preparing for editing. On the right, the Timeline Viewer shows the sequence as you are constructing it within the Timeline.
- Editing Toolbar: Directly above the Timeline, there's a toolbar containing various tools essential for importing, trimming, and snapping clips together in your sequence.
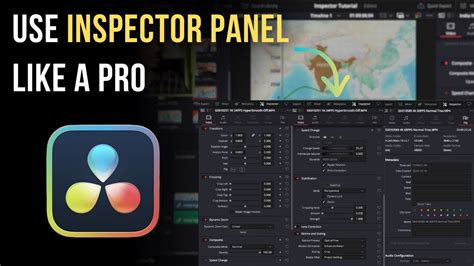
- Inspector Panel: Situated in the top-right corner, you'll find the Inspector panel. This panel houses a range of editing tools, effects, and transitions that can be applied to your clips. From here, you can adjust parameters like rotation, zoom, flip, and position. Additionally, it offers options for cropping, stabilizing footage, applying lens corrections, and much more.
By now, you should have a foundational understanding of the Media, Cut, and Edit pages. We strongly recommend dedicating time to familiarize yourself with each page; this will significantly accelerate your editing process as you become proficient in locating and utilizing its features. As you gain more experience with DaVinci Resolve, you can begin to explore the Fusion, Color, and Fairlight pages. These advanced pages provide everything you need to enhance the colors, sounds, and visual effects within your videos. Don't forget that you can leverage DaVinci Resolve LUTs and intro templates to further elevate these capabilities.
Importing and Editing Your Media
Now that you understand the layout of the Media, Cut, and Edit pages, it's time to import your audio and video files and commence editing. As we proceed through these steps, we'll include both the actions and their corresponding keyboard shortcuts in Resolve. Mastering keyboard shortcuts is an excellent way to learn the program and edit more efficiently. Our comprehensive guide to DaVinci Resolve keyboard shortcuts is an invaluable resource as you embark on your learning journey.
Adding Audio and Video to Your Project
DaVinci Resolve supports a wide array of video and audio file types, which simplifies the process of importing media into your project. While there are multiple methods for importing media, the most straightforward approach is to simply drag and drop your files into the Media Pool.
To do this, navigate to the Media page, open the Media Storage pane, and locate your files. Then, drag and drop the desired files from the directory structure into the Media Pool.
Alternatively, you can import media directly from the Cut and Edit pages. To do so, right-click within the Media Pool and select "Import Media." Browse to your desired files and click "Open."
Splitting Clips for Precision Editing
Splitting clips allows you to create distinct segments within your footage, enabling you to isolate specific parts, remove unwanted sections, and rearrange your video content effectively.
To split clips in DaVinci Resolve:
- Open the Edit page.
- Navigate to the specific point in your sequence where you wish to make a split.
- Press the 'B' key on your keyboard or click the "Blade Edit Mode" icon (which resembles a razor blade) in the toolbar.
- Click within your sequence at the desired location to create a cut.
You can also split clips within the Cut page using the "Split Clip" tool. Position the playhead at the section of the clip you want to divide, then click the "Split Clip" icon to create a break.
Cropping Footage to Refine Your Shots
Cropping a video allows you to eliminate unwanted edges, draw focus to a specific area of the frame, or adjust the aspect ratio of your footage. You can crop your footage directly within the Edit page, where you are provided with intuitive tools to modify specific elements of your video.
Here’s how to crop your footage:
- Select the Clip: Ensure you are on the Edit page and then select the clip you wish to crop within the timeline. It will be highlighted to indicate it's selected.
- Open the Inspector Panel: If the Inspector panel is not already visible, click the "Inspector" button located in the top-right corner of the interface.
- Adjust Cropping Settings: Locate and select the "Cropping" header to expand the related settings. Then, adjust each slider (Crop Left, Right, Top, and Down) until you achieve the desired crop. Each directional slider will crop inwards by a specified number of pixels; the further you drag a slider, the more pronounced the crop will be.
- Reposition and Scale Your Footage: If you want the cropped footage to fill the entire frame, you can reposition and scale the clip. Within the "Transform" section of the Inspector, use the "Position" tool to center your clip. Subsequently, utilize the "Zoom" tool to expand your clip until it perfectly fills the frame.
Undoing and Redoing Actions: Your Editing Safety Net
Undoing and redoing actions in DaVinci Resolve is a quick and efficient way to rectify any mistakes you might make during the editing process. DaVinci Resolve provides straightforward keyboard shortcuts and an extensive edit history feature to help you swiftly undo or redo your actions.
Here are the essential keyboard shortcuts:
- Windows/Linux: Press
Ctrl + Zto undo the last action, andCtrl + Shift + Zto redo the last action that was undone. - Mac: Press
CMD + Zto undo the last action, andCMD + Shift + Zto redo the last action that was undone.
You can also access a detailed list of your recent actions by navigating to the top bar and selecting "Edit" > "History." This feature allows you to revert to a specific point in your editing timeline, acting as a powerful backup if you need to backtrack through a series of edits.
Adding Text and Titles to Your Videos
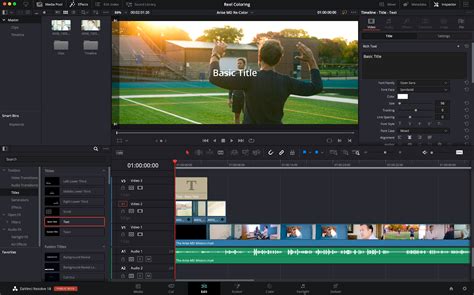
DaVinci Resolve offers a versatile range of options for text customization, from simple captions to more intricate animated titles. Here's how to add text to your video using the Edit page:
- Import Your Media (if needed): If you intend to overlay text onto your video, ensure your clips are already placed within the timeline.
- Access the Effects Library: Click on "Effects" in the top-left corner of the interface and navigate to "Titles" under the "Toolbox" category.
- Choose a Text Effect: For straightforward text, drag and drop the "Text" effect from the Titles section onto your timeline, positioning it above your video track. If you require more advanced customization and features, opt for the "Text+" option and drag it onto your timeline instead. DaVinci Resolve also provides a variety of other preset title animations you can choose from.
- Edit the Text: Select the text element on your timeline, then navigate to the Inspector panel. Here, you can modify the font, size, color, and other fundamental properties to your liking. If you've utilized the "Text+" effect, you'll gain access to additional controls for tracking, line spacing, color, shading, and animation options.
Enhancing Your Edits with Advanced Features and Assets
You've now been introduced to the foundational features necessary to begin using DaVinci Resolve effectively. Once you feel comfortable with the concepts covered here, you can progress to more advanced tasks, such as rendering and exporting your project. If you encounter performance issues like lag while editing, consult our tips on how to make Resolve run faster.
Leveraging DaVinci Resolve Templates and Assets
Utilizing DaVinci Resolve templates is an excellent way to familiarize yourself with the program, as much of the intricate work has already been pre-designed for you.
Sign up for services like Storyblocks for unlimited downloads of thousands of pre-made, customizable templates for DaVinci Resolve. With curricula designed for both new users and established professionals, Blackmagic Design certified training teaches you the skills needed to be more creative, work faster, and complete your projects efficiently. Discover the art of editing in DaVinci Resolve!
How to Edit A Video in DaVinci Resolve! (Start to Finish)
Exploring Specialized Workspaces
As you advance, delve into the specialized workspaces DaVinci Resolve offers:
- Fusion Page: This powerful page allows you to create cinematic visual effects and sophisticated motion graphics. You can perform common compositing tasks and explore a true 3D workspace, including advanced 3D compositing tools.
- Color Page: This video introduces the robust Color page, essential for color grading. Discover advanced features used by Hollywood colorists to achieve stunning visual results. The bottom-left corner of the Color tab interface houses most of the color correction tools, offering an extensive range of possibilities.
- Fairlight Page: This workspace is dedicated to audio post-production. Learn about critical audio mixing, recording simple voiceover tracks, and utilizing ADR tools to replace dialogue. You can also explore advanced features like channel mapping, linked groups, and the immersive world of Dolby Atmos with tools built directly into Fairlight.
Mastering Keyboard Shortcuts for Efficiency
Becoming a proficient DaVinci Resolve user is significantly enhanced by mastering its keyboard shortcuts. These shortcuts streamline the editing process, making it smoother and considerably faster. Like learning musical notes, it requires practice to integrate them seamlessly. However, once mastered, you'll find yourself rarely needing to reach for your mouse. For those transitioning from other software, such as Premiere Pro, you can often import your existing keyboard shortcuts to maintain continuity.
Basic Editing Keyboard Shortcuts:
These shortcuts are crucial for efficiently navigating and cutting through your footage to identify the desired segments:
J: Rewind; increase playback speed with repeated presses.K: Stop playback.L: Fast-forward; increase playback speed with repeated presses.Space bar: Play and pause video playback.I: Set the "In Point" for a cut.O: Set the "Out Point" for a cut.F9: Insert the selected cut footage into the timeline.Q: Toggle between the source and timeline views.
Gain Speed with 77 Keyboard Shortcuts: Become a Resolve pro with our free keyboard shortcuts reference sheet. Download PDF.
Advanced Editing Techniques
- Sync Video and Audio: If you record audio separately from your video, DaVinci Resolve simplifies syncing. Select the audio and video clips you want to sync (using
Controlon PC orCommandon Mac). Right-click and choose "Auto Sync Audio" > "Waveform." Resolve analyzes the audio waveforms to align them, ensuring your footage plays back with perfectly synced audio. - Add Sound Effects: Within the Edit tab, the "Sound Library" provides access to a vast collection of sound effects. Once downloaded, you can easily drag and drop these effects into your videos. Searching for three asterisks (
***) can reveal all available effects. - Scrubbing Footage with Source Tape Viewer: For large projects, individually selecting clips can be cumbersome. The "Source Tape Viewer" displays all your video files in a continuous stream, making it easy to find your in and out points, especially useful for sorting through b-roll clips repeatedly.
- Automating Parameters with Keyframes: Keyframes allow you to animate changes to parameters over time. Whether you need a slow zoom, a dynamic punch-in, or motion graphics, keyframes are the solution. Select a clip, open the Inspector, place your playhead where you want a parameter change to begin, and click the keyframe diamond next to the parameter in the Inspector. Move the playhead to where you want the change to occur and add another keyframe. Adjusting the parameter will automatically create a new keyframe.
- Mass Applying Changes: To apply a specific change (like volume adjustment) across multiple clips, copy the modified clip (
Ctrl + Con PC orCommand + Con Mac). Then, select all the target clips and pressAlt + V(PC) orOption + V(Mac). A "Paste Attributes" menu will appear, allowing you to choose which parameters to apply across the selected clips. This method works for various attributes, including zoom, crop, and equalizer settings. - Normalizing Audio Levels: To ensure consistent volume across all clips, select all clips in the Timeline, right-click, and choose "Normalize Audio Levels." Select "Independent" to normalize each clip individually, creating a uniform volume range throughout your video.
- Auto Color Correction: While in-depth color grading is a separate topic, a quick beginner hack is available. In the Color tab, select a clip and press the "A" button for auto color correction. You can then select other clips and right-click to "Apply Grade" to propagate the correction.
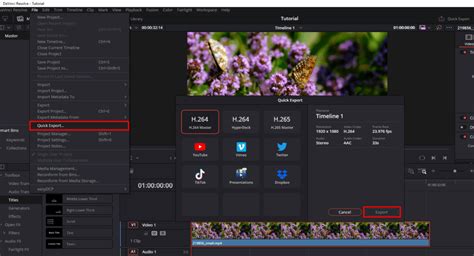
- Quick Export: For rapid project exports without navigating to the Delivery tab, use the "Quick Export" option found in the upper-right corner of the Edit tab. This pop-up window allows you to select render settings (e.g., H.264 Master), add a filename, and export directly to your computer.
Conclusion: Your Editing Journey Begins
You've now covered the core process of editing in DaVinci Resolve, from organizing your media to exporting your final product. As you continue to practice, these steps will become second nature. If you have questions, unique tips to share, or specific topics you'd like to see covered in future tutorials, we encourage you to engage with the community.
Blackmagic Design offers comprehensive training resources, including hands-on guides that teach you how to cut interviews, dramatic scenes, documentary material, and music videos. Their training also covers sound editing, mixing, mastering, and detailed color correction techniques. Furthermore, you can learn to create visual effects directly within DaVinci Resolve using its powerful Fusion page tools, without the need for external applications. With DaVinci Resolve Studio, advanced features like 3D camera tracking and Universal Scene Descriptor (USD) nodes simplify the transition from 2D to 3D compositing.
DaVinci Resolve is Hollywood's most popular solution for editing, visual effects, motion graphics, color correction, and audio post-production, available for Mac, Windows, and Linux. The platform is complemented by specialized hardware designed to enhance workflow efficiency, including editing control surfaces, a multi-cam editing panel, premium keyboard editors, powerful color panels for refined grading, and extensive Fairlight audio mixing consoles. These tools are designed to help professionals work faster and achieve greater creative control.