Creating a professionally formatted book, whether it's a novel, a cookbook, or a photobook, can be a daunting task, especially when starting from scratch. Adobe InDesign, a powerful desktop publishing software, is the industry standard for achieving polished, print-ready documents. However, its complexity can be a barrier for many. This guide aims to demystify the process by focusing on the practical application of InDesign booklet templates, enabling users to achieve professional results with greater ease.
The Power of InDesign Templates: Skipping the Steep Learning Curve
Rather than starting from scratch, this guide to InDesign formatting will assume you’re using one of my InDesign book templates. That way, we’ll skip a lot of technical stuff you don’t really need to know about. Even so, InDesign can be frustratingly complex. For those who find the initial setup overwhelming, I recommend hiring someone on Fiverr.com to do the initial formatting. However, it’s beneficial to have InDesign and know how to use it, so that you can later make small changes or fix typos without having to go back to your designer each time.
The core advantage of using templates lies in their pre-configured structures and styles. These templates often come with pre-set master pages, paragraph styles, character styles, and layout grids. This means that fundamental design decisions - such as page margins, header/footer placement, font choices, and text flow - have already been made, allowing you to focus on your content.
Understanding Master Pages: The Backbone of Consistency
InDesign is a legacy book formatting software, meant for print design - so for magazines and media/graphic heavy content, it makes sense. A fundamental concept in InDesign, and one that templates leverage heavily, is the "master page." A master page is like a template for your document's pages. You set up elements on a master page, such as headers, footers, page numbers, and background graphics, and then apply this master page to any or all of your document pages.
Basically, you set up a “master” page which is like a page style, that you can apply to all similar pages. Once you’ve got all your master pages set up, you can tweak your headers and fonts, and make sure everything is consistent throughout your document. This ensures a uniform look and feel, which is crucial for a professional publication. For instance, a book template might have two master pages: one for chapter start pages (perhaps with no header or page number) and another for interior pages (with consistent headers and page numbers).
Setting Up Your First InDesign Book Template
I’m going to start with a very simple, basic InDesign Book Template. You should be able to download this template by clicking it. Pages should automatically be added, so that the rest of the text is pushed down to the end of the document. This automatic page creation is a key feature that prevents text from being cut off when you paste in your content.
Let's say you have a chapter heading that you want to style consistently. I’ll highlight the “Chapter One” text and set it to Trajan Pro, all caps to match the cover. Then I’ll highlight the text again, and hit the little panel button on the top right of the Paragraph Styles panel (right under the X to close the panel). Now “Header1” shows up under my Paragraph Styles - next time I get to a chapter heading, I’ll just hit that style. This process of defining and saving styles is what makes InDesign so powerful for maintaining consistency across large documents.
The same principle applies to other text elements. I’ll do the same thing for the subtitle, increasing the font size, making sure the text is centered. I change the font to “Lato” to match the cover, then saved it as “Scene” (because in this book, the subtitle describe the scene). For the first paragraph, I’m going to set the font to Sabon, 11pt, with 18pt line spacing. Then I’ll save it as a new style, “NoIndent.” Then I’ll open that style and adjust the “Indents and spacing” so there’s actually no indent. (When you pasted your text in, it probably already had a style assigned by default. You can just redefine the current style so it applies to most of your text.)
Navigating and Adjusting Master Pages in Practice
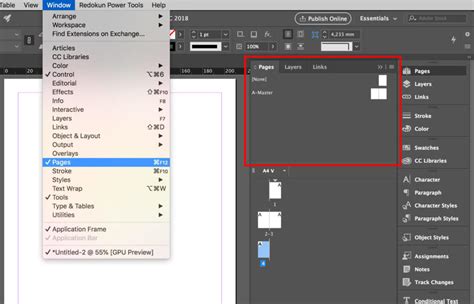
After applying initial styles, you might need to refine the layout. If I scroll down to the next page, I can see that everything looks pretty good, except that I need to adjust my headers. If I click on the Pages Panel, in the main box I can see my document and all the pages - in those little icons, at the top, is an “H” or an “I”. Those are two different master page styles. “H” is totally blank, with no headers, for my chapter pages or front matter. “I” has headings and page numbers. I don’t want to do anything with the page numbers, which display here as only the symbol “I” (if this is confusing, my master pages could have been named “A” or “B” or something else.)
This highlights the importance of understanding how master pages are applied and how to switch between them. Sometimes, especially when importing text from other sources, you might find that the default styles aren't quite right. I wasn’t quite happy so I fiddled some more, making the subtitle smaller.
Handling Overset Text and Page Management
A common issue when working with InDesign templates, especially when pasting in a large amount of text, is "overset text" - text that doesn't fit within the designated text frames. My template was only for 49 pages, and when I added my new text InDesign didn’t make new pages for me. First, I’m going to insert some more pages. Then, I’ll go back and click on that little red “+” sign. This will work fine as long as you made enough pages for the overset text.
But there’s a way to avoid this if you aren’t sure. After hitting the red “+” and getting the overset text on your mouse, hold down Shift when you click into the next page. This action automatically creates new pages and links the text frames, ensuring all your content flows seamlessly. A quick cheat is to go back and highlight the first paragraph and heading from the first chapter, and copy+paste it to the first pages of other chapters. Then I just have to change all the text to make it right.
A Diverse Landscape of InDesign Templates
The world of InDesign book templates is vast, catering to nearly every genre and aesthetic. Whether you're a fiction author, a chef, or a photographer, there's likely a template designed to enhance your work. Psst… have you downloaded our free package of templates yet? If you need to publish a bookshelf quality book, I recommend grabbing over 100 formatting templates and in-depth tutorial videos by signing up to the Master Package. I’m on a quest to make a full-time living with my writing, and I share everything I learn! I have several free guides to writing, publishing and book marketing - they’ll help you avoid serious mistakes that can ruin your journey.
So you've written a book - that's incredible! You've put so much time and effort into every page, and now you want to present it in the best way possible. Well, I've scoured the Internet to find 50 best InDesign book templates that will help make your book a great success. But why use an InDesign template, you may ask? Take it from a desktop publishing expert, InDesign is the best tool to develop your book into a polished final product. If you’ve struggled with Microsoft Word, you'd know the pains of dealing with text styling, page sizing, page numbering, chapters, sections, image placement and so on. You’ll find InDesign to be much much (much) easier to work with. And it's often the better tool if you want your book to have a clean and professional look.
In this post, you'll find 50 of my favourite InDesign book templates, which you can download and start customizing today. Don't feel like scrolling? Find the styles you want quickly by using this search bar:
Multipurpose InDesign Book Templates
These templates offer versatility, suitable for a wide range of genres, from novels to non-fiction.
- Book Layout with Bold Typographic Accents: Make your words pop with this bold typographic style! This book template has an innovative layout that centers around photo backgrounds. In contrast, the text really stands out, making your words come to life.
- Vintage Style Book Layout: The vintage book template to make any writer's dreams come true! Its look is classic and timeless yet versatile and unique. You can't go wrong with a choice like this one.
- Blue Book Layout with Gothic Accents: A new take on the classic book template. Straightforward yet captivating, it is perfect for any story you want to tell. Let your readers dive into the blue of its layout.
- B&W Book Layout with Typography Accents: Modern and sleek, this is one our favorite InDesign book templates. It has a simple yet impressive layout. Specifically, the picture placement and the headings really make work stand out.
- Book Layout with Large Chapter Numbers: This visually stunning book template perfectly balances pictures and text. What really catches the eye are the large chapter numbers. It is a simple yet effective way to draw the reader's attention.
- Book Layout with Purple Text Accents: The purple accents of this book template may seem like a small detail, but they make it truly unique. Otherwise standard and fully editable, this book template is sure to leave its mark!
- Square Layout with Pop Style Elements: The pop artists themselves would be stunned by this book template. It's fun and creative without taking attention away from the written text. Give your work an exiting frame and choose this template.
- Minimalist Layout: This layout, out of the InDesign book templates seen so far, is more suitable for visually oriented work. Although, while the picture placement is dominant, there is still a lot of space for text. Choose this template and let the world see your work.
- Red Typographical Accents: The red accent on this book template is a bold statement. The layout and picture placement are also visually captivating. Dare to choose this out of all the InDesign book templates!
- Square Book Layout: The square layout of this book really makes it stand out from the crowd. The picture placement is dominant, leaving less room for text. Similarly, the color palette has a big role in the structure of this template. If you're looking for something unique, look no further.
- Black and White Book Layout: Classy and elegant, black and white. This book layout doesn't play with colors, but it doesn't play around either! The layout is practical and versatile, and the overall feel is timeless.
- Book Layout with Blue Accents: This fully editable book template has a more traditional feel to it. However, the blue accents and yellow details really help the content stand out. You can't go wrong if you choose this out of all the InDesign book templates!
- Wavy Teal and Brown Book Layout: This dreamy color palette is sure to really bring out your content. This book template is unique for its landscape orientation, and clever picture placement. In addition, it is fully editable!
- Brown and White Book Layout: This is the most delicate of the InDesign book templates in this list so far! The brown and white color palette really gives it a classy and elegant feel. The layout is perfectly balanced and will make your content look great.
- Book Layout with Yellow Accents: A more traditional template, this book layout still manages to leave its mark through the yellow accents that characterize it. Likewise, its typographic style is unique and creative. Let yourself be charmed by this simple yet striking layout.
- Red and White Book Layout: This book template is stunning. First and foremost, the color palette is bold yet delicate. Similarly, the layout is very well organized. It has the perfect balance between picture placement and descriptive text. Choose this one out of our list of 50 best InDesign book templates!
- Blood-Red Book Template: Dare to be bold! Choose this book template with alternating white and red backgrounds and really wow your readers. This layout is fully editable, with space for both text and pictures. In other words, it has everything you need!
- Ultimate Book Template: Last but certainly not least, this template really has everything! Specifically, it's a bundle that contains a book and ebook template, mockups, cover templates, and more. The design is "antique" and classic, making it extremely versatile. It just may be the best of our list of InDesign book templates!
Cookbook Templates
Designed to make your culinary creations shine, these templates offer practical layouts for recipes and food photography.
- Cookbook Layout with Earth Tone Accents: Warm and simple, like chocolate chip cookies fresh out of the oven! This cookbook template has everything you could ever need and will frame your content in a traditional and classic way.
- Blue and Red Cookbook Layout: This blue and red cookbook template puts the spotlight on your food! The picture placement is dominant, but the color palette frames everything elegantly. A truly beautiful template!
- Cookbook Layout with Tan Accents: The bold typography is toned down by the tan accents. As a result, this cookbook is both edgy and delicate. After all, we all know a good recipe needs both sugar and spice!
- Square Cookbook Layout with Red and Green Accents: This stunning cookbook template will wow your reader with its careful details. The layout is very versatile and easy to read. Equally important are the color palette and the typography, they tie the whole template together!
- Cookbook Layout with Green Textured Accents: Look at this stunning green textured template. The design is very captivating and the layout is practical and versatile. Choose this template and your food will be front and center!
- Black and Bold Cookbook Template: The bold white text on the black backgrounds of this cookbook is stunning and captivating. Go for class and elegance with this amazing template!
- Minimalist Cookbook: This minimalist design will flawlessly frame your recipes. It has a beautiful and versatile layout paired with bold typography.
- Cookbook Template with Clean Design: A simple cookbook template with a clean and captivating design. Neatly structured, this layout will make your recipes stand out and keep the reader engaged!
- Cookbook Template with Orange and Green Accents: Last but not least in this cookbook section is this beautiful orange and green accented template. The recipes will come to life thanks to its captivating and fully-editable layout.
If you couldn't find the right cookbook template, you should check our list of 50 Fresh InDesign Cookbook Templates - you'll find the best 50 templates I found online! I hope it helps!
Children's Book Templates
Designed with young readers in mind, these templates feature playful designs and ample space for illustrations.
- Classic and Illustrated: Let your heart soar through the pages of this book. Its traditional layout will remind you of simpler times, when all you needed were good stories with beautiful illustrations.
- Kids Book Template: This colorful children's book template is sure to entertain your little readers. The layout is versatile and fully editable and the images are really eye-catching!
- Children's Book Illustrated: With an illustrated book template like this one, you will win over any child! The colors are bright and captivating and the layout is exceptional. You can't go wrong if you choose this out of our InDesign book templates!
Multipurpose InDesign Ebook Templates
These templates are optimized for digital reading, offering sleek designs suitable for various ebook formats.
- Classic Ebook: With this ebook, you will feel like you're actually turning pages. The little illustration details, and the classic layout, give this template a hard-copy feel!
- Minimalist Ebook Layout: Less is more! This ebook layout has everything you need without any distracting details. Let the words speak for themselves!
- Ebook Layout with Teal Accents: A captivating ebook with a beautiful color palette. The layout of this template is versatile and unique. Similarly, the typography and the teal details really catch the reader's attention. This might just be the ebook you're looking for!
- Simple Ebook Template with Teal Accents: This simple ebook template is sure to give you everything you need. Its layout is straightforward and versatile, and the teal accents give it a splash of color.
- Classy Ebook Template: Sleek and elegant, this fashion-inspired ebook template is fully editable. The layout is perfect for balancing text and pictures, while the typography is classy. Overall, it's a really good choice!
- Urban Ebook Template: Don't be afraid to make a bold statement with this ebook template. The overall design is very contemporary, namely because of the typography and the black framing of the text. The picture placement is truly captivating as well.
- Sleek and Modern Ebook Template: Amaze your readers with this beautiful template. It is fully editable, with a versatile layout and bold typography. In addition, the picture placement is very well organized. Other ebooks will pale in comparison with yours!
InDesign Photobook Templates
Showcase your photography with these visually driven templates, designed to make your images the hero.
- Photobook Layout with Grey Accents: Give your photos an elegant frame with this photobook. The tasteful color palette and the versatile layout will put your pictures in the spotlight!
- Black and White Photobook Layout: Striking black and white, this photobook is itself a work of art. Minimalist, unique and versatile, this layout can fit all your needs!
- Minimalist Grayscale Photobook: Simple yet elegant, this template has it all! The page layout is very versatile, leaving you enough space for both photos of any size and descriptive text. Perfect to showcase your work!
- Square Photobook with Dark Green and Yellow Accents: This versatile layout really catches the eye with its color palette. The dark green and yellow play off each other in the most elegant way. Give your photos a beautiful frame, and choose this template!
- Photobook Layout with Yellow Accents: Delicate yet bold, this template is truly extraordinary. The soft color palette is balanced out by the striking typography and innovative layout. Choose this photobook and you are choosing to stand out!
- Square Photobook with Green Accents: Classic with a twist! This square photobook layout may seem quite traditional at first glance, but the green accents and decorative details really make it unique. In addition, the structure is very versatile and fully editable.
Additional Template Categories and Resources
Beyond the main categories, a wealth of specialized templates exist.
- Novel and Poetry Book Layout: Classic, simple, and versatile. This book layout may be basic, but it will fulfill all your needs. In other words, it's a choice you won't regret.
- Whimsical Cookbook Template: Who said food needs to be serious? Have a little fun with your recipes and choose this whimsical template!
- Cookbook Layout with Yellow Accents: Give your recipes the style they deserve! This cookbook template has a sleek and modern layout. Immediately, the yellow details grab your attention, while the well-structured content warms your heart.
- Fiction Ebook Layout: More on the traditional side, this template is the right choice for you if you're looking for something simple. Let the words speak for themselves!
- Non-Fiction Ebook Layout: This straightforward book template is great for non-fiction. The layout is versatile but simple, and in addition, it's quick and easy to customize. Perfect for no-nonsense writers.
- Simple Ebook Layout: A simple book. The name says it all. Who needs distracting colors or strange layouts, when all you care about are the words? Choose this template and concentrate on your work.
- Classic Ebook Layout: Classic means timeless. Make sure your work passes the test of time with this straightforward template. No colors that may go out of style, no strange typography, no unusual layout. Just you, your words, your legacy.
Search for more Book and Ebook Templates: While I've gathered all my favorites on this list, sometimes things just don't click. If you haven't clicked with these InDesign book templates, we've got 28,000+ more high-quality InDesign templates you can search from by using the form below. Trying entering a keyword related to the style you're looking for.
How to Create an InDesign Template
Formatting for Print: Booklet Creation in InDesign
So you’ve got an InDesign document that you'd like to print out and bind like a magazine or booklet. You can print booklets to any of our on-campus color or BW laser printers yourself OR submit your files to the SB and have our staff print them for you! The cost of Booklet/Saddle stitch binding is included in the cost of any prints made for the booklets (fees may apply if the size of your booklet necessitates hand folding/stapling).
Key Considerations for Booklet Printing
- Page Count: Booklets need to have a page count that is a multiple of 4 (12, 16, 32, etc.). This is because when you output the spreads correctly, there will be 4 pages per sheet (2 on one side, 2 on the other).
- Cover and Back Cover: In a booklet, the first page will be your front cover and the last page will be your back cover.
- Margins and Bleed: Keep important content ¼” away from the edge of pages to avoid being trimmed. For content that will bleed off the edge, make sure to include AT LEAST ⅛” of bleed.
- Proofing: Proof your document on screen or as a BW print. Catch your mistakes now!
- Packaging: Package your InDesign file (File > Package) or save or export your pages as a PDF if using another application.
The "Print Booklet" Feature Explained
In InDesign, the "Print Booklet" feature is specifically designed for imposing pages for booklet printing. Imposition is the process of arranging pages in a specific order on a larger sheet of paper so that when the sheet is folded and cut, the pages appear in the correct sequence.
DIY Booklet Printing Instructions:
- Open InDesign and select New File.
- Choose Paper Size: The first choice you’ll have to make is the page size you’ll be printing on. You can choose the “half-letter” option or the “letter” option, depending on your needs. This is the page that pops up. When adding pages, make sure the total page count is a multiple of 4.
- Print Booklet: Once you are finished making your booklet, it's time to print!
- In InDesign, go to
File > Print Booklet. - The default settings in this window should work fine:
2-up Saddle Stitch. - Click on
Print Settings. This brings up the standard InDesign print window. Check the box underOptionstoPrint Blank Pages. In theSetuptab (on the left), you can choose the page orientation and scale to fit the page if necessary. Leave thePaper sizeasDefined by Driver. - Click on the
Page Setup...button to choose your paper size. Be sure to choose toFormat Forthe printer you are sending it to, as each printer has different margins, and this will affect the alignment front to back. You can choose your page orientation here as well. - If you're printing to any public b&w or color laser printer, you'll have to set up duplexing (double-sided printing). Click on the
Printer...button. (For the 3rd/4th floor copiers, dropdown toFinishingfromLayout). Check the box forTwo-Sided, and you'll want to chooseShort-Edge binding(for a standard booklet). ClickPrint. - You are back to the InDesign print window. Turn on any other output options you want (Crop Marks or Bleeds). Click
OK. This brings you back to thePrint Bookletwindow. - Click on the
Previewtab on the left side. You will see a preview layout of your pages. The first sheet should contain your front and back page/covers. If you move the slider all the way to the right, the last spread should contain your middle two pages. - If you have "PostScript File" selected as your printer, click Print.
- In InDesign, go to
- Binding: You can use a saddle stapler or stitch the pages together by hand.
The Print Booklet feature allows you to create printer spreads for professional printing. For example, if you’re editing an 8-page booklet, the pages appear in sequential order in the layout window. The process of creating printer spreads from layout spreads is called imposition. While imposing pages, you can change settings to adjust spacing between pages, margins, bleed, and creep. The layout of your InDesign document is not affected, because the imposition is all handled in the print stream. You cannot create a new document based on the imposed pages.
Understanding Imposition Settings
- Print Preset: From the Print Preset menu, you can select predefined settings for common booklet types.
- Pages: This section allows you to specify the range of pages to be included in the imposition. You can select non-adjacent page numbers.
- Binding: The Booklet dialog box imposes pages based on the Binding setting. For example,
Saddle Stitchcreates two-page, side-by-side printer spreads that fit within the specified signature size. These printer spreads are appropriate for printing on both sides, cutting, and binding to a cover with adhesive. - Signature Size: This setting determines the size of the sheet on which the printer spreads will be imposed.
- Between Pages: This value controls the spacing between pages in the printer spread.
- Creep: Creep specifies the distance pages move from the spine to accommodate paper thickness and folding in Saddle Stitch and Perfect Bound documents. InDesign considers the “cover” of the final piece to be the outermost printer spread, while the “centerfold” is considered to be the innermost printer spread. The term "sheet" represents two printer spreads: the front of the sheet and the back of the sheet. When you provide a positive creep value, the centerfold is not adjusted, but the pages on the outer sheets move away from the spine.
By leveraging InDesign booklet templates and understanding the nuances of its formatting and printing features, authors and designers can create professional, visually appealing publications with greater efficiency and control.