Photoshop, the industry-standard image editing software, offers a plethora of tools and techniques to manipulate and enhance digital imagery. Among the most fundamental and frequently utilized operations is duplication. Whether you aim to replicate an entire image, a specific object, or a meticulously crafted selection, understanding the various methods to duplicate in Photoshop is a cornerstone skill that can dramatically streamline your workflow and unlock creative possibilities. This tutorial will delve into the diverse approaches available, from simple keyboard shortcuts to more nuanced layer-based duplications, ensuring you can efficiently replicate elements for a multitude of purposes.
The Power of Copy and Paste: The Easiest Duplication Method
At its core, duplicating an element in Photoshop often boils down to the classic "Copy and Paste" command, a universal shortcut familiar to users across many applications. This method is exceptionally straightforward and serves as an excellent starting point for beginners.
To duplicate an entire image using this technique, you simply need to activate the image you wish to copy. Then, employ the keyboard shortcut: Command + C on a Mac or Ctrl + C on a PC to copy the image data to your clipboard. Following this, you can paste this copied content into a new document or an existing one. The paste command is Command + V for Mac users and Ctrl + V for PC users. This action will create a new layer containing the duplicated image content.
This fundamental copy-paste operation is not limited to entire images. It can be applied to selected areas as well. If you have a specific object or region within an image selected using Photoshop's powerful selection tools, copying and pasting will duplicate only that selected portion, placing it onto a new layer. This is particularly useful when you want to isolate and replicate a particular element without affecting the rest of the image.
Duplicating Layers: Building Complexity with Ease
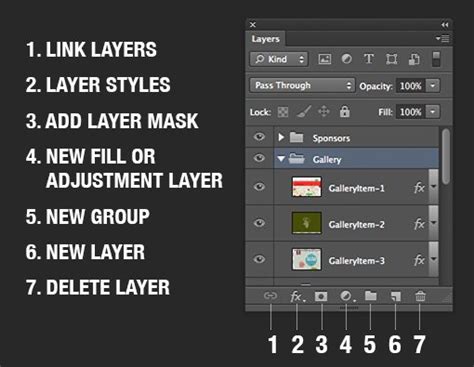
Beyond simple copy and paste, Photoshop provides robust tools for managing and duplicating entire layers, a crucial aspect of non-destructive editing and complex compositing. The Layers Panel is your central hub for these operations.
Utilizing the Layers Panel for Duplication
One of the primary methods to duplicate one or more layers is directly through the Layers Panel. To duplicate a single layer, you can:
- Select the layer you wish to duplicate in the Layers Panel.
- Right-click on the selected layer.
- Choose the "Duplicate Layer…" option from the context menu.
A dialog box will appear, allowing you to give the duplicated layer a new name if desired. This is beneficial for maintaining an organized layer structure, especially in complex projects. Confirming this action will create an exact replica of the selected layer, positioned directly above the original in the Layers Panel.
For duplicating multiple layers simultaneously, the process is similar:
- Select the layers you wish to duplicate in the Layers Panel. You can do this by clicking on the first layer, then holding down the Shift key and clicking on subsequent layers to select a contiguous range, or by holding down the Ctrl key (PC) / Command key (Mac) and clicking on individual layers to select non-contiguous ones.
- Right-click on any of the selected layers.
- Select "Duplicate Layers…" from the context menu.
Again, a dialog box will prompt you to name the duplicated layers. This is an efficient way to replicate groups of elements, saving considerable time compared to duplicating each layer individually.
Image Duplication for Layer Management
Another approach to duplicating layers, particularly when dealing with an entire image or a flattened composite, is referred to as "image duplication." While the term might sound distinct, it often overlaps with the copy-paste functionality when applied to the entire canvas. If you have a single layer representing your entire image, copying and pasting it into a new document effectively achieves this. Alternatively, some workflows might involve duplicating the canvas itself, which can then be manipulated. The key takeaway is that Photoshop offers flexibility in how you achieve a duplicated layer, whether it's a single object, a selection, or the entire image content.
Merging Layers: Consolidating Duplicated Elements
After duplicating multiple layers, you might find it beneficial to merge them into a single layer for easier management or to simplify further editing. Photoshop offers a straightforward shortcut for this purpose.
The keyboard shortcut Ctrl + E on a PC or Command + E on a Mac is used for merging layers. To utilize this effectively:
- Select the layers you wish to merge in the Layers Panel. As mentioned before, use Shift + Click for contiguous layers or Ctrl/Command + Click for non-contiguous layers.
- Press the Merge Layers shortcut (Ctrl + E or Command + E).
The selected layers will then be combined into a single layer. This is an extremely useful shortcut after you are done duplicating and arranging multiple layers you wish to consolidate. It's important to note that merging is a destructive process in that the individual layers are combined, so it's often wise to duplicate your layers before merging, ensuring you retain the original individual layers if needed.
Advanced Duplication: Cloning and Selections
Beyond duplicating entire layers or images, Photoshop excels at duplicating specific objects or regions with greater precision.
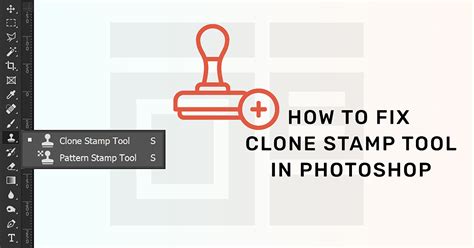
The Clone Stamp Tool: Direct Object Replication
Cloning is a powerful technique that allows you to copy pixels from one area of an image and paint them onto another. This is invaluable for replicating textures, removing blemishes, or precisely duplicating objects by sampling their source material.
To use the Clone Stamp Tool (S):
- Select the Clone Stamp Tool from the Photoshop toolbar.
- Choose a brush size and hardness that suits your needs.
- Alt-click (PC) / Option-click (Mac) on the part of the image you wish to clone (this sets your source point).
- Click and drag on the area where you want to paint the cloned pixels.
This method effectively copies the sampled pixels, allowing you to "paint" a duplicate of that area onto your image. It's crucial to re-sample your source point frequently to avoid repetitive patterns and ensure a natural look.
Duplicating Selections: Precision Placement
If you only need to duplicate a specific part of an image rather than an entire layer, you can use Photoshop's selection tools. These tools allow you to define a precise area you want to work with.
- Marquee Tools: These tools, such as the Rectangular Marquee Tool and the Elliptical Marquee Tool, are ideal for creating geometric selections.
- Lasso Tools: For more freeform selections, the Lasso Tool, Polygonal Lasso Tool, and Magnetic Lasso Tool offer greater flexibility.
Once you have made your selection using any of these tools:
- Copy the selection: Use Command + C (Mac) or Ctrl + C (PC).
- Paste the selection: Use Command + V (Mac) or Ctrl + V (PC).
Photoshop will automatically create a new layer containing only the selected and copied content. This new layer can then be moved, transformed, or further edited independently.
Addressing Complex Duplication Scenarios: The Masking Challenge
A common challenge arises when dealing with selections and masks in conjunction with duplication. For instance, if you have an action that duplicates an image and flips it horizontally, and the original image has a selection around specific elements (like leaves and a stem) with a mask created from that selection, the mask might not automatically transfer with the duplicated image.
The user's query highlights this: an action duplicates an image and flips it horizontally. The original image has a selection around leaves and a stem, and a mask is created from this selection. When the image is flipped, the selection/mask does not get transferred along with the duplicated image. The desired outcome is for the selection/mask to be duplicated and flipped along with the original image, resulting in a mirror image with the selection/mask intact on both the original and the duplicated image.
Solutions for Duplicating with Masks
To achieve the desired outcome of duplicating an image along with its associated mask and then flipping both, several approaches can be employed:
Duplicate Layer with Mask:
- Ensure the layer with the mask is selected in the Layers Panel.
- Duplicate the layer using right-click > Duplicate Layer… or by dragging the layer to the new layer icon at the bottom of the Layers Panel.
- This duplication method typically preserves the layer mask.
- Once duplicated, select the new layer and use Edit > Transform > Flip Horizontal to mirror the image and its mask.
Copying and Pasting the Mask:
- If duplicating the layer doesn't carry over the mask as expected, you can manually copy and paste the mask.
- In the Layers Panel, Alt-click (PC) / Option-click (Mac) on the layer mask thumbnail to view the mask itself.
- With the mask visible, Ctrl-click (PC) / Command-click (Mac) on the mask thumbnail to load it as a selection.
- Copy this selection (Command + C / Ctrl + C).
- Now, duplicate your image layer.
- On the duplicated image layer, create a new mask by clicking the "Add layer mask" icon at the bottom of the Layers Panel.
- With the new mask thumbnail selected, paste the copied mask selection (Command + V / Ctrl + V).
- Finally, use Edit > Transform > Flip Horizontal on the duplicated layer.
Saving and Loading Selections:
- Load the selection of your leaves and stem using your preferred selection tool.
- Go to Select > Save Selection… and give it a descriptive name.
- Now, duplicate your image layer.
- On the duplicated layer, go to Select > Load Selection…, choose the saved selection, and ensure "Invert" is unchecked if you want to apply the mask to the selected area.
- With the selection loaded on the duplicated layer, create a layer mask by clicking the "Add layer mask" icon.
- Then, flip the duplicated layer horizontally.
- You might need to repeat the process of loading the selection and creating a mask on the original layer if the mask wasn't preserved correctly.
These methods ensure that the selection and its corresponding mask are replicated and transformed accurately along with the image content, fulfilling the requirement of a perfectly mirrored image with intact selections.
Photoshop Layer Masks Explained in 7 Minutes!
Creating a New Document for Duplication Purposes
In certain scenarios, especially when working with complex edits or when you want to ensure the original image remains untouched, creating a new document for your duplicated elements is a prudent step.
To create a new document:
- Navigate to File > New… in the Photoshop menu bar.
- A dialog box will appear, allowing you to specify the dimensions, resolution, color mode, and other properties of your new canvas.
- Once you have set your desired parameters, click "Create" or "OK."
You can then copy elements from your original image and paste them into this new document, creating a duplicate workspace where you can freely experiment without risk to your source file. This is particularly useful when preparing elements for a composite or when performing extensive transformations on a duplicated object.
Embracing the Workflow: Finding Your Preferred Method
Photoshop's versatility in duplication means there isn't a single "best" way; rather, the most effective method depends on your specific task, the complexity of your project, and your personal workflow preferences.
- For quick, straightforward duplication of entire images or simple objects, Copy and Paste remains the most accessible.
- When managing multiple elements or working with layered compositions, utilizing the Layers Panel for direct layer duplication offers superior control and organization.
- For precise replication of textures or intricate details, the Clone Stamp Tool is indispensable.
- When isolating and replicating specific areas, mastering selection tools in conjunction with copy-paste is key.
- And for advanced scenarios involving masks, understanding how to duplicate and transform these non-pixel elements ensures seamless integration.
Experiment with these various methods. Understand their nuances and when each is most appropriate. By internalizing these techniques, you will significantly boost your productivity and creative potential within Photoshop, making the process of duplicating elements a swift and efficient part of your digital art and design endeavors. Happy duplicating!