DaVinci Resolve has established itself as the industry standard for color correction and color grading, a crucial process in transforming raw footage into a compelling visual narrative. Whether you are a beginner or an experienced editor, mastering its robust toolset can elevate your projects from amateur to cinematic. This tutorial will guide you through the essential steps of color grading in DaVinci Resolve, from initial project setup to applying creative looks, ensuring each frame captures your envisioned aesthetic.
Understanding Color Correction vs. Color Grading
Before diving into the technicalities, it's vital to distinguish between color correction and color grading. Color correction is the foundational step, focusing on achieving a balanced and accurate image. This involves ensuring that whites appear white, blacks look black, and the overall exposure levels are correct. It's about fixing and balancing the image.
Color grading, on the other hand, is where creativity takes center stage. It involves making intentional stylistic choices with your color palette to evoke specific emotions, set a mood, enhance the narrative, and draw focus to key elements. While color correction is generally objective and follows established standards, color grading is subjective and allows for artistic interpretation. You could spend hours perfecting a grade, and another editor might prefer a completely different look.
Project Setup for Optimal Color Workflow
Proper project setup is paramount for consistent and accurate color work. Within DaVinci Resolve preferences, navigate to General. If you are using a Mac, it is highly recommended to check the option "Use Mac display color profiles for viewers." PC users do not need to worry about this setting.
Next, go to your Timeline Settings and then to Color. Ensure that the Color Science is set to DaVinci YRGB. In most scenarios, you will be working with Rec.709, which is the industry-standard color space for high-definition video. Click OK.
Within the Project Settings, access Color Management. Here, once again, confirm that the Color Science is set to DaVinci YRGB and the Color Space is set to Rec.709. These settings ensure a consistent color environment throughout your project.
Navigating the Color Page
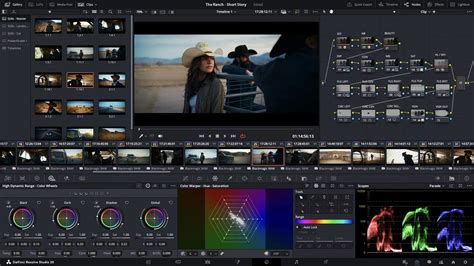
The Color page in DaVinci Resolve is your dedicated workspace for all things color. It offers a comprehensive suite of tools designed for precise color manipulation. Key components include:
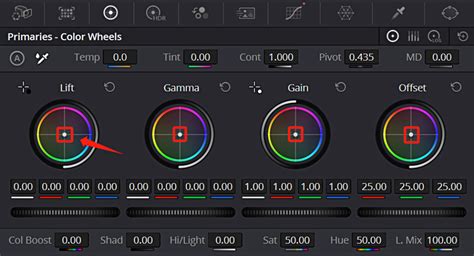
Color Wheels
DaVinci Resolve features two primary types of color wheels: Primaries and HDR Color Wheels. The Primaries include Lift, Gamma, Gain, and Offset wheels.
- Lift: Affects the shadows of the image.
- Gamma: Adjusts the midtones.
- Gain: Controls the highlights.
- Offset: Provides a broad adjustment, influencing the entire image in a specific direction.
The HDR Color Wheels are advanced tools for high dynamic range (HDR) grading, offering finer control over a wider range of luminance values.
Curves
Curves provide a more nuanced way to adjust an image's color and contrast. DaVinci Resolve offers various curve types:
- Custom Curves: For independent RGB and luma adjustments.
- Hue vs. Hue: Alters the hue of specific colors.
- Hue vs. Saturation: Adjusts the saturation of specific hues.
- Hue vs. Luma: Changes the brightness of specific hues.
- Luma vs. Saturation: Modifies saturation based on luminance levels.
- Saturation vs. Saturation: Adjusts saturation within a specific saturation range.
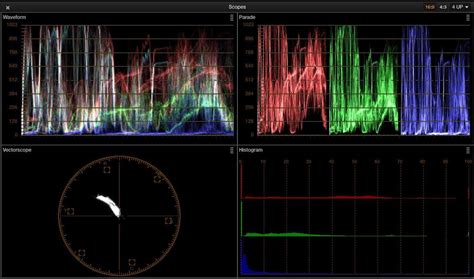
Scopes
Scopes are essential for objective color analysis and accurate grading. They provide visual representations of the color data within your image. Key scopes include:
- Waveform Monitor: Displays the brightness (luma) levels of the image.
- Vectorscope: Shows color distribution and saturation, invaluable for skin tones and white balance.
- Parade: Splits the image into RGB channels, aiding in color correction and tonal balance.
- Histogram: Displays the tonal distribution of the image across its luminance range.
- Chromaticity Scope: Helps determine if colors are within the acceptable boundaries for your project's delivery format.
Nodes
Color grading in DaVinci Resolve is performed using a node-based system. Each node acts as a layer, allowing for non-destructive editing and organized workflows. Unlike traditional layer-based systems, nodes enable you to connect, rearrange, and modify specific color effects without impacting the entire grade. While a single node can be used, a structured node tree is highly recommended for managing complex grades.
Understanding Log Footage and Color Space Conversion
Many professional cameras capture footage in a "log" format. Log footage is designed to capture the maximum possible dynamic range, preserving detail in both the brightest highlights and darkest shadows. This results in a "washed-out," desaturated image that provides significant flexibility in post-production.
If your footage is not in log format, it means your camera has already applied its own color space and profile. In such cases, you typically do not need a color space conversion to Rec.709.
For log footage, a conversion to Rec.709 is necessary to bring the image to a viewable standard. There are two primary methods for this conversion:
Using LUTs (Look-Up Tables)
LUTs are pre-defined color transformations that can quickly alter the look of your footage. For log footage, you can apply a technical LUT to convert it to Rec.709.
- Right-click on your clip in the node editor.
- Select LUT.
- Choose the appropriate LUT for your camera's log profile (e.g., Sony S-Log3 to Rec.709).
Applying a LUT can significantly alter saturation and exposure, bringing the image closer to its intended appearance. After the conversion LUT, you can add subsequent nodes for further adjustments.
Using Color Space Transform
Alternatively, you can use the Color Space Transform effect.
- Go to the Effects Library, type "Color Space Transform," and drag it onto a new node.
- In the effect's settings, select the Input Color Space and Input Gamma that match your camera's log footage (e.g., Sony S-Gamut3 Cine and Sony S-Log3).
- Set the Output Color Space to Rec.709 and the Output Gamma to 2.4.
Both methods achieve a similar result. The Color Space Transform can be more precise if your camera is well-represented, while LUTs offer a quick and often effective solution. It's good practice to label your nodes for clarity, for instance, "Rec.709 Conversion" or "CSC."
Pro Colorist Explains: CSTs vs Resolve Color Management
The Node Workflow: Correction Before Grading
A common misconception among beginners is to perform all adjustments after the color space conversion. However, the correct workflow dictates that you should make primary adjustments for exposure and white balance before the conversion. This is because working with log footage directly for these adjustments can be challenging due to its washed-out nature.
For organization, you can create multiple nodes before your conversion node. However, for simplicity, especially when starting, you can combine balance and exposure adjustments on a single node labeled "CC" for Color Correction.
Performing Color Correction
With your footage converted to Rec.709, you can now proceed with color correction.
Adjusting Exposure
Using the Curves panel or the Primary Color Wheels, focus on exposure.
- If using color wheels, start with the Lift, Gamma, and Gain wheels.
- Pull up the Lift to brighten the shadows if they are too dark.
- Adjust Gamma for midtones and Gain for highlights.
- The Offset wheel can provide a global adjustment.
- Pay close attention to the Scopes, particularly the Waveform Monitor and Histogram, to avoid clipping highlights or crushing shadows.
Adjusting White Balance
To achieve an accurate white balance:
- Use the Primary Color Wheels.
- Select the white balance eyedropper tool (if available) and click on a neutral white or grey area in your footage.
- Alternatively, use the Offset wheel to subtly shift the overall color balance. If your image has a green tint, move the wheel towards magenta; if it has a magenta tint, move towards green. Aim for neutral skin tones or a balanced grayscale appearance.
- The Vectorscope is invaluable here, helping you center colors and ensure they fall within expected ranges.
Adding Contrast and Saturation
Once exposure and white balance are corrected, enhance the image's impact:
- Use the Contrast and Saturation sliders in the Primary Color Wheels tab.
- Increase contrast to add depth and separation between light and dark areas.
- Boost saturation to make colors more vibrant and appealing.
- For more targeted adjustments, utilize the Curves panel, such as the Hue vs. Saturation curve, to selectively increase or decrease saturation in specific color ranges.
Creative Color Grading: Developing a Look
With color correction complete, you can now move on to color grading to achieve a specific aesthetic. This is where you make creative choices to tell your story and evoke emotion.
The "Teal and Orange" Look
A popular cinematic look, "teal and orange" utilizes complementary colors for high contrast. It typically involves pushing shadows towards teal and midtones/highlights towards orange.
- In the Color Wheels, use the Lift wheel to introduce teal into the shadows.
- Use the Gain wheel to push the highlights and midtones towards orange.
- The Hue vs. Hue curve can be useful to fine-tune these colors, ensuring that skin tones remain natural while achieving the desired contrast.
Bleach Bypass
This look creates a gritty, dramatic atmosphere with high contrast and desaturation, reminiscent of old film stock.
- Significantly lower the Saturation slider in the Color Wheels.
- Increase the Contrast slider to mimic the high contrast of the bleach bypass process.
- Consider adding film grain using Resolve FX plugins to further emulate the vintage film aesthetic.
Vintage or Retro Look
To evoke a nostalgic, warm-toned feel:
- Apply a subtle sepia tint (yellow or orange) using the Color Wheels.
- Reduce the overall contrast to simulate the muted quality of old film.
- Adding a vignette using Resolve FX can further enhance the vintage atmosphere.
Exaggerating a Sunset
For a clip featuring a sunset, the goal might be to emphasize its warmth and drama.
- On a dedicated "Grade" node (placed after your conversion), consider slightly increasing the Hue towards red and boosting Saturation.
- Within the Curves, you can lift the Reds channel to further enhance the fiery tones of the sunset.
- Adjusting midtones towards red and shadows away from red can create a more dramatic and visually appealing sunset.
Advanced Techniques and Workflow Tips
Using Qualifiers and Power Windows
- Qualifiers: Allow you to select and isolate specific colors, hues, or luminance ranges within your image. This is useful for making targeted adjustments, such as enhancing the color of a specific object or maintaining natural skin tones while altering the background.
- Power Windows: Enable you to create masks (shapes like circles, squares, or custom shapes) to isolate specific areas of the frame for grading. Combined with the tracker, these windows can follow moving objects, allowing for localized adjustments.
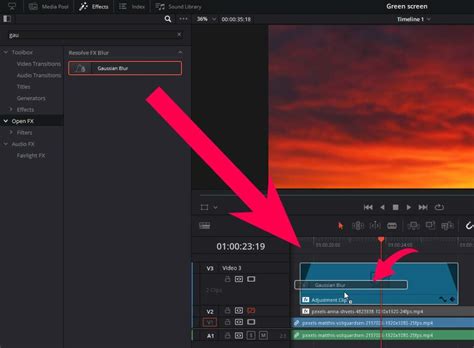
Adding Effects (Resolve FX)
DaVinci Resolve offers a library of GPU and CPU accelerated Resolve FX plugins. These can add various effects like:
- Glow: Creates a bloom effect, softening highlights and adding a dreamlike quality.
- Film Grain: Emulates the texture of traditional film stock.
- Vignette: Darkens the edges of the frame, drawing focus to the center.
Copying and Pasting Grades
If you have a grade you like on one clip, you can easily apply it to others:
- Middle-click on the graded clip in the timeline to copy its grade to the current clip.
- Alternatively, right-click on a clip in the gallery's "Stills Album" and select Apply Grade.
Saving Grades as Presets
To reuse your grades:
- In the Color page, open the Gallery.
- Right-click in the Stills Album and select Grab Still. This saves the current clip's grade as a still image.
- To apply this saved grade to another clip, select the clip and middle-click on the still in the gallery.
Working with RAW Footage
DaVinci Resolve supports most native camera RAW formats. This allows you to work directly with the unprocessed sensor data, offering maximum control over:
- Highlight recovery
- White balance
- Gamma and exposure
- Color temperature and tint
- Sharpness
RAW processing is non-destructive and occurs before the node editor. Access these controls via the RAW palette.
Utilizing Templates and Plugins
For increased efficiency, consider using customizable templates and plugins for DaVinci Resolve. Services like Storyblocks offer pre-made effects, transitions, and LUTs that can streamline your workflow.
Conclusion: The Power of Color
Mastering color grading in DaVinci Resolve is a journey that combines technical understanding with artistic vision. By diligently setting up your project, understanding the tools, and practicing different techniques, you can transform your footage into visually captivating narratives that resonate with your audience. Remember that color correction is the foundation upon which creative color grading is built. Experiment, practice, and always refer back to your scopes to ensure your grades are not only aesthetically pleasing but also technically sound.