Color grading plays a pivotal role in giving your video projects a professional and polished look. It sets the mood, enhances storytelling, and adds a professional touch to your footage. DaVinci Resolve, renowned for its robust color grading capabilities, offers various tools and techniques to achieve the desired aesthetic. One such technique is copying color grades, which allows you to replicate the color adjustments from one clip to another seamlessly. If you’ve meticulously crafted a color grade for one clip and want to effortlessly apply it to others, DaVinci Resolve makes it incredibly easy to copy and paste color grades across clips in just a few clicks or keyboard shortcuts. This guide will explore the most effective methods to copy color correction settings, whether you’re grading a documentary, short film, YouTube video, or client work.
Understanding the Fundamentals of Color Grading
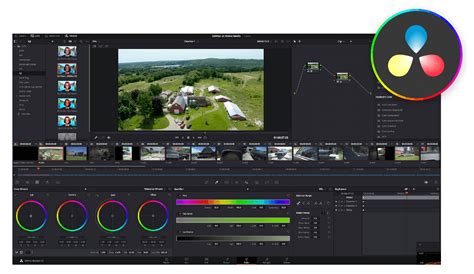
Before delving into the specifics of copying color grades, it’s essential to grasp the fundamentals of color grading. Color grading involves adjusting the color, contrast, and overall look of a video to evoke a particular mood or enhance its visual appeal. DaVinci Resolve’s color page provides everything you need for grading footage. Access it by clicking on the "Color" option in the application's interface.
The Importance of Copying Color Grades
Instead of grading each clip individually, copying your grade allows you to:
- Save time and effort: Avoid the tedious process of recreating the same adjustments on multiple clips.
- Maintain a consistent look: Ensure a uniform aesthetic across scenes, crucial for narrative coherence.
- Reuse grades as creative presets: Develop signature looks that can be applied to future projects.
- Quickly apply LUTs and node structures: Streamline the application of pre-made or custom color transformations.
- Improve editing workflows: Reduce the number of clicks and actions required for repetitive tasks.
Method 1: Quick Copy/Paste Using Keyboard Shortcuts
This is the fastest and most common method to copy and paste color grading from one clip to another. It’s ideal for applying a grade to a few clips or when you need to quickly replicate adjustments.
Steps:
- Open the Color Page in DaVinci Resolve.
- Click on the clip that has the desired color grade applied to select it.
- Press
Ctrl + C(orCmd + Con a Mac) to copy the grade. This action copies the entire node tree, including all color wheels, curves, LUTs, and effects. - Select the target clip(s) to which you want to apply the grade.
- To select a single target clip, simply click on it.
- To select multiple clips for applying the same grade, you can hold down the
Ctrlkey (orCmdon Mac) and click on individual clips, or hold down theShiftkey and click on the first and last clip in a sequence to select all clips in between.
- Press
Ctrl + V(orCmd + Von a Mac) to paste the copied grade onto the selected clip(s).
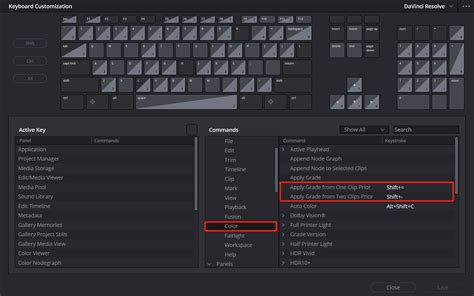
For even faster workflows, especially when copying grades between dozens of clips, you can pair this technique with hardware controls like the DaVinci Resolve Micro Color Panel to speed up primary corrections and fine-tuning.
Method 2: Using the Color Gallery → Still Reference
This method is ideal if you want to save a grade and reuse it later, even across different projects. It’s a powerful way to create a library of your signature looks.
Steps:
- Navigate to the Color Page.
- Select the clip that contains the color grade you wish to save.
- In the Viewer, right-click and choose "Grab Still". This action captures a snapshot of the current frame, along with its associated color grade.
- The captured still will appear in the Gallery panel, typically located in the top-left corner of the Color Page. You'll notice that the still saves both the look and a thumbnail preview, which is helpful for visual references.
- Now, select the new clip(s) in your timeline that you want to apply this grade to.
- In the Gallery panel, right-click on the saved still and choose "Apply Grade".
How To Use POWER GRADES to help speed up your Color Grading Workflow | Quick Tip Tuesday!
This method allows you to transfer color grades between projects. To do so, you can export the still (by right-clicking on it and selecting "Export"). Then, import this exported still into another project's gallery and apply the grade as usual.
Method 3: Using Middle-Click to Apply Grade
This technique is excellent when you're working quickly with many clips on the timeline and want an even more streamlined approach. It bypasses menus and shortcuts for instant application.
Steps:
- In the Color Page, locate the graded clip on your timeline.
- Select the ungraded target clip on the timeline.
- With the target clip selected, perform a middle-click (a click with the scroll wheel) on the graded clip in the timeline.
- DaVinci Resolve will instantly copy and paste the grade, preserving the full node structure.
This method offers a no-menu, no-shortcut approach, making it incredibly fast for applying grades sequentially.
Bonus: Copying Only One Node (Selective Grading)
Sometimes, you might not want to copy the entire color grade. Perhaps you only want to replicate a specific adjustment, like a creative LUT, a glow effect, or a power window, while leaving the rest of the grading intact.
Steps:
- In the graded clip's Node Editor, right-click on the specific node you wish to copy and select "Show Node Label" if it's not already visible.
- Select that node.
- Press
Ctrl + C(orCmd + Con Mac) to copy the selected node. - Navigate to the target clip.
- If the target clip doesn't have enough nodes, add a new node by right-clicking in the Node Editor and selecting "Add Node".
- Select the newly created node in the target clip.
- Press
Ctrl + V(orCmd + Von Mac) to paste the copied node.
This selective method is especially useful when applying creative LUTs or glow nodes, allowing for precise control over which elements of a grade are transferred.
PowerGrades and Memories: Advanced Grade Management
Beyond simple copying, DaVinci Resolve offers more advanced ways to manage and apply grades.
PowerGrades
PowerGrades allow you to transfer color grades between projects effortlessly. Think of PowerGrades as a cloud repository or a dedicated library for your color grades.
Steps to Save a Grade as a PowerGrade:
- Begin by selecting the video clip containing the desired color grade to be copied.
- In the Color Page, right-click on the image in the Viewer and select "Grab Still".
- Navigate to the Gallery panel.
- Right-click on the still you just captured and choose "Save as PowerGrade". You can also drag and drop the still into the PowerGrade section of the gallery.
Steps to Apply a PowerGrade:
- To apply this grade to a clip (or multiple clips), select the clips you want to apply this grade to.
- In the Gallery panel, locate your saved PowerGrade.
- Right-click on the PowerGrade and select "Apply Grade".
Memories
DaVinci Resolve also allows you to save and apply custom grading presets using "Memories." This is particularly useful for making bulk adjustments to multiple clips or for keeping track of temporary grades.
Steps to Save a Grade using Memories:
- After you've applied color grading to a clip, click on the "Color" option in the menu bar at the top.
- Navigate to "Memories" and opt for "Save Memory A" (or any other available memory slot) to record the color grade.
Steps to Apply a Grade from Memory:
- Select the video clip intended to receive the copied color grade.
- Go to "Memories" and select the memory slot (e.g., "Memory A") that contains the grade you wish to apply.
Adjustment Clips: Uniform Grading for Multiple Clips
Adjustment clips stand out as one of the most potent features within Resolve, particularly in the realm of color grading. Instead of applying color adjustments directly to individual clips, consider using adjustment layers to apply uniform color grades to multiple clips simultaneously. This is an efficient way to ensure consistency across a sequence of shots.
Steps to Use Adjustment Clips:
- Navigate to the Edit Page.
- In the "Toolbox" (often found at the top left), find "Adjustment Clip" and drag it onto your timeline, positioning it above the clips you want to grade.
- Switch to the Color Page. Any grading you apply to the adjustment clip will affect all the video clips positioned directly underneath it on the timeline.
For iPad Users: Copying Grades Without a Keyboard
For users working with DaVinci Resolve for the iPad without an external keyboard, copying color grades can present a unique challenge, as the common keyboard shortcuts are unavailable. However, there are effective workarounds.
Workaround 1: Using the Edit Page
- Navigate to the Edit Page.
- In the screenshot, observe that blue-marked clips already possess color grades, while green ones lack color grading.
- Select the desired clip and press and hold with the pencil tool (effectively a long-press, similar to a right-click).
- In the subsequent window, select only "Color Correction" inside the "Video Attributes." This allows you to copy the color grading attributes.
Workaround 2: Using Grab Still and Applying (Color Page)
- Begin by selecting the clip containing the desired color grade.
- In the Color Page, go to the Viewer and perform a long-press (right-click equivalent) and choose "Grab Still".
- Now, select the clip(s) you want to apply this grade to. For multiple selections on iPad, you can tap on the first clip, then tap on subsequent clips to add them to the selection.
- In the Gallery panel (accessible within the Color Page interface), right-click (long-press) on the still you created and choose "Apply Grade".
Workaround 3: Copying Specific Nodes (Color Page)
If you need to copy just a specific node:
- Select the clip with the color grade you want to copy.
- In the Node Editor, right-click on the specific node and select "Copy Node".
- Select the target clip(s).
- In the target clip's Node Editor, right-click in an empty area and select "Paste Node".
Shot Match: Automatic Color Matching
DaVinci Resolve also offers an automated approach to color matching. If your goal is to match the color and exposure of one clip to another, the "Shot Match to This Clip" feature is invaluable.
Steps:
- Select a clip in your timeline.
- Right-click on another clip (the reference clip) and choose "Shot Match to This Clip" from the menu. Resolve will analyze the selected clip and attempt to automatically match its color and exposure to the reference clip.
Considerations for Consistency
While copying color grades can expedite the editing process, it’s crucial to maintain visual consistency throughout your project. Not every shot will require an identical grade. Sometimes, minor adjustments may be necessary after applying a copied grade to account for variations in lighting or camera angle. Always review your graded clips in sequence to ensure a cohesive final look.
Beyond Built-in Tools: Enhancing Your Workflow
For those looking to further streamline their color grading workflow, consider dedicated hardware controllers like the TourBox. Mapping your most-used functions and shortcuts to physical buttons and knobs on such devices can significantly enhance efficiency and precision, whether you're adjusting color parameters, fine-tuning grades, or navigating through your timeline.
Addressing Common Questions
Will copying a grade overwrite my existing grade?Yes, by default, copying and pasting a grade will overwrite any existing grading on the target clip. If you want to preserve your current work on the target clip, it's advisable to add a new node first and then paste the grade into that empty node.
Can I copy grades across different projects?Yes, you can copy grades across different projects primarily by using the "Grab Still" and "Save as PowerGrade" features in the Color Gallery. Exporting a still or saving it as a PowerGrade allows you to import and apply it in a new project.
Can I copy Fusion effects or Edit page edits too?No. Copying a grade in DaVinci Resolve specifically copies the color grading information from the Color page's node tree. Fusion compositions, transitions, or effects created on the Edit page will not be transferred using these methods.
Can I save my color grade as a preset?Yes. In the Color Gallery, you can right-click on a still and choose "Export" to save it as a .drx file, which can then be imported and used as a preset in other projects.
Mastering the art of copying color grades in DaVinci Resolve opens up a world of possibilities for editors and colorists. Whether you prefer the simplicity of keyboard shortcuts, the versatility of the Color Gallery, or the speed of middle-clicking, DaVinci Resolve offers a range of powerful tools to suit your workflow. By following the step-by-step instructions outlined in this guide, you can streamline your editing process, achieve visual consistency, and elevate the quality of your video projects.