If you're at all interested in using your phone to take great photos, you've probably heard of VSCO. In our last tutorial on VSCO, How to Take Photos with the VSCO Cam App, we took an in-depth look at VSCO's camera capabilities and why it beats out your phone's default camera app. This time, let's take a walk through VSCO's filters and editing options, and explore how to translate that signature VSCO look into Adobe Photoshop for more advanced control and integration into your professional workflow.
So it's no surprise that when VSCO launched a free mobile app for iOS and Android, photographers flocked to it as a way to give their mobile images a filmic look. As far as mobile apps go, VSCO has it all: a great camera, sophisticated filters and editing options, and social features that allow you to instantly publish your images online. It's no wonder it frequently tops the Photo sections of the mobile app stores. VSCO is a free app available for iOS on the App Store and the Google Play Store.
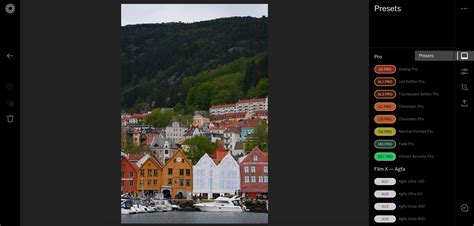
It's important to note that people sometimes confuse the mobile VSCO app with the VSCO Lightroom presets. The middle icon for VSCO is the focus of this tutorial, and is called the Studio. VSCO for Mobile does a lot, from acting as a photo exploration service, to a capture and editing tool, to a social service of its own for sharing photos.
Understanding VSCO's Core Functionality
To capture images from within VSCO, tap the Studio icon at the bottom of the app. If you use another app to capture images, you can import them later into VSCO as well. Importing them to VSCO creates a copy. After the import menu opens, tap on the images to import. VSCO doesn't automatically delete images from your camera roll. Once you've imported your images into VSCO, it creates a copy contained solely within the app.
To apply a filter to an image, double tap on an image to open it. At the bottom of the app, you'll see small thumbnails. From the Studio view, double tap on an image to open it. You can scroll to the right to apply other presets. If you tire of the built-in presets, VSCO also offers additional presets in the VSCO store right inside of the app. To fade a preset, start by tapping on the thumbnail for the preset. Pull the slider to the left to fade the preset slightly. Also try out applying multiple presets to an image.
In addition to presets, VSCO offers the standard suite of correction tools, such as exposure, contrast, and sharpening. To launch the correction tools, select an image from Studio view. Tap the slider icon just like you did when we entered the presets menu. VSCO offers a litany of tools for correcting and styling your images. These controls appear below an image. Many of these features will be familiar if you've used any other photo editor.
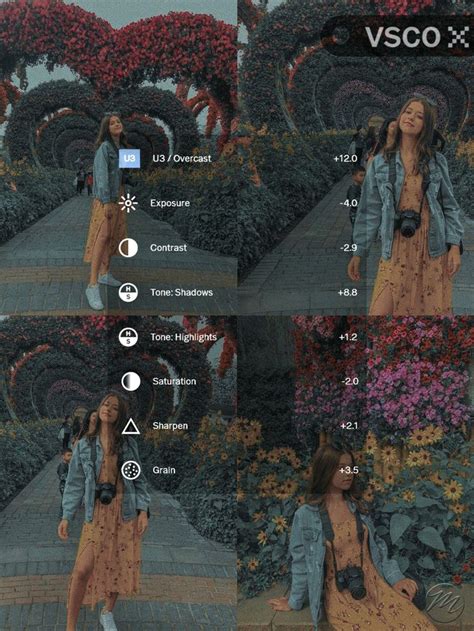
Fading an image gives it that beautiful aged image look. The fade look is similar to tone curve adjustments applied in apps like Adobe Lightroom. A slider from 0 to 12 adjusts the amount of fade to apply to an image. Broadly speaking, fade works by lifting the shadows and dropping the highlights (slightly) to create a low-contrast look. Film is often preferred for its unique color renditions. Two of my favorite tools in VSCO are the shadows tint and highlight tint options. These days, the high ISO capabilities of modern digital cameras have reduced much of the grain seen in images. VSCO has a great option for making grain look more random and film-like.
When you've finished editing your image, you'll need to export it from VSCO. When I finish editing an image, I save my edited image to the camera roll and delete it from VSCO to save space on my iPhone. With a single image selected, tap the "…" menu. You can also export multiple images from VSCO.
The Popularity of VSCO Filters
Using the best VSCO filters can totally transform your Instagram feed, which explains the popularity of the VSCO app. When Instagram was first born, it was focused on its own retro, cool filters, but since the platform has added more functions, its filters have been sidelined. Third-party app VSCO (previously known as VSCO Cam) has filled the gap. Providing a range of expressive filters, VSCO allows you to elevate imported photos and also take photos within the app itself. Many of the filters are free forever, and there are over 100 others, which are included in a yearly subscription.
On the whole, a VSCO filter will give your images a subtle, filmic look that, when used thoughtfully, can raise them above the norm and add a real touch of sophistication. You can also, if you wish, tweak things further with the app’s own toolkit, which allows finer adjustments to fade, clarity, skin tone, tint, sharpen, saturation, contrast, temperature, exposure, and much more.
Rachel Etheredge, a strategist at Creative Parc, is among the app's fans. “I wouldn’t use it for curated design work on my business feed, of course,” she notes. “But I love it for my personal Instagram.” “I pay for all the filters through the annual membership,” she explains. “I start with one, and tweak and edit it with the photo editing tools until I get where I like. You can also copy the effect you create onto any other photo, so you don’t have to remember all your tweaks.”
Sharing on Instagram and Beyond
VSCO’s makers would, of course, like you to share your newly edited images among its global community within the app, and many do. But there’s nothing to stop you sharing them to Instagram too, or instead, and a quick search for #vsco or #vscocam will show you how tens of millions are doing just that.
VSCO offers many more filters than Instagram, so you stand a better chance of finding one that will help your image stand out. But with hundreds to choose from, that can be a time-consuming business, so it’s good to have a few trusty go-tos to start out with.
✧ BEST VSCO FILTERS WITH SETTINGS & EXAMPLES ✧
Exploring Popular VSCO Filters
We've divided some of the best paid-for and free VSCO filters to make things easier, and used the same image so you can see the difference between the filters.
Best Free VSCO Filters
- M3: A natural-feeling filter that tweaks the colors to bring a soft brown tone. Perfect for nature shots (especially with autumnal vibes), it's slightly faded and underexposed, leading to a subtle change that speaks volumes.
- P5: A popular VSCO filter that makes everything feel a little more edgy, a bit cooler, and more atmospheric, like the light before a thunderstorm. It's a great filter for when you want to add a little grunge and grit to your image. You can also add scratches and grain to the image using this filter to really amp up the atmosphere.
- C1: Part of the Vibrant Classic series of presets (C1-C3), intended for a variety of scenarios and uses. It gives your images a colorful, vibrant look that works really well on subjects like flowers, nature, and beach scenes.
- F2: From the Mellow Fade F Series preset pack (F1-F3), which aims to replicate the feel of analogue film stock. F2 is an understated matte filter that’s great for enhancing tone and for bringing to life intimate, everyday moments.
- M5: The second pack in the M Series (M4-M6) revives the vintage look of photo albums from the 1970s beautifully. M5 offers a mellow, desaturated look that gives a retro feel to both urban and rural environments, and works well with portrait shots too.
- G3: The Portraits G Series (G1-G3) is aimed at enhancing your portraits by flattering skin tones. G3 can sharpen the colors and vibrancy of still-life scenes, too, offering a slightly surreal twist on reality that can completely transform a shot when it works.
- B1: From the Black & White Classic B Series (B1-B3), B1 is a great way to turn your shots black and white in a subtle way that doesn’t just blindly remove color but evokes a true vintage feel. It offers excellent shadow detail and contrast that brings out little details that other filters might have dulled down.
Best Paid-For VSCO Filters
- S2: VSCO labels S2 as bright and clean, and it delivers a light finish that feels classic and fresh all at once.
- HB1: Created in collaboration with men's fashion and streetwear brand Hypebeast, HB1 gives a dramatic, gritty look to photos shot on city streets. It can turn a banal scene into something reminiscent of an urban hip hop video and even makes landscapes look cool.
- A6: A popular VSCO preset that offers beautifully clean brightness while adding warmth to the richer tones.
- Dog 3: Inspired by Wes Anderson's film "Isle of Dogs," this filter has purple-pink neon hues and is perfect for early evening light, inspired by a lab in Megasaki City.
- A4: Another preset inspired by analogue film from the Aesthetic Series (A4-A6), characterized by natural tones, subtle color shifts, and slight dimming. A4 is great for enhancing interior photography.
Translating VSCO Filters to Photoshop: The Power of LUTs
While the VSCO app is excellent for mobile editing, for more precise control, batch processing, and integration into a professional workflow, replicating VSCO filters in Photoshop is highly beneficial. This is where understanding Look-Up Tables (LUTs) becomes crucial.
A LUT is essentially a table that maps input colors to output colors. When you apply a VSCO filter, you're applying a LUT that has been pre-programmed with specific color and tonal adjustments. In essence, filters are instructions for generating a color mapping.

The brilliance of a LUT is that it contains information about how original colors should be transformed. When an app like VSCO applies a filter, it reads the color of each pixel in your image and then uses the LUT to determine the new color for that pixel.
The Limitations of the LUT Approach in Mobile Apps
From an app developer's perspective, shipping LUTs is efficient. However, from a photographer's perspective, it can be limiting. If a filter doesn't quite match your expectations or style, you're often out of luck. You might try to use the app's other adjustment tools to compensate, but this can lead to repetitive and time-consuming work, especially when editing multiple images.
Recreating VSCO Filters in Photoshop: A Deeper Dive
While VSCO's mobile app uses LUTs internally, achieving a similar effect in Photoshop often involves understanding the underlying principles of color grading and tonal adjustments. This can be done by either finding LUTs that emulate VSCO filters or by manually recreating the look using Photoshop's powerful tools.
Method 1: Using VSCO-like LUTs in Photoshop
Many third-party resources offer LUTs designed to emulate popular VSCO presets. These can be a quick way to achieve a similar aesthetic.
- Find and Download LUTs: Search online for "VSCO LUTs" or "film emulation LUTs." Many reputable photography sites offer free or paid packs.
- Import into Photoshop:
- Open your image in Photoshop.
- Go to
Layer > New Adjustment Layer > Color Lookup.... - In the Properties panel, click the dropdown menu next to "3DLUT File."
- Select "Load 3D LUT…" and navigate to where you saved your downloaded LUT file.
- Adjust Opacity and Blend Modes: Once the LUT is applied, you can adjust its opacity and experiment with different blend modes (e.g., Soft Light, Overlay) to fine-tune the effect and integrate it more naturally with your image.
Method 2: Manually Recreating VSCO Looks in Photoshop
This method offers the most control and allows you to truly understand how VSCO filters achieve their look. It involves using Photoshop's adjustment layers to mimic the key characteristics of VSCO presets.
Step 1: Analyze the VSCO Filter
Before you start adjusting, carefully examine the VSCO filter you want to replicate on a sample image. Pay attention to:
- Color Cast: Is it warm, cool, greenish, or magenta-biased?
- Contrast: Is it high, low, or crushed in the shadows/highlights?
- Saturation: Are the colors vibrant, muted, or selectively desaturated?
- Tonal Range: Are the shadows lifted, highlights compressed, or is there a specific curve applied?
- Grain: Does it have a subtle or pronounced film grain?
- Specific Color Shifts: Do blues lean towards cyan, greens towards yellow, or reds towards orange?
Step 2: Apply Key Adjustment Layers in Photoshop
Start with the foundational adjustments and build from there.
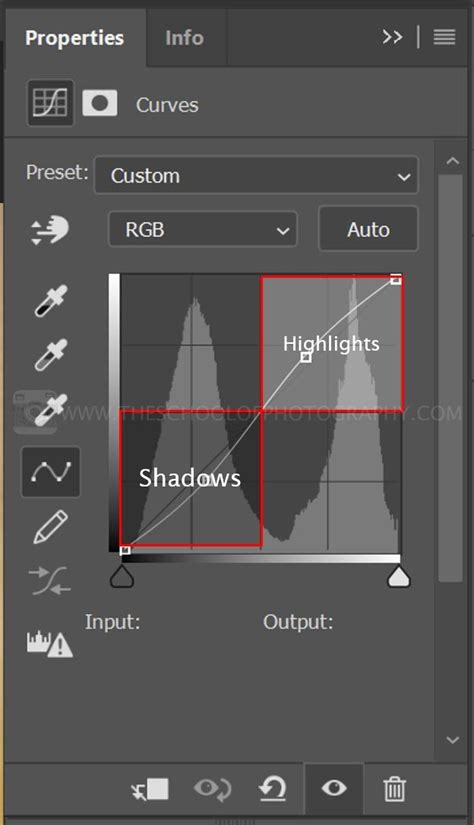
Curves: This is your primary tool for adjusting contrast and tonal range. VSCO filters often employ specific S-curves or lifted shadows.
- Add a
Curvesadjustment layer. - Experiment with pulling the shadow endpoint up slightly (lifting shadows) and the highlight endpoint down slightly (compressing highlights) to mimic the "fade" effect.
- Create an "S" curve for increased contrast, or an inverted "S" curve for a flatter look.
- You can also adjust individual Red, Green, and Blue channels within Curves to fine-tune color shifts.
- Add a
Color Balance / Selective Color: These tools are essential for adjusting the overall color cast and specific color ranges.
- Add a
Color Balanceadjustment layer. Use the sliders for Shadows, Midtones, and Highlights to introduce warmth (yellow/red) or coolness (blue/cyan). - Add a
Selective Coloradjustment layer. This allows you to target specific colors (Reds, Yellows, Greens, Cyans, Blues, Magentas) and adjust their Cyan, Magenta, Yellow, and Black components. This is crucial for replicating the nuanced color shifts seen in VSCO filters (e.g., making blues more cyan, or greens more yellow).
✧ BEST VSCO FILTERS WITH SETTINGS & EXAMPLES ✧
- Add a
Hue/Saturation: Use this to control the overall intensity of colors.
- Add a
Hue/Saturationadjustment layer. You can decrease the overall saturation for a more muted look or selectively desaturate specific color ranges.
- Add a
Levels: While Curves is often more powerful, Levels can be useful for quick adjustments to black points, white points, and midtones.
Vibrance/Saturation: VSCO filters often have a specific balance between vibrance and saturation. Vibrance is generally preferred as it intelligently boosts less saturated colors while protecting skin tones.
Split Toning (Optional): For more advanced color grading, consider using the
Split Toningoption within the Curves adjustment layer or a dedicatedColor Lookuplayer with a split toning effect. This allows you to add different color tints to the highlights and shadows, mimicking film's unique color rendition.Grain: To add that authentic filmic texture:
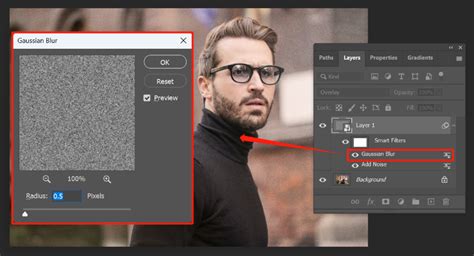
- Create a new layer.
- Fill it with 50% gray (
Edit > Fill > 50% Gray). - Set the blend mode of this layer to
OverlayorSoft Light. - Go to
Filter > Noise > Add Noise.... Choose "Gaussian" and "Monochromatic." Adjust the amount to replicate the desired grain intensity. You can also experiment with different noise types and amounts for finer or coarser grain.
Fading and Vignetting:
- Fade Effect: As mentioned, lifting shadows and slightly lowering highlights in Curves is the primary way to achieve a fade.
- Vignette: Use the
Lens Correctionfilter (Filter > Lens Correction...) and go to theCustomtab. Adjust theVignettesliders to darken the edges of the image, drawing the viewer's eye to the center. Alternatively, use a soft black brush on a new layer set toSoft LightorOverlayat low opacity.
Step 3: Saving Your Custom Preset/Action
Once you've dialed in the adjustments to closely match a VSCO filter, you can save your work in a few ways:
- Save as a Photoshop Action: This is ideal for batch processing. Go to
Window > Actions, create a new action, record your adjustment layers, and then stop recording. You can then play this action on any image. - Save as a Preset: For specific filters, you can group your adjustment layers and save them as a preset that can be applied within Photoshop or other compatible software.
- Create a Custom LUT: For ultimate portability and use in other applications, you can export your combined adjustment layers as a custom LUT. In Photoshop, this often involves using the
Generate Texture Presetfeature or third-party plugins.
Advanced Techniques and Considerations
Film Emulation with VSCO's Film X Presets
VSCO's own Film X presets are meticulously crafted to emulate specific analog film stocks. While these are primarily designed for Lightroom, the principles behind them can inform your Photoshop workflow. Understanding how film stocks like Kodak Portra, Fuji Velvia, or Ilford HP5 behave in terms of color, contrast, and grain can help you make more informed adjustments in Photoshop.
Understanding Color Spaces and Profiles
For accurate color translation, ensure you're working within consistent color spaces (e.g., sRGB for web, Adobe RGB for print). Understanding how different camera profiles and color management settings affect your image is also key to achieving predictable results.
The Importance of Shooting RAW
To get the most out of any editing process, especially when aiming for specific looks like those from VSCO, shooting in RAW format is highly recommended. RAW files contain much more image data than JPEGs, offering greater flexibility for adjustments to exposure, white balance, and color without introducing artifacts or significant quality loss.
Iterative Refinement and Personal Style
Recreating a VSCO filter is not about exact replication but about capturing its essence. As you become more familiar with Photoshop's tools and the characteristics of different film aesthetics, you'll develop your own signature style, potentially combining elements from various VSCO filters or creating entirely new looks. The goal is to use these tools to enhance your vision, not just to mimic existing presets.
By combining the intuitive interface of VSCO with the powerful capabilities of Photoshop, you can achieve a sophisticated, filmic aesthetic in your photography, elevating your images to a professional standard.