Photoshop, a powerhouse for digital artistry and photo manipulation, relies heavily on its layer system for flexibility and creative control. Layers act as individual levels within an image, allowing users to edit elements separately without affecting others. This granular control is fundamental to complex compositions and intricate edits. However, a common point of confusion and occasional frustration arises when users need to reverse the process of merging layers - essentially, how to "unmerge" them. While Photoshop doesn't offer a direct "unmerge" button, understanding its workflow and employing specific techniques can effectively restore or preserve the original layered structure.
Understanding Merging vs. Flattening
Before delving into "unmerging," it's crucial to distinguish between merging and flattening an image in Photoshop. Both actions combine multiple layers into a single entity, but they differ in scope and outcome.
When you flatten an image, you combine all layers into a single background layer. This process discards any hidden layers and replaces any transparent areas with white. Flattening is often done to reduce file size or prepare an image for certain output formats.
Merging layers, on the other hand, offers more selective control. You can choose to merge all visible layers or only the specific layers you have selected. This allows for consolidation of related elements while potentially keeping other layers intact.
However, it's important to note that both methods are destructive. Once layers are merged or flattened, the original individual layers are lost, making direct "unmerging" impossible in the strictest sense. This is why adopting a non-destructive workflow is paramount for efficient and reversible editing.
The Challenge of "Unmerging" Layers
The fundamental problem with merging layers in Photoshop is that the action destroys the original layers. This means it's not a non-destructive approach to photo editing. If you merge layers and then realize you need to edit them individually, you're faced with a challenge. However, there are several options available if you discover the need to revert soon after merging.
Reclaiming Your Layers: Strategies for "Unmerging"
While a direct "unmerge" command doesn't exist, Photoshop provides several methods to effectively achieve a similar outcome or to recover from an accidental merge. The success of these methods often depends on how recently the merge occurred and what subsequent actions have been taken.
1. The Power of Undo
The most immediate and straightforward way to "unmerge" layers is by using the Undo function. If you realize you've merged layers unintentionally, the first thing you should do is press Command/Ctrl + Z (Undo).
If you've performed other actions after merging, you can repeatedly use the Undo shortcut to step back through your editing history until you reach the state before the merge occurred. However, it's critical to understand that this method will also undo any work you've done after the merge. This makes it ideal for immediate corrections but less effective if significant editing has taken place.
2. Harnessing the History Panel
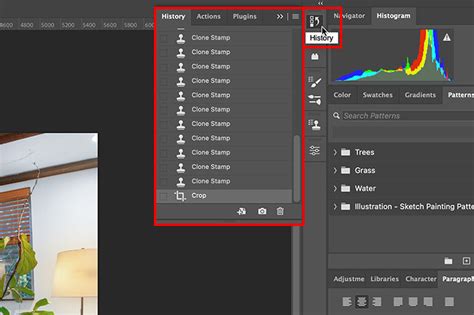
For situations where you've performed multiple steps after merging, the History Panel becomes an invaluable tool. Photoshop keeps a record of your recent adjustments, providing a snapshot of your document at each step.
To use the History Panel:
- Navigate to Window > History to open the panel.
- You will see a list of recent adjustments made during your current Photoshop session.
- Simply click on the state before the "Merge Layers" action. This will revert your document to that precise point, effectively undoing the merge and any subsequent edits.
It's worth noting that the number of history states is configurable. You can increase this number in Photoshop > Preferences > History States. However, be mindful that a very high number of history states can potentially impact software performance, leading to lag.
3. Preserving Layers Before Merging: Proactive Strategies
The most effective way to deal with the desire to "unmerge" is to avoid destructive merging in the first place. Photoshop offers several non-destructive alternatives that allow you to achieve the visual effect of merged layers while retaining the ability to edit them individually later.
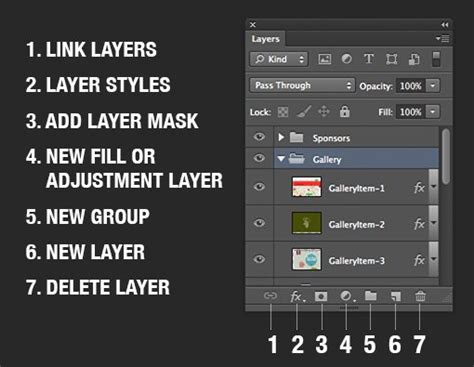
a. Grouping Layers:Instead of merging layers, consider grouping them. Select the layers you intend to merge and press Command-G (Group). This bundles them into a folder within the Layers panel, allowing you to collapse or expand the group as needed. You can rename groups for better organization, making complex projects much more manageable.
b. Duplicating and Merging Visible Layers:A robust method to preserve your original layers is to create a merged copy.
- Select the layers you wish to merge.
- Press Command-Option-Shift-E (macOS) or Ctrl-Alt-Shift-E (Windows). This command creates a duplicate of all selected layers and merges them into a new layer above the originals, leaving your original layers untouched.
c. Utilizing Smart Objects:Smart Objects are a cornerstone of non-destructive editing in Photoshop. By converting layers or groups of layers into a Smart Object, you essentially encapsulate them in a container that preserves their original data and allows for transformations and edits without permanently altering the underlying pixels.
To convert to a Smart Object:
- Right-click on the layer or layers in the Layers panel.
- Select Convert to Smart Object.
The layers will now appear as a single Smart Object layer. The magic happens when you need to edit the contents:
- Double-click the Smart Object layer thumbnail. This will open the Smart Object in a new tab.
- Within this tab, you can edit each original layer individually.
- Save the Smart Object tab (File > Save), and your changes will be reflected in the original project window.
If you later decide you need to break down a Smart Object back into its constituent layers, simply right-click on the Smart Object layer in the Layers panel and select Convert to Layers. This makes Smart Objects incredibly flexible for managing and "unmerging" content.
Smart Objects in Photoshop: Learn The Basics
4. Recreating Layers (When All Else Fails)
In scenarios where the document has been closed, the History Panel is no longer helpful, and no proactive measures were taken, the only recourse might be to manually recreate the layers. This involves using selection tools (like the Marquee, Lasso, or Quick Selection tools) or masks to isolate elements from the merged layer and then copying them to new, separate layers. If the original assets were separate files, you may need to re-import them. This method is time-consuming and prone to accuracy issues, highlighting the importance of the previously mentioned strategies.
Best Practices for Layer Management
Beyond "unmerging," effective layer management in Photoshop is key to a smooth workflow.
- Naming Layers: Always give your layers descriptive names. Double-click the layer name in the Layers panel and enter a clear, concise name. This makes it significantly easier to identify and manage layers, especially in complex documents.
- Color Coding: Assigning colors to layers and groups can visually organize your workspace. Right-click on a layer or group and choose a color from the options. This helps in quickly locating related elements.
- Organizing with Groups: As mentioned, grouping is essential for tidiness. Use groups to consolidate related elements, such as background elements, character components, or UI elements.
- Duplicating Before Destructive Actions: Before performing any potentially destructive action like rasterizing text or merging layers, duplicate the layer or group first. This provides a safety net, allowing you to revert to the original if needed. Right-click the layer and select "Duplicate Layer."
Understanding Rasterization
It's important to understand the concept of rasterization. Layers containing vector data (like type layers, shape layers, or Smart Objects) or generated data (like fill layers) cannot be directly edited with painting tools or filters. To apply such edits, these layers must be rasterized, converting them into pixel-based layers. Once rasterized, the original editable data is lost. Therefore, it's highly recommended to duplicate a layer before rasterizing it, ensuring you retain the original editable version.
Conclusion: Embracing Non-Destructive Workflows
The ability to "unmerge" layers in Photoshop is not about a single button press but about employing smart strategies to either recover from an accidental merge or, more importantly, to prevent the loss of original layer data in the first place. By consistently utilizing tools like Undo, the History Panel, layer grouping, and especially Smart Objects, you can maintain a flexible and non-destructive workflow. This approach not only saves time and reduces frustration but also empowers you to make more creative decisions with the confidence that your original work is always recoverable. Mastering these techniques is fundamental to unlocking the full potential of Photoshop's powerful layer-based editing environment.