DaVinci Resolve, a titan in the post-production world, offers a powerful suite of tools designed to streamline the video editing and color grading process. Among these, the "Scene Cut Detection" feature stands out as a significant time-saver, particularly for editors and colorists dealing with extensive footage. This advanced functionality automates the identification and separation of individual scenes within a single video file, transforming a potentially tedious manual task into a swift, automated process.
Understanding Scene Cut Detection in DaVinci Resolve
At its core, Scene Cut Detection in DaVinci Resolve is an intelligent feature that analyzes a continuous video file and automatically pinpoints where one scene ends and another begins. This capability is invaluable when working with long-form content, such as entire events, documentaries, or raw camera footage that has not been pre-edited. Instead of painstakingly scrubbing through hours of video to manually mark each cut, users can leverage Resolve's algorithms to perform this task with remarkable speed and accuracy.
The software achieves this by employing sophisticated analytical algorithms. These algorithms meticulously examine various visual elements within the video stream, looking for discernible changes. Key indicators that signal a new scene include shifts in lighting conditions, alterations in camera angles, or significant changes in motion patterns. These are all common cues that editors and directors use to delineate distinct segments of a narrative or recording. Once these transitions are identified, DaVinci Resolve can then automatically generate separate, individual clips for each detected scene. This not only simplifies the editing workflow but also makes managing and organizing large volumes of footage significantly more efficient. For professionals under tight deadlines, this feature represents a crucial advantage, freeing up valuable time for more creative and nuanced aspects of post-production.
The Workflow: How to Utilize Scene Cut Detection
Implementing Scene Cut Detection in DaVinci Resolve is a straightforward process, integrated seamlessly into the software's workflow. The journey begins on the Media page, the central hub for importing and organizing all project assets.
Importing Your Footage: Begin by importing your video file into DaVinci Resolve's media pool. This is where all your raw footage, audio, and other media assets reside.
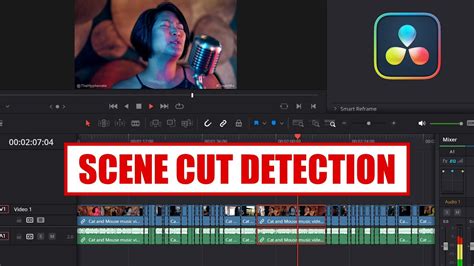
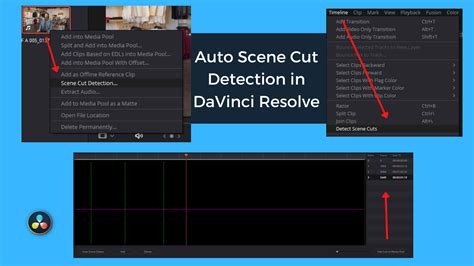
Initiating Scene Cut Detection: Instead of simply dragging and dropping the clip into your project or timeline, you'll need to access the Scene Cut Detection function. Locate the clip you wish to analyze within the media pool. Right-click on the clip, and from the contextual menu that appears, select "Scene Cut Detection."
The Cut Detection Window: This action will open a dedicated "Cut Detection" window. Within this interface, you'll find the primary tool for initiating the analysis. Click on the "Auto Scene Detect" button, typically located in the lower-left corner of this window.
Algorithmic Analysis: DaVinci Resolve will then commence its analysis of the selected clip. The software's algorithms will process the video, identifying potential transition points between scenes.
Reviewing and Adjusting: As the analysis progresses, you will observe visual feedback within the Cut Detection window. Vertical lines on a graph often represent the algorithm's confidence level in detecting a scene cut. A key element here is the "purple horizontal threshold line." If the confidence of a detected cut exceeds this threshold, DaVinci Resolve registers it as a definitive scene break. The viewer pane within this window is also crucial. It will display the frame at the current playhead position, offering a side-by-side view of the final frame of the preceding clip on the left and the initial frame of the current clip on the right. This visual comparison aids in evaluating the accuracy of the detected cuts.
Fine-Tuning Sensitivity: A critical aspect of achieving optimal results is the ability to adjust the detection sensitivity. This is often managed via a "sensitivity slider." Moving this slider to the right increases the software's aggressiveness in identifying cuts, making it more likely to detect subtle transitions. Conversely, moving it to the left decreases sensitivity, making it more selective and potentially missing finer cuts. Experimenting with this slider is often necessary to match the specific characteristics of your footage.
Adding Detected Clips to the Media Pool: Once you are satisfied with the detected cut points and have made any necessary adjustments, you can finalize the process. Click on the "Add Cuts to Media Pool" button. This command instructs DaVinci Resolve to create new, individual clips in your media pool, each corresponding to a detected scene. These newly created sub-clips can then be seamlessly integrated into your project timeline, just like any other footage.
This method, while powerful, deviates slightly from a simple drag-and-drop import. It requires a deliberate step to engage the Scene Cut Detection feature before the clip is fully integrated into your project, ensuring that the analysis is performed at the optimal stage.

Troubleshooting Scene Cut Detection Issues
While DaVinci Resolve's Scene Cut Detection is a robust feature, users may occasionally encounter situations where it doesn't function as expected. Understanding potential causes can help resolve these issues efficiently.
Settings and Sensitivity Levels
One of the most common culprits behind malfunctioning scene cut detection lies in the configuration of its settings. The software relies on parameters like sensitivity and threshold levels to interpret changes in the video. If these are not set appropriately for the specific footage, the algorithm may struggle to accurately distinguish between genuine scene changes and minor visual fluctuations. For instance, a very low sensitivity setting might cause the software to overlook even obvious cuts, while an excessively high setting could lead to the detection of numerous false positives - segments that are not actual scene breaks. It's crucial to understand that there isn't a universal "correct" setting; the optimal configuration often depends on the nature of the video content.
Video Quality and File Format
The quality and integrity of the video file itself can also play a significant role. Poorly compressed footage, low-resolution video, or files that have been corrupted during transfer or storage can present challenges for the analysis algorithms. When the visual data is unclear or incomplete, DaVinci Resolve may find it difficult to reliably detect the subtle or even overt changes that signify a scene transition. Furthermore, ensuring that the video file format is compatible with DaVinci Resolve is paramount. While Resolve supports a wide array of codecs and containers, using an unsupported or improperly encoded format can lead to playback issues and, consequently, hinder the functionality of features like scene cut detection.
Software Glitches and Updates
Occasionally, the issue might stem from the software itself. Like any complex application, DaVinci Resolve can be subject to occasional glitches or bugs. These can sometimes interfere with the normal operation of specific features. In such cases, a simple yet effective solution is to ensure that you are running the latest version of DaVinci Resolve. Software developers frequently release updates that include bug fixes and performance improvements. If updating doesn't resolve the problem, a more drastic step might be to try reinstalling DaVinci Resolve. This can help to rectify any corrupted program files that might be causing the issue.
Understanding Algorithm Limitations
It's also important to acknowledge that the algorithms, while advanced, have inherent limitations. They are primarily designed to detect abrupt visual changes that typically signify simple cuts. Footage that incorporates subtle transitions, such as dissolves, fades, or complex visual effects, might not be accurately interpreted by the default settings. In tests, DaVinci Resolve's algorithm has sometimes interpreted sudden pixel-value changes within a part of the frame as a cut, leading to false detections. Similarly, transitions like additive dissolves, even if detected, might register with confidence levels below the default threshold, making them susceptible to being missed or requiring manual adjustment.
Scene Cut Detection with DaVinci Resolve FREE
Adjusting Sensitivity for Optimal Detection
The ability to fine-tune the sensitivity of the Scene Cut Detection feature is a cornerstone of its utility. This control allows users to tailor the analysis to the specific needs of their footage, ensuring that the software identifies cuts with the desired precision.
To access and adjust this critical parameter, the workflow is as follows:
Navigate to the Media Page: Begin by going to the Media page within DaVinci Resolve. This is your primary interface for managing media assets.
Select the Target Clip: Identify and select the video clip you intend to analyze for scene cuts.
Access Scene Cut Detection: Right-click on the selected clip. From the contextual menu that appears, choose "Scene Cut Detection."
Locate the Sensitivity Slider: The "Cut Detection" window will open, presenting you with various options. Prominently featured within this window is the sensitivity slider.
Manipulating the Slider: The sensitivity slider offers a direct means of controlling the algorithm's responsiveness.
- Increasing Sensitivity: Moving the slider towards the right increases the sensitivity. This makes DaVinci Resolve more prone to detecting cuts, even those that are less pronounced. It's useful for footage where scenes might transition with subtle visual cues.
- Decreasing Sensitivity: Conversely, moving the slider towards the left decreases the sensitivity. This makes the software more conservative, focusing on more significant and obvious changes. This setting is beneficial when dealing with footage that has a lot of minor visual variations that you don't want mistaken for scene cuts.
Initiate Analysis: After adjusting the sensitivity to your desired level, click the "Start" button (or "Auto Scene Detect"). DaVinci Resolve will then re-analyze the clip using your adjusted sensitivity settings, aiming to provide more accurate cut point detections.
The effectiveness of scene cut detection is directly proportional to how well the sensitivity is calibrated to the footage. It's often an iterative process; you might start with a default setting, review the results, adjust the sensitivity, and re-analyze until the detected cuts align with your expectations. This level of control is what makes the feature adaptable to a wide range of video content, from highly stylized productions to straightforward documentary footage.
Scene Cut Detection: A Workflow Enhancement
The Scene Cut Detection feature in DaVinci Resolve is more than just a tool; it represents a paradigm shift in how editors and colorists can approach certain workflows, particularly when dealing with large, unedited source files. This feature offers a compelling alternative to traditional, more labor-intensive methods, especially when time is of the essence.
The "Flat-File" Workflow Advantage
In certain production scenarios, particularly those involving oversized or non-standard frame sizes common in specialized installations, a "flat-file" workflow can be highly advantageous. This approach bypasses complex XML import routes and direct linking to camera-original footage. Instead, the process involves rendering out a single, continuous QuickTime movie from the "locked picture" timeline, after removing titles and color corrections. This simplified, single file is then handed over to the colorist.
The primary benefit here is a dramatically simplified conform process. The colorist receives a unified piece of media, eliminating the potential for errors or confusion that can arise from managing multiple XML files and camera originals. The automatic nature of scene cut detection becomes an "Ace in the Hole" in these situations. Instead of the colorist having to manually identify and mark every single edit point - a task that would be mind-numbingly tedious and time-consuming on a feature-length project - the software can perform this initial segmentation automatically. This drastically reduces the manual labor required, allowing the colorist to focus on the creative aspects of grading rather than the mechanics of conforming.
Streamlining Collaboration
This workflow also enhances collaboration between editors and colorists. By providing a single, clearly defined QuickTime movie, the editor ensures that the colorist starts from the same precise timecode and has a clear, consolidated reference. This minimizes the chances of miscommunication or errors related to timeline versions or edit point discrepancies. The colorist is freed from the worry of whether the timeline is correctly conformed, as the scene cut detection has already segmented the footage into manageable units.
When to Leverage Scene Cut Detection
The Scene Cut Detection feature is particularly valuable when:
- Time is Limited: When quick turnarounds are critical, automating the detection of cuts saves significant manual effort.
- Dealing with Raw Footage: Importing and organizing extensive raw camera footage can be overwhelming. Scene Cut Detection helps break it down into more digestible segments.
- Simplifying Conform for Colorists: Providing a single, pre-segmented file streamlines the color grading process, making it more efficient and less prone to errors.
- Avoiding Complex XML Workflows: For projects where the intricacies of XML roundtripping are deemed unnecessary or overly complex, this feature offers a more direct path.
While the core algorithms are adept at detecting simple cuts, it’s important to remember their limitations with complex transitions. However, for many standard editing and grading scenarios, DaVinci Resolve's Scene Cut Detection offers a powerful, time-saving solution that enhances workflow efficiency and simplifies the post-production process. It represents a smart application of technology to solve a common, often time-consuming, challenge in video editing.
Comparative Analysis: DaVinci Resolve vs. Other Solutions
While DaVinci Resolve's Scene Cut Detection is a powerful tool, understanding its performance in comparison to other professional solutions provides valuable context. Competitors like Adobe Premiere Pro and specialized Media Asset Management (MAM) platforms also offer similar functionalities, each with its own strengths and weaknesses.
DaVinci Resolve's Approach
DaVinci Resolve integrates Scene Cut Detection primarily at the point of import on the Media page. The process involves right-clicking the clip and selecting the "Scene Cut Detection" option, which opens a dedicated window for analysis and adjustment. The software uses an algorithm that analyzes visual changes, with a confidence threshold represented by a horizontal line. Cuts exceeding this threshold are detected. The system also provides a viewer to compare outgoing and incoming frames, aiding in verification.
In practical tests, DaVinci Resolve's default settings have shown varying degrees of success. For a simple one-minute edit with eighteen cuts and no transitions, it correctly identified seventeen edits, missing only one and making one false detection. However, when presented with more abstract footage, such as macro shots of paint mixing featuring jump cuts, dissolves, and additive dissolves, its performance was less impressive. In such cases, it correctly identified only one cut and made two false detections, with the correctly identified cut having the lowest confidence score. Notably, dissolve transitions were sometimes detected but with confidence levels below the default threshold.
Adobe Premiere Pro's Scene Edit Detection
Adobe Premiere Pro offers a comparable feature, "Scene Edit Detection," accessible by right-clicking a clip on the timeline and selecting it from the drop-down menu. A subsequent window allows users to choose whether to add cuts or markers at detected edit points and whether to extract subclips. Premiere Pro's feature has demonstrated strong accuracy, particularly with jump cuts, successfully detecting all six in the test scenario. However, like Resolve, it was unable to detect the additive dissolve transition.
ELEMENTS Media Library: A MAM Perspective
The ELEMENTS Media Library, a MAM platform, offers a different approach. It has provided automatic scene detection for over six years and performs this analysis for every clip ingested into the system. This proactive approach means the feature is always available without needing to be manually triggered per clip during the editing process. While specific performance details in direct comparison are less detailed in the provided information, the fact that it's a long-standing, integrated feature suggests a mature and robust implementation within its ecosystem.
Key Differences and Limitations
A crucial observation across these professional non-linear editing systems (NLEs) is their primary focus on detecting simple cuts. Transitions like dissolves, fades, and more complex visual effects often pose a challenge. Both DaVinci Resolve and Premiere Pro, in the provided examples, struggled with or failed to accurately detect dissolve transitions. This suggests that while these tools are excellent for segmenting footage based on abrupt visual changes, they are not a complete replacement for manual analysis when complex transitions are present.
The ELEMENTS Media Library's continuous analysis offers a workflow advantage for large organizations managing vast amounts of media. For individual editors or smaller teams, the on-demand nature of Resolve and Premiere Pro's features is often more practical.
Ultimately, the choice between these solutions may depend on the specific workflow, the type of footage being handled, and the desired level of automation versus manual control. While DaVinci Resolve and Premiere Pro offer convenient, integrated solutions, their effectiveness can be influenced by the complexity of transitions within the footage. For seamless integration and proactive analysis, a dedicated MAM system like ELEMENTS Media Library might offer a more comprehensive solution, though potentially at a different cost and complexity level. The common thread is the ongoing development and refinement of these automated detection capabilities, aiming to further enhance editing efficiency.