Photoshop, a powerhouse of digital artistry, harbors a multitude of techniques that can transform ordinary images into extraordinary visual statements. Among these, the X-ray effect stands out as a particularly intriguing and versatile method for exposing hidden details and creating striking, artistic compositions. This technique isn't a single button press; rather, it's a deliberate orchestration of various Photoshop tools and adjustments, often found in fundamental Photoshop courses, but combined in more advanced ways to achieve a transparent layer effect, revealing what lies beneath. This detailed exploration will guide you through the process of simulating an X-ray look, whether you aim to reveal anatomical structures or simply add a unique, ethereal quality to your photographs.
Understanding the X-Ray Aesthetic
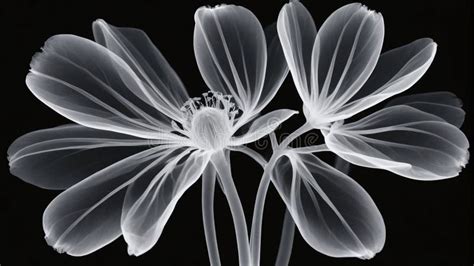
At its core, the X-ray effect in Photoshop emulates the visual characteristics of medical X-ray imagery. This typically involves creating a high-contrast negative image, often with a distinct blue or green tint, that imparts a transparent or ghost-like appearance. This aesthetic is highly sought after in various creative fields for its ability to generate surreal, futuristic, or scientific themes, adding a mysterious and captivating vibe to an image. While medical X-rays serve a diagnostic purpose, photographers and artists leverage this effect for artistic expression, revealing the inner structure of objects, from intricate flower petals to everyday items, creating studies that are both visually compelling and thought-provoking.
Method 1: Simulating an X-Ray Effect on Any Image
This method focuses on achieving the X-ray look without necessarily requiring an image of bones. It's particularly effective for creating a ghostly or ethereal appearance for subjects like people or objects.
Step 1: Prepare Your Image
Begin by opening your chosen photograph in Adobe Photoshop. You can do this by navigating to File > Open or by dragging and dropping the image directly into the Photoshop workspace. For seamless editing, ensure your Layers panel is visible. If it's not, go to Window > Layers.
Step 2: Duplicate the Background Layer
To preserve your original image and allow for experimentation, duplicate the background layer. In the Layers panel, right-click on the background layer and select Duplicate Layer. This creates a working copy that you can manipulate freely.
Step 3: Convert to Black and White and Adjust
X-rays inherently lack color, so the first step in achieving the effect is to convert your image to grayscale. With the duplicated layer selected, go to Image > Adjustments > Black & White. Alternatively, you can use the shortcut Ctrl + Shift + Alt + B (Windows) or Cmd + Shift + Option + B (Mac). This dialog box offers sliders to control the brightness of different color ranges, allowing you to fine-tune which elements become lighter or darker in the grayscale conversion. Adjust these sliders to bring out the desired details.
Step 4: Invert the Tones
The characteristic look of an X-ray is a negative image. To achieve this, invert the colors of your black and white image. Go to Image > Adjustments > Invert, or use the shortcut Ctrl + I (Windows) or Cmd + I (Mac). This will transform bright areas into dark ones and vice versa, creating a negative effect.
Step 5: Enhance Contrast and Brightness
To make the details pop and enhance the X-ray appearance, adjust the brightness and contrast. Navigate to Image > Adjustments > Brightness/Contrast. Increase the contrast to create a sharper distinction between light and dark areas, which helps define the "bones" or internal structures. You may also want to slightly lower the brightness to deepen shadows and intensify the X-ray look.
Step 6: Apply a Blue Tint
A signature element of many X-ray images is a blue or greenish tint. To add this, create a new Hue/Saturation adjustment layer by going to Layer > New Adjustment Layer > Hue/Saturation. In the properties panel for this new layer, check the Colorize box. Now, adjust the Hue slider to a value around 200-220 to achieve a blue tint. Fine-tune the Saturation slider to control the intensity of the color, keeping it subtle to maintain the X-ray aesthetic.
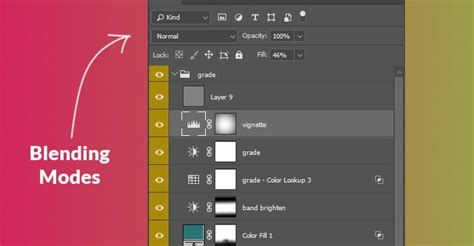
Step 7: Experiment with Blending Modes
Blending modes can add depth and help integrate the various layers. Duplicate your current layer again, and then experiment with different blending modes for this new duplicate. Modes such as Overlay, Multiply, Soft Light, or Screen can yield interesting results. Adjust the Opacity of this duplicated layer to control the intensity of the blending mode's effect.
Step 8: Masking Unwanted Areas
Precision is key. If there are parts of the image that detract from the X-ray effect, you can mask them out. Add a Layer Mask to the relevant layer by clicking the "Add Layer Mask" button at the bottom of the Layers panel. Select the Brush Tool (B), set your foreground color to black, and adjust the brush's hardness and size. Painting with black on the mask will hide those areas of the layer, allowing the layers beneath to show through.
Step 9: Final Touches and Export
Before saving, review your image. You might want to make further adjustments to brightness, contrast, levels, or curves to refine the details and ensure the colors are well-balanced. You can also use a soft eraser around edges or specific features for added refinement.
To save your creation, go to File > Save As. If you intend to share your image online or via email, select JPEG as the format. For preserving layers and further editing, PSD is the recommended format.
Method 2: Simulating an X-Ray with Bones
This method is specifically designed for creating an X-ray effect when you have an image of a skeleton or bones and want to overlay it onto another subject.
Step 1: Gather Your Images
You will need two primary images: one of the subject you wish to apply the X-ray effect to, and another of a skeleton or bones. For best results, try to obtain images of your subject and the skeleton posed in similar positions and ideally photographed against plain backgrounds, preferably white. This simplifies the background removal process.
Step 2: Prepare Your Subject Image
Open the image of your subject in Photoshop. If the background is plain, tools like the Quick Selection Tool or Color Select Tool can be effective for isolating the subject. Alternatively, the Lasso Tool can be used to meticulously trace around the subject. Once selected, you can delete the background or mask it out.
Step 3: Place the Skeleton Image
Import your skeleton image into the same Photoshop document. Go to File > Place and select your skeleton image. This will add the skeleton as a new layer.
Step 4: Isolate the Skeleton
Similar to isolating your subject, you'll need to remove the background from the skeleton image. If the background is a solid color, the Quick Selection Tool or Color Select Tool can be used. For more complex backgrounds, the Lasso Tool or the Pen Tool might be necessary for precise selection. Once the skeleton is selected, you can delete the background or create a layer mask.
Insanely Difficult Photoshop Masks MADE EASY with "Calculations"
Step 5: Align and Transform the Skeleton
With the skeleton image now isolated, you'll likely need to resize, rotate, and position it to align with your subject. Ensure "Show Transform Controls" is checked in the top options bar when the skeleton layer is selected. Use the handles to resize and rotate. If precise alignment is challenging, switch to Warp mode by clicking the warp icon in the top options bar. This allows you to distort the skeleton image to better match the contours of your subject.
Step 6: Adjust Skeleton Appearance
To make the skeleton look like an X-ray, several adjustments are typically needed.
- Invert or Adjust Exposure: If the skeleton appears too dark, you can try
Image > Adjustments > Invert. However, this can sometimes be too harsh. An alternative is to add anExposureadjustment layer above the skeleton layer and create a clipping mask (right-click the adjustment layer > Create Clipping Mask) to apply it only to the skeleton. Adjust the exposure slider to lighten the bones. - Black & White with Color Filter: X-rays don't register blue light as strongly. Apply a
Black & Whiteadjustment (Image > Adjustments > Black & White) to the skeleton layer. In the Black & White dialog, you can adjust the color filter sliders. Lowering theBluesslider will help to darken the skin tone of your subject or create a more typical X-ray appearance. - Gaussian Blur: To create a softer, more integrated look and simulate the light diffusion in X-ray film, apply a
Gaussian Blurfilter (Filter > Blur > Gaussian Blur) to the skeleton layer. The amount of blur will depend on your image, but it should be enough to soften the details while still keeping them discernible. - Brightness & Contrast: Further refine the appearance by going to
Image > Adjustments > Brightness & Contrast. Increase the contrast to make the bones appear clearer and more defined.
Step 7: Blend and Refine
- Layer Opacity: Adjust the
Opacityof the skeleton layer to control how strongly it shows through your subject. - Layer Mode: Experiment with blending modes for the skeleton layer.
Screenmode can be effective for overlaying the bones. - Color Overlay/Solid Color: Some tutorials suggest adding a solid color layer (often blue or green) above the skeleton and setting its blending mode to
Color Burnor similar, then adjusting its opacity and the skeleton layer's appearance. - Soft Eraser: Use a soft brush with the Eraser tool to subtly blend the edges of the bones or remove them from areas where they might look unnatural, such as the eyes or soft tissue areas.
- Noise: Adding a small amount of
Noise(Filter > Noise > Add Noise) to a solid color layer or directly to the skeleton layer can help mimic the graininess of X-ray film.
Step 8: Final Adjustments and Saving
As with the first method, review your image and make any final adjustments to color balance, contrast, or brightness. Ensure the skeleton integrates convincingly with your subject. Save your work as a JPEG for sharing or as a PSD for future editing.
Advanced Techniques and Considerations
- Channel Mixer: For more nuanced control over the grayscale conversion and color channels, the
Channel Mixer(Image > Adjustments > Channel Mixer) can be a powerful tool. - High Pass Filter: Some methods involve using the
High Passfilter (Filter > Other > High Pass) to enhance edge details before or after other adjustments, contributing to the sharp definition seen in X-rays. - Actions and Presets: Once you've perfected a workflow, consider recording it as a Photoshop Action. This allows you to apply the entire sequence of steps to new images with a single click, saving significant time and ensuring consistency.
- Image Compatibility: It's important to note that the effectiveness of certain X-ray techniques can vary depending on the original image's lighting, resolution, and subject matter. Some versions of Photoshop (e.g., 6.01 to CS2) might handle specific steps differently, and the effect may not work perfectly on every picture. Roughly 60% of photos might show hidden details well with certain approaches.
- Artistic Interpretation: The X-ray effect is not strictly about anatomical accuracy but about artistic interpretation. Feel free to experiment with different color tints, levels of transparency, and contrast to achieve the desired mood and visual impact.
The X-ray effect in Photoshop is a testament to the software's versatility. By understanding the core principles of contrast, inversion, and color manipulation, you can unlock a world of creative possibilities, revealing hidden depths and transforming your images into captivating works of art. The journey of mastering this technique will not only sharpen your Photoshop skills but also enhance your artistic eye, enabling you to perceive and create visual narratives that go beyond the surface.