DaVinci Resolve, a powerhouse in video editing and color correction, offers a comprehensive suite of tools for creators to bring their visions to life. While its primary function is video editing and export, a frequently overlooked yet crucial feature is the ability to extract individual still frames from your footage. This capability is invaluable for a variety of tasks, from creating compelling thumbnails and marketing materials to referencing specific visual elements or simply capturing a perfect moment. This guide will delve into the intricacies of exporting still frames from DaVinci Resolve, alongside a thorough exploration of video export settings, ensuring you can effectively share your finished projects with the world.
Capturing the Perfect Still Frame: A Step-by-Step Guide
For users transitioning from other editing software, the process of grabbing a still frame in DaVinci Resolve might initially seem less intuitive. However, with a clear understanding of the available methods, it becomes a straightforward task. DaVinci Resolve offers several pathways to export a still frame, depending on your preferred workflow and the version of the software you are using.
Exporting from the Cut Page (DaVinci Resolve 18.5 Beta and later)
For those who prefer a streamlined editing experience, the Cut page, introduced in later versions of DaVinci Resolve, now includes the functionality to export still frames.
- Navigate to the Cut Page: Begin by opening your project and ensuring you are on the Cut page.
- Locate the Desired Frame: Use the playhead on the timeline to scrub through your footage. You can drag the cursor left or right to precisely find the frame you wish to capture.
- Initiate Frame Export: Once the desired frame is displayed in the program window, navigate to the top menu. Click on "File," then select "Export Current Frame as Still."
- Configure Save Options: A dialog box will appear, allowing you to choose the save location for your still image. You can also name the file and select the desired file type. Common choices include JPEG for broad compatibility or PNG for lossless quality.
- Confirm Export: After naming your file and selecting the format, click "Export" to save the still frame.
Exporting from the Edit Page
The Edit page, a more traditional editing environment, also provides straightforward methods for exporting still frames.
- Access the Edit Page: Switch to the Edit page within your DaVinci Resolve project.
- Find Your Frame: Similar to the Cut page, you can use the program window's slider or the playhead on the timeline to locate the specific frame you want to capture.
- Export Still Frame: Go to the "File" menu in the top bar and select "Export Current Frame as Still."
- Specify Save Details: In the subsequent dialog box, choose a location, enter a filename, and select the desired file format (e.g., JPEG, PNG).
- Complete the Export: Click "Export" to save the still image.
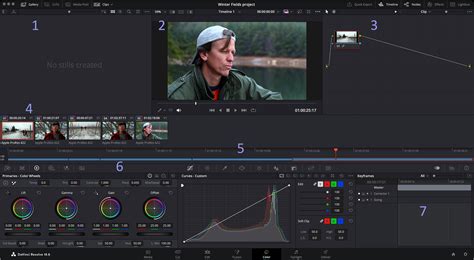
Exporting from the Color Page: Utilizing the Gallery
The Color page, primarily used for color grading, offers a unique method for capturing and exporting stills through its Gallery feature.
- Navigate to the Color Page: Click on the "Color" tab at the bottom of the DaVinci Resolve interface.
- Locate the Target Frame: Use the playhead on the timeline to find the exact frame you wish to capture.
- Grab a Still: Right-click within the program window. From the context menu, select "Grab Still." This action saves the current frame as a thumbnail in the Gallery, which is typically located in the lower-left section of the Color page.
- Access and Export from Gallery: In the Gallery, you will see a thumbnail of the still you just captured. Right-click on this thumbnail.
- Export Options: A new menu will appear. You can choose "Export with Display LUT" if you want the still to include any applied Look-Up Tables, or simply "Export" for the raw image.
- Save Your Still: A dialog box will prompt you to choose a save location, name the file, and select the file type.
- Finalize Export: Click "Export" to save the still image.
Exporting Your Video Projects: A Comprehensive Approach
Beyond individual frames, the primary function of DaVinci Resolve for many users is the export of complete video projects. The software offers a robust "Deliver" page, designed to give users granular control over their final output. While a "Quick Export" option exists for faster, preset-based exports, understanding the "Deliver" page is crucial for achieving optimal results for various platforms and delivery requirements.
Understanding the Deliver Page
The Deliver page, accessible by clicking the rocket ship icon at the bottom of the DaVinci Resolve interface, is your command center for rendering and exporting video projects. Here, you can view your project, manage render queues, and fine-tune export settings.
Key components of the Deliver page include:
- Render Settings Panel: Located in the top-left, this is where you configure all aspects of your export, from format and codec to resolution and bitrate.
- Timeline Viewer and Timeline: These allow you to preview your project and navigate through it, much like on the Edit page, but without editing capabilities. You can set In and Out points here to render specific sections.
- Render Queue: Situated at the top-right, this panel lists all the projects you have queued for export. You can add multiple projects here and render them in batches.

Quick Export vs. Custom Export
DaVinci Resolve provides two main export workflows:
- Quick Export: This is ideal for users who need to export quickly with minimal fuss. It offers a selection of presets optimized for common platforms like YouTube, Vimeo, and social media. You simply choose a preset, set a filename and location, and click "Export."
- Custom Export: For greater control, select "Custom Export" within the Render Settings panel. This unlocks a wide array of options, allowing you to precisely define your video's format, codec, resolution, frame rate, bitrate, and more.
Recommended Export Settings for Various Platforms
When using the Custom Export option, several settings are critical for ensuring your video looks its best and is compatible with its intended destination.
Format and Codec Recommendations
The choice of format (container) and codec (compression method) significantly impacts file size, quality, and compatibility.
- MP4 (H.264 or H.265/HEVC): This is the most widely used format for web uploads, social media, and general playback.
- H.264: Offers good compression and wide compatibility, making it a safe choice for most applications.
- H.265 (HEVC): Provides more efficient compression than H.264, resulting in smaller file sizes for the same quality, especially for HD and 4K content. It's recommended for modern platforms and devices.
- QuickTime (ProRes or DNxHD/DNxHR): This format is favored in professional workflows for its high quality and less aggressive compression, making it suitable for further editing or archival purposes.
Recommendation for Web/Social Media: MP4 with H.265 (HEVC) codec is generally recommended for HD and 4K content due to its balance of quality and file size efficiency. If H.265 is not compatible with your target platform or older devices, H.264 is a reliable alternative.
Resolution and Frame Rate
It is crucial to match your export resolution and frame rate to your timeline settings and source footage. Exporting at a resolution higher than your project's timeline will not improve quality and may lead to errors.
- Matching Timeline: To check your timeline settings, go to the Media tab, right-click on your timeline in the Media Pool, and select "Timeline Settings."
Quality Settings and Bitrate
The "Quality" section in the Render Settings panel allows you to control the visual fidelity of your export.
- High Quality: This setting is recommended for most content, delivering excellent visual quality with an efficient file size.
- Medium Quality: This option can reduce file size by approximately 30% with only a minor, often imperceptible, impact on visual quality.
- Bitrate: The bitrate determines the amount of data used per second of video. A higher bitrate generally results in better quality and a larger file size, while a lower bitrate leads to smaller files but potentially reduced quality.
YouTube Recommended Bitrates (Standard Dynamic Range):
- 2160p (4K): 35,000â45,000 kb/s (for 30 fps and under), 53,000â68,000 kb/s (for over 30 fps)
- 1440p (2K): 16,000 kb/s (for 30 fps and under), 24,000 kb/s (for over 30 fps)
- 1080p: 8,000 kb/s (for 30 fps and under), 12,000 kb/s (for over 30 fps)
- 720p: 5,000 kb/s (for 30 fps and under), 7,500 kb/s (for over 30 fps)
It's often beneficial to experiment with different bitrates to find the optimal balance between quality and file size for your specific footage.
Exporting with Chapters
If you wish to embed chapter markers into your video for easier navigation on platforms that support them, you can do so via the "Chapters" option.
- Enable Chapters: Check the box labeled "Chapters" in the Render Settings.
- Select Marker Color: Choose the color of the timeline markers you have used to denote your chapters.
- Embed Chapters: Ensure this option is selected if you want chapters embedded in the exported file.
Render Settings Specifics
- Single Clip vs. Individual Clips: In the Render Settings, you can choose to export your entire timeline as a "Single Clip" or as "Individual Clips," where each clip on your timeline becomes a separate output file.
- Export Subtitles: If your project includes subtitles, make sure to enable the "Export Subtitles" option in the Video tab of the Render Settings.
- Color Management: For consistent color output, especially across different platforms, ensure your project's "Timeline color space" is set appropriately within the Project Settings. "Rec.709-A" is a common and recommended setting for many workflows.
The Complete Guide to the DaVinci Resolve Deliver Page
The Rendering Process
Once your export settings are configured:
- Add to Render Queue: Click the "Add to Render Queue" button. Your project will appear in the Render Queue panel.
- Render All: To begin the export process, click the "Render All" button. DaVinci Resolve will then process your project according to the specified settings. The time required for rendering depends on the video's length, resolution, complexity of effects, and your computer's processing power.
Troubleshooting Common Export Issues
Even with careful setup, you might encounter issues during the rendering or exporting process. Here are some common problems and their solutions:
Render Fails or Stops Halfway
- Corrupted Media: The render might stop due to corrupted video or audio clips. Locate the point where the render failed in your timeline, try replacing the problematic media, or re-importing the files.
- Effects and Transitions: Complex or poorly optimized effects and transitions can cause rendering failures. Try disabling them temporarily to see if the render completes.
- Insufficient Disk Space: Ensure that the drive where you are exporting has enough free space for the final video file.
- Software Glitches: Sometimes, a simple restart of DaVinci Resolve or your computer can resolve temporary glitches.
Audio and Video Out of Sync
- Corrupt Audio Files: Re-import or convert your audio files to a different format.
- Variable Frame Rate (VFR) Footage: DaVinci Resolve performs best with constant frame rate (CFR) footage. If your source footage is VFR (common from screen recordings or some mobile devices), convert it to CFR using tools like Shutter Encoder or HandBrake before importing into Resolve.
- Frame Rate Mismatches: Ensure your project settings, timeline settings, and export settings all use the same frame rate.
- Outdated Software: Keep DaVinci Resolve updated to the latest version.
Render Artifacts Appear in the Final Video
- Codec Issues: Artifacts like glitches, color shifts, or black screens can sometimes be attributed to specific codecs or hardware limitations. Try exporting with a different codec (e.g., switch from H.264 to H.265 or vice-versa, or use ProRes if available).
- Graphics Card Drivers: Ensure your graphics card drivers are up to date.
- Optimized Media: Generating "Optimized Media" for your clips (right-click in Media Pool > Generate Optimized Media) can sometimes resolve rendering artifact issues by creating intermediate files that are easier for Resolve to process.
No Sound in the Exported File
- Incorrect Audio Tracks: Verify that your audio tracks are correctly configured and included in the export.
- Audio Output Settings: Double-check the audio output settings on the Deliver page to ensure they are correctly configured.
- Project Settings: Ensure your project's audio format settings align with your export preferences.
- Supported Audio Codec: Confirm that the audio codec you've selected is supported by the export format and playback device.
File Size is Larger Than Expected
- High Bitrate: The most common cause is setting the bitrate too high. Lower the bitrate in the Quality settings to reduce the file size. Refer to platform recommendations (like YouTube's) for guidance.
- Codec Choice: Using less efficient codecs or export settings can lead to larger file sizes. H.265 is generally more efficient than H.264 for similar quality.
Enhancing Your Workflow with Specialized Tools
For creators looking to streamline their DaVinci Resolve workflow, specialized hardware can make a significant difference. Devices like the TourBox can be integrated to provide tactile control over various software functions, allowing for quicker adjustments to settings, timeline navigation, and editing tasks, thereby enhancing efficiency and creative flow.
By mastering both the art of capturing still frames and the science of video export settings, you can fully leverage the capabilities of DaVinci Resolve to produce and share your video content effectively.