Cropping an image in Photoshop is a fundamental yet powerful technique that can significantly enhance the composition, focus, and overall impact of your photographs. While seemingly straightforward, the Crop Tool in Photoshop offers a surprising depth of functionality, allowing for precise adjustments, creative reframing, and even non-destructive workflows. Beyond simply trimming unwanted edges, understanding the nuances of this tool can elevate your image editing skills, transforming ordinary shots into compelling visual narratives. Whether you're aiming to adjust the composition, straighten a skewed horizon, or prepare an image for a specific social media platform, Photoshop's Crop Tool provides the flexibility to achieve your desired results with remarkable accuracy.
The Fundamentals of Cropping in Photoshop
At its core, the Crop Tool in Photoshop is designed to remove unwanted portions of an image. When you select this tool, a bounding box appears around your image, with handles at the corners and edges. Dragging these handles allows you to define the area of the image you wish to retain. The area outside this bounding box is what will be cropped away.
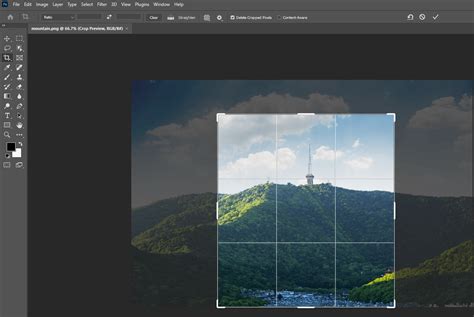
To begin, open your desired image and select the Crop Tool from the Toolbar, typically located near the top. Alternatively, you can press the 'C' key as a shortcut. A cropping border will then appear around your image. If this border isn't immediately visible, selecting another tool and then returning to the Crop Tool usually resolves this.
The default behavior when applying a crop is to delete the cropped pixels. This means that once you commit to the crop, the removed areas are gone. However, Photoshop offers options to alter this behavior, which is crucial for non-destructive editing.
Resetting the Crop Tool
If you find yourself with an undesirable crop or simply want to start fresh, Photoshop provides a 'Reset Tool' option. Right-clicking or Ctrl-clicking the Crop Tool icon in the Options Bar at the top of the screen and selecting 'Reset Tool' will revert the Aspect Ratio to its default and clear any specified Width and Height values. Pressing the 'Esc' key can also help finalize this reset.
Understanding Destructive vs. Non-Destructive Cropping
A critical aspect of using the Crop Tool is understanding the difference between destructive and non-destructive cropping. By default, when you crop an image and commit the changes, Photoshop deletes the pixels outside the crop area. This is a destructive process because the original image data is lost. If you later decide you need those pixels back, they are gone.
However, Photoshop offers a way to crop non-destructively by unchecking the "Delete Cropped Pixels" option in the Options Bar. When this option is unchecked, Photoshop doesn't discard the pixels outside the crop area; instead, it hides them. This means you can always re-expand your canvas to reveal the original image content. This is particularly useful if you're unsure about your final crop or might need to adjust it later. When you uncheck "Delete Cropped Pixels," the background layer is often converted to a regular layer (Layer 0), which can support transparency and extend beyond the canvas boundaries.

If you do crop destructively and realize your mistake, you can often revert to a previous state using the History panel, provided you haven't saved and closed the file. The History panel remembers a set number of your recent actions (50 by default). However, once a file is closed and reopened, the History panel resets. The "Revert" command under the File menu can also return your image to its last saved state, but this only works if you haven't saved over the original file.
Advanced Cropping Techniques
Beyond basic resizing, Photoshop's Crop Tool offers sophisticated features for precise adjustments and creative control.
Cropping to Specific Aspect Ratios and Sizes
Photoshop allows you to crop images to precise aspect ratios or specific dimensions, which is invaluable for social media, print, or web design.
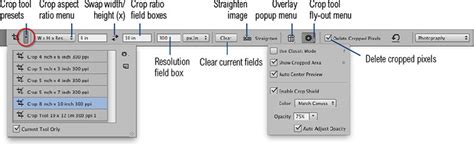
Using Preset Aspect Ratios: In the Options Bar, you'll find a drop-down menu for Aspect Ratio. Here, you can select common ratios like 1:1 (Square), 4:5 (8:10), or even video aspect ratios like 16:9. Once a ratio is selected, the crop box will adjust to adhere to it. You can then drag the handles to resize the crop area while maintaining the chosen ratio.
Custom Aspect Ratios: You can also create and save your own custom aspect ratios. After setting your desired Width and Height values in the Options Bar, click on the Aspect Ratio drop-down menu again and select "New Crop Preset." Give your preset a name, and it will be available for future use.
Specific Sizes and Resolutions (W x H x Resolution): For print or high-resolution online use, you can specify exact dimensions and resolution. Select "W x H x Resolution" from the Aspect Ratio drop-down. You can then input your desired width and height (e.g., "8 in x 10 in") and, crucially, a resolution value (e.g., "300 ppi" for print). Photoshop will then crop your image to these exact specifications. You can verify the final dimensions and resolution by going to Image > Image Size.
Straightening Images with the Crop Tool
A common issue in photography is a slightly tilted horizon or a building that isn't perfectly vertical. The Crop Tool has a built-in straighten feature to correct these imperfections.
Using the Straighten Tool: Within the Crop Tool's options, you'll find a straighten icon (often resembling a spirit level). Select this tool and then draw a line along an element in your image that should be perfectly horizontal or vertical (like a horizon, a wall, or a building edge). Photoshop will automatically rotate and crop the image to straighten that line.
Manual Straightening: You can also manually straighten by dragging the corner handles of the crop box. If you've unchecked "Delete Cropped Pixels," you'll have more flexibility to adjust and reposition the image within the expanded canvas.
When straightening, especially if you've unchecked "Delete Cropped Pixels," you might encounter transparent areas around the edges where the image has been rotated. These areas will need to be addressed, either by cropping them off or by filling them.
Content-Aware Fill for Transparent Areas
When you straighten an image or crop it in a way that creates transparent areas, Photoshop's Content-Aware Fill is an excellent tool to seamlessly fill these gaps.
Applying Content-Aware Fill: After straightening and defining your crop area (with "Delete Cropped Pixels" unchecked), if you have transparent areas, you can select those areas and use Content-Aware Fill. This feature analyzes the surrounding pixels and intelligently generates new content to blend into the empty space. It's particularly effective for filling in natural textures or patterns.
It's important to note that Content-Aware Fill must be applied during the initial crop process. If you try to apply it after committing to a destructive crop, it won't have the original pixels to work with. If the initial Content-Aware Fill isn't perfect, you can try applying it again or use tools like the Spot Healing Brush or Clone Stamp to refine the results.
How To Use CONTENT-AWARE FILL in Photoshop - ADVANCED Method
Enhancing Composition with Crop Overlays
Photoshop provides various overlays within the Crop Tool to help you compose your shots more effectively. These overlays are visual guides that appear within the crop bounding box.
Rule of Thirds: This classic composition guideline divides the image into nine equal parts by two horizontal and two vertical lines. Placing key elements of your image along these lines or at their intersections can create a more balanced and engaging composition.
Golden Ratio: Similar to the Rule of Thirds, the Golden Ratio provides a more complex grid that can lead to aesthetically pleasing compositions.
Other Overlays: Photoshop offers other overlays like a grid, a triangle, or a circle, each providing a different visual framework for composition. You can access and cycle through these overlays by clicking the "Overlay" icon in the Options Bar.
When using overlays, you can often hold down the 'Alt' or 'Option' key while dragging the crop handles to reposition the overlay independently of the crop box, allowing you to align it perfectly with your subject.
Cropping Specific Layers
Sometimes, you might only want to crop a single layer within a multi-layered document, rather than the entire canvas.
Using the Ruler Tool and Straighten Layer: If you have a layer that needs straightening, you can select that layer. Then, access the Ruler Tool (often hidden under the Eyedropper Tool). Use the Ruler Tool to draw a line along an element that should be straight. Then, with the desired layer still selected, the "Straighten Layer" option (which may be grayed out if the layer is a background layer) becomes active. Clicking this will straighten only the selected layer.
Converting Background Layers: Background layers have limitations; they cannot be transparent and have fewer editing capabilities. Unlocking a background layer by clicking the lock icon transforms it into a regular layer, which then allows features like "Straighten Layer" to function.
If straightening a layer creates transparent areas, you can use selection tools to select these transparent areas and then fill them using Content-Aware Fill or by painting over them. You can create a selection of the transparent areas by selecting the layer, then going to Select > Load Selection, and ensuring "Invert" is checked if you want to select the transparent areas.
Adobe Express: A Simpler Alternative for Quick Cropping
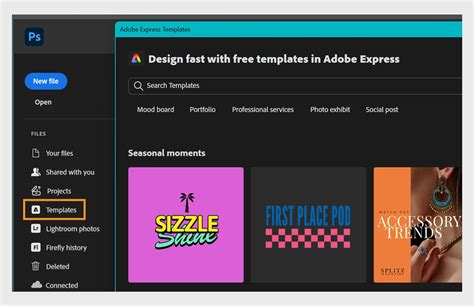
While Photoshop offers unparalleled depth and control, for quick and straightforward cropping, especially for social media, Adobe Express is a user-friendly alternative.
Adobe Express allows you to cut pictures quickly so you can share them instantly. It provides an image cutter tool where you upload your photo and drag handles to select the desired cropping area. You can also use their Crop & Shape tool to crop your image using aspect ratios in popular preset sizes for social media. Adobe Express has a free plan that includes core photo editing tools, effects, and thousands of free templates, making it an accessible option for basic image manipulation.
Practical Cropping Tips for Better Images
- Focus on Composition: Use the Crop Tool not just to resize, but to improve the storytelling of your image. Direct the viewer's eye to the most important elements.
- Avoid Cropping Joints: When cropping full figures, try to avoid cutting off ankles, knees, hips, or elbows, as this can create an awkward or unsettling visual.
- Consider the Subject's Expression: Cropping close to a person's face can emphasize their personality and expression, while leaving more of the body can highlight physical characteristics like posture or clothing.
- Embrace Non-Destructive Editing: Whenever possible, uncheck "Delete Cropped Pixels" to retain original image data. This provides flexibility for future edits.
- Utilize Presets: For consistent sizing across multiple images (e.g., for a website or social media feed), set up and save custom crop presets.
- Straighten with Precision: Don't let a crooked horizon ruin a good photo. Use the straighten tool for quick and accurate corrections.
- Leverage Content-Aware Fill: For seamlessly filling gaps created by straightening or significant cropping, Content-Aware Fill is an invaluable tool.
By mastering Photoshop's Crop Tool, you gain a powerful ally in image manipulation, enabling you to refine compositions, correct imperfections, and prepare your images for any intended use with professional precision and creative flair.