Historically, a contact sheet was a crucial tool for photographers, presenting a page of images printed at the same size as the film negative. This allowed for easy reference to all the images captured on a roll of film. The name "contact sheet" originated from the method of printing, where the film was placed in direct contact with the photographic paper. In the contemporary digital age, the term "contact sheet" has evolved, now commonly referring to an arrangement of multiple, small, identically sized images displayed on a single page. These digital contact sheets often include identifying information, such as the image filename, beneath each thumbnail. Their primary purpose remains consistent: to provide a visual overview and reference for a larger collection of images. Photographers may print these sheets for personal archives or provide them to clients as a catalog of images from a specific shoot.
Initiating Your Contact Sheet Creation in Lightroom
The journey to creating a digital contact sheet begins within Adobe Lightroom, specifically in its Print module. First, you'll need to select the folder or collection that houses the images you intend to feature on your contact sheet. Once the Print module is launched, navigate to the Template Browser, typically found in the left-hand panel. Here, you will discover a selection of pre-designed contact sheet layouts. Among these are several grid options, including two that utilize square image cells, specifically a 4x8 and a 5x8 grid.
If your intention is to "print" the contact sheet as a JPG file, locate the Print Job panel on the right side of the screen. Within this panel, select the "Print to JPG File" option. The page dimensions will default to 8.5 x 11 inches. While you have the flexibility to define your own Custom File Dimensions, it's important to understand that increasing the page size here will only alter the overall page dimensions, not the size of the individual image cells. These cells must be adjusted separately.
Selecting and Arranging Your Images
A critical detail to remember is that if only one image is selected in the Filmstrip, your contact sheet will only display that single image. To include all your desired images, you must select them all within the Filmstrip. This can be achieved by clicking on the first image and then Shift + Clicking on the last image in the sequence. Alternatively, you can select all photos in the Filmstrip by choosing "All Filmstrip Photos" from the "Use:" list located on the toolbar. If the toolbar is not immediately visible, you can display it by pressing the 'T' key on your keyboard. The toolbar also provides valuable information, such as the number of pages your contact sheet will span, and offers arrow keys for navigating between these pages.
Incorporating Informative Text and Data
To enhance the utility of your contact sheet, you can add identifying information below each image. Within the Page panel, located on the right side of the screen, select the "Photo Info" checkbox. This action will reveal a dropdown menu where you can choose the specific field to display. Lightroom offers several preset options, such as "Caption," "Date," or "Filename." For more customized information, you can click "Edit" to create your own unique field.
The Text Template Editor provides access to a wide array of data fields. You can include information like the image filename, sequential numbering, or the date the photograph was taken. Furthermore, you can incorporate EXIF and IPTC metadata, offering insights into camera settings, location, and other relevant details. This editor also allows you to type custom text, enabling you to construct highly detailed photo information for your contact sheet. For instance, you might combine custom text with a sequential number and the filename to create a comprehensive label for each image.
Lightroom cc 2015 Create a Custom Print Module Template
Tailoring Layouts and Visual Presentation
The template contact sheets provided by Lightroom serve as excellent starting points, but they are not rigid blueprints. You have the freedom to deviate from their default designs and customize them to your specific needs. For example, within the Layout panel, if you select the "Keep Square" checkbox, you might observe that in certain layouts, your images can change orientation, resulting in a page that features a mix of portrait and landscape images.
You can precisely control the size of your image cells using the "Cell Size Height" and "Width" sliders found in the Layout panel. As you adjust these sliders, you'll notice that the "Cell Spacing" values will automatically update. To increase the size of individual cells, you can decrease the number of rows and/or columns using the "Page Grid" options. By reducing the number of rows or columns, you effectively allocate more space to each image cell, allowing for larger thumbnails.
Strategic Use of Margins and Identity Plates
Adjusting the top and bottom margins can be strategically employed to create additional space on your contact sheet. This extra room can be utilized for various purposes, such as placing an "Identity Plate." An Identity Plate can be your logo, a signature, or any other graphic element that you wish to brand your contact sheet with. To add an Identity Plate, navigate to the Page panel, select the "Identity Plate" checkbox, and then choose the desired Identity Plate from the available options. By default, the Identity Plate will appear in the center of the page; you can then drag it to your preferred position. Its scale can be adjusted using the "Scale" slider.
Outputting Your Completed Contact Sheet
Once you have finalized the design and content of your contact sheet, you are ready to output the result. If you previously selected the option to "Print to JPG File," simply click "Print to File." You will then be prompted to provide a name for your file and select a location for saving it.
For those who wish to print their contact sheet to a PDF, the process on a Windows machine typically requires a PDF printer driver to be installed. Popular options include Adobe PDF or other drivers that can be downloaded from the web. After ensuring a PDF printer driver is installed, go to "Page Setup" and select your chosen PDF printer. Configure the page size to match your template's dimensions, such as Letter paper in portrait orientation. Subsequently, in the Print Job panel, set the "Print to:" option to "printer" and click "Print." This will generate a PDF version of your contact sheet.
Saving Custom Templates for Future Use
A significant advantage of Lightroom's Print module is the ability to save your customized layouts for future use. If you have spent time meticulously arranging and styling a contact sheet template, you can preserve this design by saving it as a new template. To do this, click the plus symbol located next to the Template Browser panel header. Provide a name for your template and choose where to store it. You can save it within the "User Templates" folder or create a new folder specifically for your custom designs. By saving your customized templates, you can significantly reduce the time required for future contact sheet creations, allowing you to start from your personalized version rather than a generic template.
The Enduring Relevance of Contact Sheets in the Digital Era
While the creation of physical contact sheets was once a standard darkroom procedure, their digital counterparts continue to hold considerable value in the age of digital photography. Historically, negatives were often difficult to view directly, and a contact sheet provided a convenient, thumb-sized overview of all captured photographs. Making contact proofs, which are small positive prints from a roll of film, made logical sense. But in a digital world, how can contact sheets still be relevant?
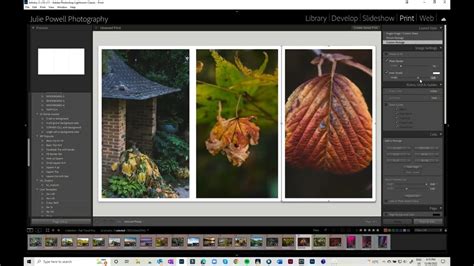
Before embarking on the creation process, it's essential to consider the specific purpose of your contact sheet. Remember, you don't always need to present a client with every single image captured during a shoot. The Print module in Lightroom offers a streamlined approach to this. Within the Print module, under the "Layer Style" section, you'll find the "Image Settings" tab. Be mindful that certain options here, such as "Zoom to Fill," can result in cropping of your images. Adjusting the slider to the right will increase the size of the border around your images. The subsequent option is the "Layout" tab, and another useful feature is the ability to "Edit Watermarks," or even use an image as a watermark. The final tab in the left-hand panel is "Print Job."
The original method involved placing film strips directly onto photography paper, exposing them to light, and then developing the paper. It can feel somewhat anachronistic to be taught a process that might seem to have diminishing relevance in the future. Many individuals who have progressed through formal educational systems can likely relate to this sentiment. Roughly a decade ago, the author recalls being instructed on the methods and rationale behind creating a contact sheet, also known as a contact print or contact proof. Typically, a contact sheet was a positive print displaying all the negatives from a roll of film or a complete shoot, with each image often rendered at the same size as the original negative.
The fundamental purpose of a contact sheet is to enable the rapid scanning of a series of images, facilitating the identification of the "keepers" â those photographs selected for potential enlargement. At the time of learning these techniques, digital photography was already firmly established as the dominant path forward, leading to questions about the future necessity of darkroom-produced contact sheets. The answer to this question is, in retrospect, relatively straightforward: with the widespread adoption of laptops, web galleries, and tablets like the iPad, there are now numerous digital avenues for interacting with, viewing, and sharing series of images.
When software like Photoshop and Lightroom became widely accessible and powerful, it strongly suggested that printed contact sheets were becoming obsolete. The eventual emergence of free or inexpensive web gallery solutions further reinforced this perception. However, the author admits to being surprisingly wrong. The surprise wasn't in being incorrect, but in the persistent demand and frequent requests for printed contact sheets.
As an educational tool, a contact sheet is highly beneficial. It allows for a macro view of a collection of images on a single printed page, aiding in the understanding of framing, line work, and overall photographic execution. Regarding prints for clients and the tangible aspect of paper, there's a strong belief that print will continue to be of paramount importance, with clients increasingly desiring physical output. There's an undeniable difference in handing a client a contact sheet of prints compared to simply showing them a web gallery. While not always superior, it offers a distinct experience. You might assume that clients wouldn't be interested in viewing tiny images, and in this opinion, you would be correct. However, Lightroom simplifies the creation of contact sheets to such an extent that you can generate contact sheets with larger images on the fly, perhaps creating a sheet with just four images, or any number that suits your needs. This entire process occurs within the Print Module, even with a single image selected.
You will observe a "Preview" screen in the top left quadrant, and directly beneath it, the "Template browser." This browser contains templates for a variety of purposes, including numerous options specifically for Contact Sheets. If you intend to create a contact sheet encompassing all the images from a shoot, it's a daunting prospect given the hundreds of images often captured in the digital age â a significant volume for printing. The "Zoom to Fill" option will expand the image to occupy the entire designated frame box. In most scenarios, this is not the desired outcome. However, you retain the ability to reposition the image within its allocated box. The "Repeat One Photo Per Page" option is typically more frequently employed for creating picture packages of prints, but the functionality remains available if you prefer this method for ease. When this option is selected, you will see the page count adjust to reflect the number of images you have chosen.
The "Layout" section, along with the "Print Job" section, are relatively self-explanatory. However, it is customary to incorporate some spacing between the images and ensure that you are utilizing the desired DPI (dots per inch) and other relevant settings. The "Page" section is arguably the most interesting and, in terms of importance, second only to the "Image Setting" tab. This section allows you to include information on the sheet that can be invaluable for study and reference. When either the EXIF or IPTC data is selected, Lightroom accesses this metadata. Information such as the camera and lens used, or the specific settings employed, will be displayed beneath the image. This is particularly beneficial as it allows you to identify which equipment you most frequently use for your best shots, or what settings prove most effective.
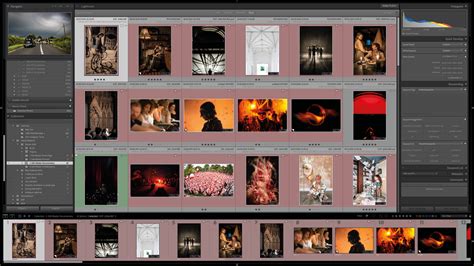
A contact sheet is essentially a collection of thumbnail photographs printed onto a single sheet of paper. The author recalls creating a contact sheet over twenty years ago. In the film era, photographers produced contact sheets to review all their images and subsequently select the most promising ones for printing. Below is an example of a Collection of photos recently created in Lightroom Classic, showcasing images of urban decay captured in Chile. It's important to note that this collection does not represent every photograph taken in Chile; rather, it comprises the best images after a thorough review process.
Here are several key reasons why contact sheets remain relevant:
- Tracking Best Photos: Your contact sheets serve as an excellent tool for keeping a record of your best photographic work. You can even export these contact sheets as JPEG files and incorporate them into a photo book, consolidating all your contact sheets in one accessible location.
- Visual Arrangement and Analysis: You have the flexibility to control the size of the thumbnails. You can rearrange them, observe how different photos work together, or identify images that form cohesive sets. This provides a unique perspective on your image collection.
- Thematic Organization: You can create contact sheets for your most significant themes and projects, allowing for a focused visual archive of your creative endeavors.
To initiate the process in Lightroom Classic:
- Navigate to the Print module and open the Template Browser, typically found at the top of the left-hand panels.
- Select a contact sheet template, such as the "4x5 Contact Sheet" template.
- In the Toolbar, set the "Use" option to "All Filmstrip Photos." (Press 'T' on your keyboard to display the Toolbar if it's not visible). This template offers space for up to 20 thumbnails per page, arranged in five rows of four columns.
You have several customization options:
- Paper Size and Orientation: Click "Page Setup" under the left-hand panels. The default paper size for contact sheet templates is US Letter. If you are not using US Letter-sized paper, you can change this to any required size.
- Adjusting Rows and Columns: Go to the Layout panel, where you can modify the number of photos displayed in each row and column.
- Customizing Text Under Photos: Navigate to the Page panel. To remove the text entirely, uncheck the "Photo Info" box. Alternatively, click the arrows next to "Filename" to select a different piece of metadata, such as "Title," to be displayed instead.
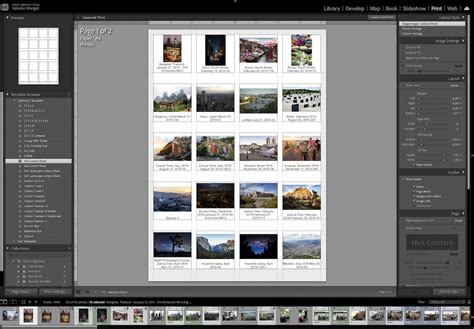
- Utilizing Different Templates or Custom Layouts: You can employ other pre-existing templates or create your own layouts. For instance, a curated Collection of photos loosely following the theme "Things outside houses" could be displayed using a custom template designed to show six photos per page.
Hopefully, the insights provided in this article help you perceive the role of contact sheets in a new light. While in the past, it might have been a necessity for printing, with digital photography, that specific need has diminished.
The end of June approaches, which for some photographers means registering a quarter's worth of photos with the US Copyright Office. When registering photos, including a contact sheet of all the images being registered is a common practice, and Lightroom's Print module is an efficient tool for its creation. Notably, the US Copyright Office accepts a contact sheet as a submission for electronic works.
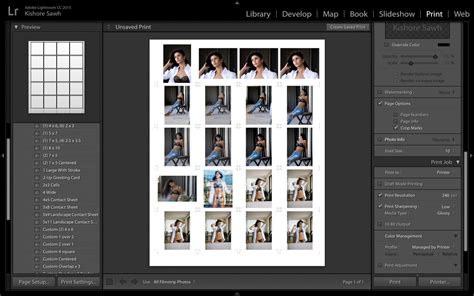
In the Print module, ensure that "Single Image / Contact Sheet" is selected in the Layout Style section of the right-hand panel. Then, select all the photos you wish to include by going to Edit > Select All. Within the Image Settings section, deselecting "Rotate to Fit" is a personal preference but can be useful. Crucially, adjust the "Rows and Columns" sliders in the Page Grid so that more than one photo is printed on each page. A setting of 4 rows with 3 images each often works well. Adding a small amount of "Cell Spacing" is also recommended. There are no strictly "right" or "wrong" settings here; it depends on your desired outcome.
Next, move down to the Page section of the right-hand pane. Here, you can add "Page Numbers" and the photo's "Filename" to the contact sheet. It's worth noting a quirk with the Print module: longer filenames may not display in their entirety on the contact sheet. If a complete filename is not visible, try selecting a different item from the "Photo Info" dropdown (e.g., "Exposure"). Then, reopen "Photo Info" and reselect "Filename." Once you have achieved your desired settings, save your layout as a print template. In the left pane, click the plus icon next to "Template Browser," provide a name, and your print template will be saved for future use.

Dan Rodney, a designer and web developer with over 20 years of experience, creates coursework for Noble Desktop and teaches classes. Contact sheets are indeed a throwback to the film days. Especially with negatives, they offered a quick way to preview all images on a film, converted into normal positive images. While a lightbox could be used, it couldn't convert a negative to a positive. Creating a contact sheet was one of the initial steps after developing a roll of film, and these sheets were filed alongside the negatives. They provided a swift and reliable method for locating specific negatives (or slides, in the case of positive film). They were also instrumental in culling and selecting images for printing, often with the aid of a magnifying loupe. Art schools frequently mandate them as a submission requirement for projects or shoot reports. Contact sheets are also commonly referred to as contact proofs, contact prints, proof sheets, or simply proofs.
The term "contact" refers to the method of printing where the negatives (or positive transparencies) are placed directly onto the photographic paper, as opposed to being mounted in an enlarger, which is the usual process. This means no magnification or enlargement occurs; light shines directly onto the film lying directly on the paper. Their origin of the name stems from their production method. Instead of placing the film into the enlarger head and projecting a magnified version onto the print paper, the film was laid directly onto the print paper (hence the "contact" part). Therefore, they represent a link to the film era. However, contact sheets continue to serve valuable purposes in the digital photography age. Contact sheets are useful for presenting clients or editors with a selection of multiple images. Some photography schools require students to submit contact sheets for their projects.
There are various methods for creating a digital contact sheet. Some approaches include using Photoshop, which is arguably the simplest and quickest, or ImageMagick, which offers the most granular control but requires command-line usage and some trial and error. The method using Lightroom Classic provides a good balance between ease of use and control over the output.
As with many functions in Lightroom, there are multiple ways to approach this task. This guide focuses on the most straightforward and generally applicable method. The initial step involves selecting the photographs you wish to include in the contact sheet. In the Library module, navigate to the desired photos. Within the Print module, you will find a Template Browser panel on the far left. The top section displays "Lightroom Templates," which are the built-in options. These include templates such as "4x5 Contact Sheet," "5x8 Contact Sheet," "5x9 Landscape Contact Sheet," and "5x11 Landscape Contact Sheet." It's important to note that the numbers in these template names refer to the number of columns by rows, not the paper size or aspect ratio. For simplicity, the basic "4x5 Contact Sheet" template is often used. This template is well-suited for photos in both landscape (horizontal) and portrait (vertical) orientations because it accommodates images within square frames.
There are several points worth noting here. Firstly, in the preview panel located in the top left, you will see a grid of squares. Secondly, you can further refine which images appear in the contact sheet by selecting an option from the dropdown menu on the toolbar, situated just above the bottom filmstrip. In this example, "Selected Photos" is used, with the photos chosen from the filmstrip. This provides precise manual control over the images included in the contact sheet. If you select more photos than can fit on a single contact sheet with the chosen grid (e.g., 4x5), the excess images will automatically roll over to a new page. You can observe the number of pages generated and navigate between them using the toolbar above the filmstrip. Finally, you can alter the paper size of the print while maintaining the established number of columns and rows. Click the "Page Setup" button and select your desired paper size, just as you would for any other print in the module. In this case, Letter Size is used, but whatever size you choose, the columns and rows setting will be preserved.
The subsequent step involves adjusting the contact sheet's settings as required. "Zoom to Fill" will enlarge the image to fill the entire allotted space. "Rotate to Fit" will have no effect on this particular contact sheet because all grid boxes are square. "Repeat One Photo per Page" is not particularly useful for a contact sheet. "Stroke Border" adds a line around the edges of each thumbnail; you can select the color and width of this line. "Cell Size" is directly linked to "Cell Spacing." If the "Keep Square" option is checked, both height and width will adjust together when you change the cell spacing. If "Keep Square" is unchecked, only the corresponding value will be linked (e.g., width adjustment affects width only).
The "Guides" panel allows you to toggle the display of guides to assist with layout. You can enable rulers, grid guides, and measurements. "Page Color" defaults to white, but you can select any color you prefer. Keep in mind that this setting only applies to the active part of the canvas and assumes you are printing on white media. "Identity Plate" enables you to add your logo or any other branding or informational graphic that you have set up as a Lightroom identity plate. Customizing this is beyond the scope of this particular guide. If you are submitting this for an assignment, including information such as your name and date is advisable, as it appears more professional than handwriting it. You can modify how the identity plate displays by overriding the color, changing the opacity and scale, determining whether it renders on top of or behind the images, or whether it shows on each image individually. "Watermarking" applies a watermark to each thumbnail image. "Page Options" allow you to add a page number to the bottom right of each contact sheet. "Page Info" is one of the most critical settings, controlling the text that appears below each image. There is considerable control over what is displayed. By default, it is the filename, but you can select from presets like caption, date, or sequence. To simply number each image, use the "Sequence" option. You can also create your own custom combination of information. The font size can be adjusted just below this setting. Consider that the thumbnail will automatically scale to accommodate the text, so be mindful of jamming too much text under each image.
The output from the Print module is consistent for contact sheet templates as it is for all other outputs from the module. You will then encounter a slightly different set of options to control JPG quality and file resolution. Lightroom does not have a built-in capability to save a PDF directly from the Print module. One method is to first save the output as a JPG and then convert that JPG to a PDF using various available applications, some of which are paid, while others are free utilities. The second method involves using the "Printer" option and then selecting PDF output as your printer. This is an option offered by most modern operating systems, though not necessarily all.
There are alternative methods for creating digital contact sheets, which have been covered elsewhere. Manually managing external drives for photo backups can be tedious. A far more reliable approach is automatic cloud backup. Services like Backblaze have been used continuously for over 15 years, running quietly in the background and proving invaluable in recovering archives from unexpected hardware failures and accidental deletions.